How to Create a Writable Wall & What Are the Benefits?

Table of Contents
- Introduction
- Why Projectors Remain Relevant in Modern Classrooms
- How Projectors Improve Learning and Retention
- Interactive Projectors for Schools
- Projector vs Smartboard in Education
- Accessibility and Cost Efficiency
- Classroom Projector Solutions for 2025
- How Projectors Improve Student Engagement
- Practical Use Cases of Projectors in Education
- Best Practices for Schools Choosing Projector Solutions
- Final Thoughts
The role of technology in education has transformed rapidly, yet some tools remain consistently valuable. One such tool is the classroom projector. Far from being outdated, projectors continue to provide schools and universities with cost-effective and versatile teaching solutions.
The benefits of projectors in education extend beyond simply displaying visuals; they facilitate collaboration, enhance engagement, and make learning accessible to diverse groups of students.
For educators, administrators, and decision-makers, understanding the value of projectors helps in creating a balanced technology strategy. This article explores why projectors in education remain an essential resource in 2025 and how they compare to other modern teaching tools.
Why Projectors Remain Relevant in Modern Classrooms

As digital transformation accelerates, schools are increasingly integrating tablets, smartboards, and interactive panels into classrooms. While these tools have value, projectors continue to offer unique advantages.
Modern teaching tools projectors, provide flexibility that permanent installations, such as smartboards, cannot match. Projectors can transform any flat surface, walls, screens, or even interactive projector screen paint, into a learning space. This adaptability makes them particularly useful in smart classroom environments where space, cost, and scalability matter.
Another reason projectors remain relevant is their ability to serve both small classrooms and large lecture halls. Unlike single-screen devices, projectors scale easily, ensuring every student has a clear view of the content. Their long-term viability, combined with cost efficiency and low maintenance, keeps them at the forefront of educational technology.
How Projectors Improve Learning and Retention

One of the strongest benefits of projectors in education is their impact on student learning and retention. Studies show that learners absorb information better when concepts are presented visually. Projectors allow teachers to display diagrams, presentations, videos, and interactive simulations that make complex subjects easier to understand.
For example, how projectors improve retention in middle school classroom is evident when abstract subjects like mathematics or science are presented visually. Instead of relying on textbooks alone, teachers can use projectors to demonstrate real-life applications and reinforce memory through repetition.
In addition, projectors support different learning styles. Visual learners benefit from diagrams and videos, while auditory learners engage better with combined audio-visual material. This flexibility makes projectors a valuable tool for inclusive classrooms where learning differences must be addressed.
Interactive Projectors for Schools

Picture an entire wall like an iPad where students are literally touching the wall and it responds like a iPad its impressive to see and highly engaging.
The rise of interactive projectors for schools has taken classroom engagement to the next level. Unlike traditional projectors, interactive models allow students and teachers to write, draw, and manipulate digital content directly on the projection surface.
The interactive projector classroom benefit lies in increased participation. Students can really get involved engaging with each other, collaborating on problem-solving tasks, annotate shared materials, and contribute ideas in real time. This hands-on approach helps reinforce understanding and builds confidence.
For educators, interactive projectors simplify lesson delivery. Instead of switching between devices or writing manually on whiteboards, they can smoothly present and interact with digital content. In many cases, interactive projectors are also more cost-effective than equipping every student with personal tablets.
Being able to draw down the latest software directly makes it easy for teachers to stay on point with content and innovation.
Ready to upgrade your experience? Shop Smarter Surfaces' top-rated products today.

White Projector Screen Paint Pro
From £171.00 ex.VAT

Ultra Short Throw Projector Screen Paint
From £137.00 ex.VAT

Interactive Projector Screen Paint
From £180.00 ex.VAT
Projector vs Smartboard in Education
When schools consider new teaching technology, the choice often comes down to a projector vs a smartboard in education. Both tools aim to enhance learning, but their strengths differ. Here is a quick comparison:
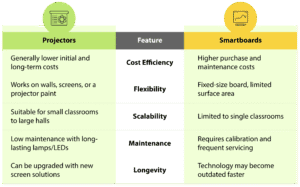
From a financial and practical standpoint, cost-efficient classroom projectors offer better return on investment, especially for schools managing multiple rooms. While smartboards can be useful in smaller, high-tech environments, projectors provide the broader, more scalable solution.
Accessibility and Cost Efficiency
In modern education, accessibility is as important as technology. Projector accessibility in classrooms ensures that every student, regardless of where they sit, can clearly view the lesson content. This visibility is particularly beneficial in larger classrooms or auditoriums.
Projectors are also inclusive for students with special needs.
Teachers can adjust screen size, brightness, and contrast to support students with visual or cognitive challenges. Combined with assistive software, projectors become a powerful accessibility tool.
Financially, cost-efficient classroom projectors are an attractive choice. Compared to alternative educational technologies, projectors have lower installation costs and reduced maintenance needs.
Many models today are low-maintenance projectors for education, with lamp-free designs that last longer. This durability significantly reduces the total cost of ownership for schools.
Classroom Projector Solutions for 2025

With the education sector evolving, schools now require adaptable and future-proof technology. Classroom projector solutions in 2025 include a variety of models, from standard projectors to products like ultra-short-throw projector screen paint.
Modern applications extend beyond traditional projector screens. Smarter Surfaces projector screen solutions, including projector screen paints and wallpapers, allow schools to transform entire walls into interactive learning spaces. These solutions eliminate the need for bulky screens, creating smooth and modern teaching environments.
Whether for small classrooms, large lecture halls, or multipurpose training rooms, projectors continue to serve as versatile educational technology. Their ability to integrate with existing systems and adapt to new learning methods makes them an essential investment.
How Projectors Improve Student Engagement
Engagement is one of the most critical elements of effective learning. In the UK and globally, educators consistently ask: how do projectors improve student engagement in schools?
The answer lies in visual stimulation and collaboration.
Projectors allow teachers to integrate videos, interactive exercises, and real-time digital content into lessons. Students engage better when lessons are dynamic and visually appealing, compared to static textbooks or lectures.
In group activities, projectors also encourage teamwork. Students can present projects, share findings, and collaborate using projected displays. In hybrid or blended classrooms, projectors make it easy to share content across in-person and remote learners simultaneously.
By transforming lessons into interactive experiences, a smart classroom projector helps bridge the gap between traditional teaching and digital engagement.
Practical Use Cases of Projectors in Education
The versatility of educational technology projectors makes them suitable for various levels of learning. In each of these environments, modern teaching tools projectors, support both educators and students by making lessons more impactful and accessible.
Primary Education
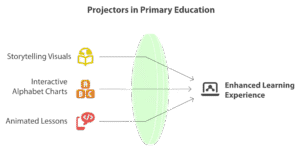
In primary classrooms, projectors make lessons more engaging by displaying storytelling visuals, interactive alphabet charts, and animated lessons. These dynamic tools help capture young learners’ attention and support early literacy and numeracy development.
Secondary Education
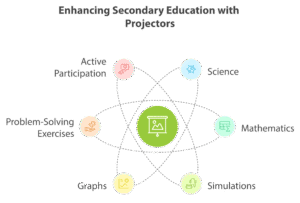
For secondary students, projectors enhance complex subjects such as science and mathematics. Teachers can display simulations, graphs, and problem-solving exercises that simplify abstract concepts and encourage active participation.
Higher Education
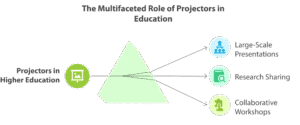
In universities and colleges, projectors are essential for lecture halls and seminar rooms. They support large-scale presentations, research sharing, and collaborative workshops, ensuring information is delivered clearly to all students.
Best Practices for Schools Choosing Projector Solutions
For administrators making purchasing decisions, selecting the right projector solution requires careful consideration. By focusing on scalability, efficiency, and long-term cost savings, schools can select projector solutions that align with both educational and financial goals.
There are some factors to assess, including:

- Room Size & Layout: Large lecture halls need high-lumen projectors for clarity, while smaller classrooms are best served by ultra-short-throw models to reduce glare.
- Maintenance & Longevity: Select low-maintenance projector solutions with extended lamp life to lower operational costs.
- Integration with Learning Tools: Ensure the projector is compatible with existing digital platforms, software, and interactive classroom technologies.
- Screen Alternatives: Evaluate cost-efficient options such as projector screen paint or wallpapers, which save space and offer modern flexibility compared to traditional projector screens.
Final Thoughts
The benefits of projectors in education are clear: they are versatile, cost-efficient, and highly effective in enhancing learning. In 2025, projectors will remain one of the most practical and scalable classroom technologies, offering schools the ability to engage students, improve retention, and deliver inclusive education.
As schools look toward modernising teaching spaces, classroom projector solutions, paired with innovations like Smarter Surfaces projector screen solutions, provide the flexibility and long-term value required for today’s smart classrooms.
For educators and administrators seeking reliable, low-maintenance, and cost-effective technology, projectors continue to be one of the best investments in modern education.
Turn Your Wall Into a Smarter Workspace
Upgrade your space with high-performance surface solutions built for productivity.

About Author
Sonia Bueno is Senior Manager at Smarter Surfaces, leading sales operations, customer experience, and distributor partnerships globally. With extensive experience supporting education, office, and commercial projects, she shares practical insights on whiteboard paint, magnetic paint, and functional surface solutions to help organisations make informed specification decisions