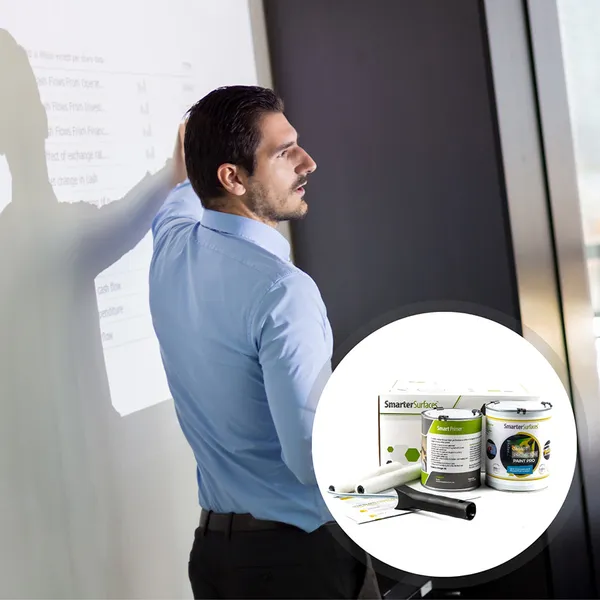
Ultra Short Throw Projector Screen Paint: The Complete Guide
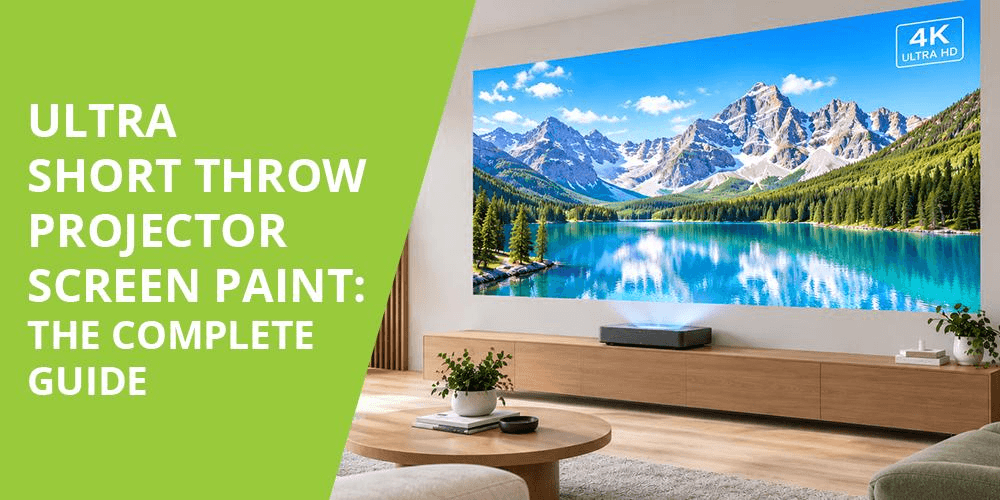
The ultra short throw projector screen paint is creating a seamless 4K home cinema wall with a UST projector.

Ultra short throw projectors have changed how people design home cinemas, offices, classrooms, and meeting rooms. Positioned just a short distance from the wall, they eliminate long cable runs while producing large, high-quality images from compact spaces.

However, image quality depends on more than the projector itself. Even a premium UST projector cannot perform at its best when projecting onto an ordinary painted wall. Surface texture, uneven colour, poor reflectivity, and ambient light all reduce contrast, colour accuracy, and image sharpness.

Ultra Short Throw Projector Screen Paint provides a purpose-built projection surface designed specifically for UST projection. Unlike standard wall paint, it creates a smooth, high-performance screen that delivers brighter images, better colour reproduction, and improved detail while maintaining the clean appearance of a painted wall.

This complete ultra short throw projector screen paint guide explains what Ultra Short Throw Projector Screen Paint is, how it works, how it compares with projector screens and ALR screens, and how to choose the right solution for your space.


 Why Trust This Ultra Short Throw Projector Screen Paint Guide

What Is Ultra Short Throw Projector Screen Paint?

Ultra Short Throw Projector Screen Paint is a specialist projection coating engineered for projectors positioned only a few centimetres from the projection surface. Unlike conventional projector paints or ordinary emulsion, it creates an ultra-smooth finish that reflects projected light evenly across the viewing area.

Because UST projectors project at an extremely steep angle, even small imperfections on the wall become much more noticeable. Surface texture, roller marks, or inconsistent finishes can distort the image and reduce overall picture quality. A dedicated 4K UST projector screen paint minimises these issues by creating a uniform projection surface that helps preserve image sharpness and colour accuracy.

Unlike a fixed projector screen, projector screen paint transforms the wall itself into the screen. Once applied, there are no frames, visible borders, or permanently mounted screens, allowing the projection surface to blend seamlessly into modern interiors.

For homeowners, businesses, education, and commercial spaces, this approach creates a clean installation while delivering professional projection performance.

Find the right Ultra Short Throw Projector Screen Paint for your projector setup.


Why Ultra Short Throw Projectors Need a Special Surface

Ultra short throw projectors behave differently from standard long throw projectors. Instead of projecting across several metres, they sit close to the wall and project upwards at a very steep angle. This unique projection path makes the quality of the projection surface significantly more important.

A standard painted wall often appears smooth when viewed normally, but under UST projection, tiny bumps, roller texture, and surface imperfections become amplified. These irregularities scatter light unevenly, reducing image clarity and creating visible distortion across the picture.

Using a purpose-designed UST projector screen paint helps overcome these challenges by providing:

  • A smoother projection surface for improved image sharpness
  • More consistent brightness across the entire image
  • Better colour accuracy
  • Improved perceived contrast
  • Enhanced 4K and high-resolution detail
  • Professional appearance without installing a fixed screen

For users investing in premium laser projectors or Laser TVs, choosing the correct projection surface is often just as important as selecting the projector itself.

Benefits of Ultra Short Throw Projector Screen Paint
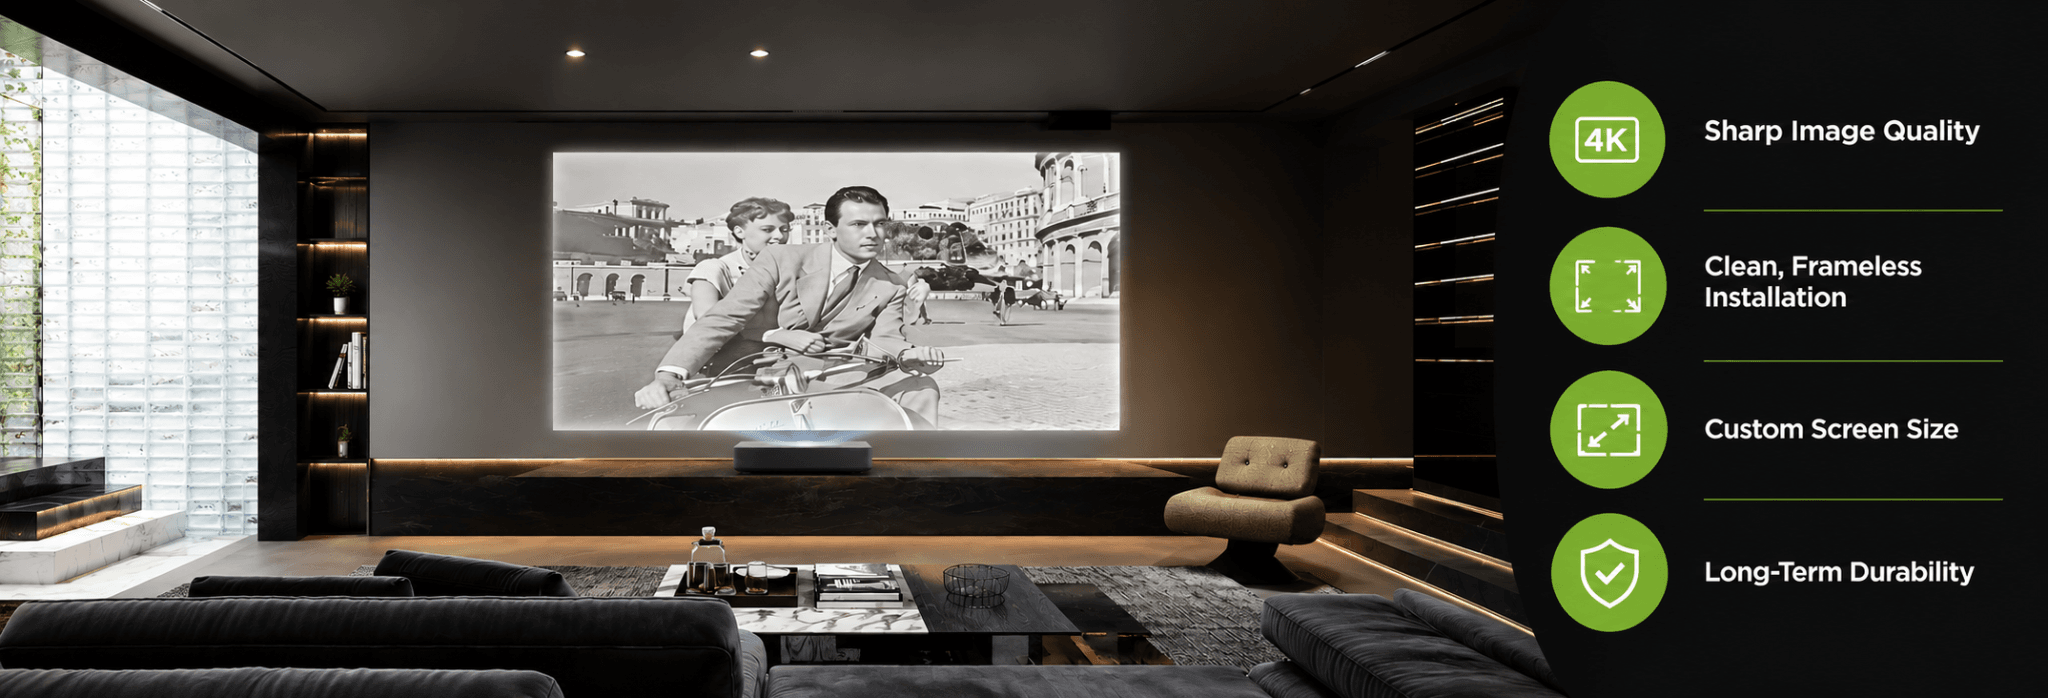
Ultra Short Throw Projector Screen Paint delivers more than a simple decorative finish. It improves projection quality while giving users greater flexibility than traditional projection screens.

Designed Specifically for UST Projection

Unlike standard projector paints, UST projector screen paint has been formulated to perform with the steep projection angle created by ultra short throw projectors. This helps maintain image consistency across the entire screen area while reducing visible distortion caused by uneven wall surfaces.

Excellent 4K Image Performance

Modern UST projectors support Full HD, 4K, and increasingly 8K-compatible content. A smooth projection surface allows these higher resolutions to be displayed with greater clarity, preserving fine image detail without interference from wall texture.

Clean, Minimalist Installation

Traditional projector screens remain permanently visible even when not in use. Projector screen paint transforms the wall itself into the projection surface, maintaining a clean architectural appearance that integrates naturally into homes, offices, classrooms, and meeting spaces.

Flexible Screen Sizes

Unlike fixed screens, projector screen paint is not restricted to standard screen dimensions. Users can create projection surfaces that match the exact wall size and projector requirements, whether installing a 90-inch display in a meeting room or a full home cinema wall.

Long-Term Value

A painted projection surface requires no mechanical housing, retractable components, or frame installation. Once correctly applied, it provides a durable projection surface suitable for years of everyday use while reducing the visual impact of traditional projection screens.

Ready to upgrade your experience? Shop Smarter Surfaces’ top-rated products today.

Ultra Short Throw Projector Screen Paint vs Bare Wall

Many people initially project directly onto a painted wall, assuming it will produce similar results to a dedicated projection surface. While this may be acceptable for occasional viewing, it rarely delivers the image quality expected from today's Ultra Short Throw projectors.

A standard emulsion wall is designed for decoration, not image projection. Even walls that appear smooth often contain small imperfections, roller texture, or inconsistent paint finishes. Because Ultra Short Throw projectors cast light at a very shallow angle, these imperfections become much more visible, reducing sharpness and creating uneven brightness across the image.

Ultra Short Throw Projector Screen Paint is specifically engineered to overcome these limitations. It creates a smoother, more uniform projection surface that improves image clarity, colour accuracy, and overall viewing performance while preserving the clean appearance of a painted wall.

UST Projector Screen Paint vs Bare Wall
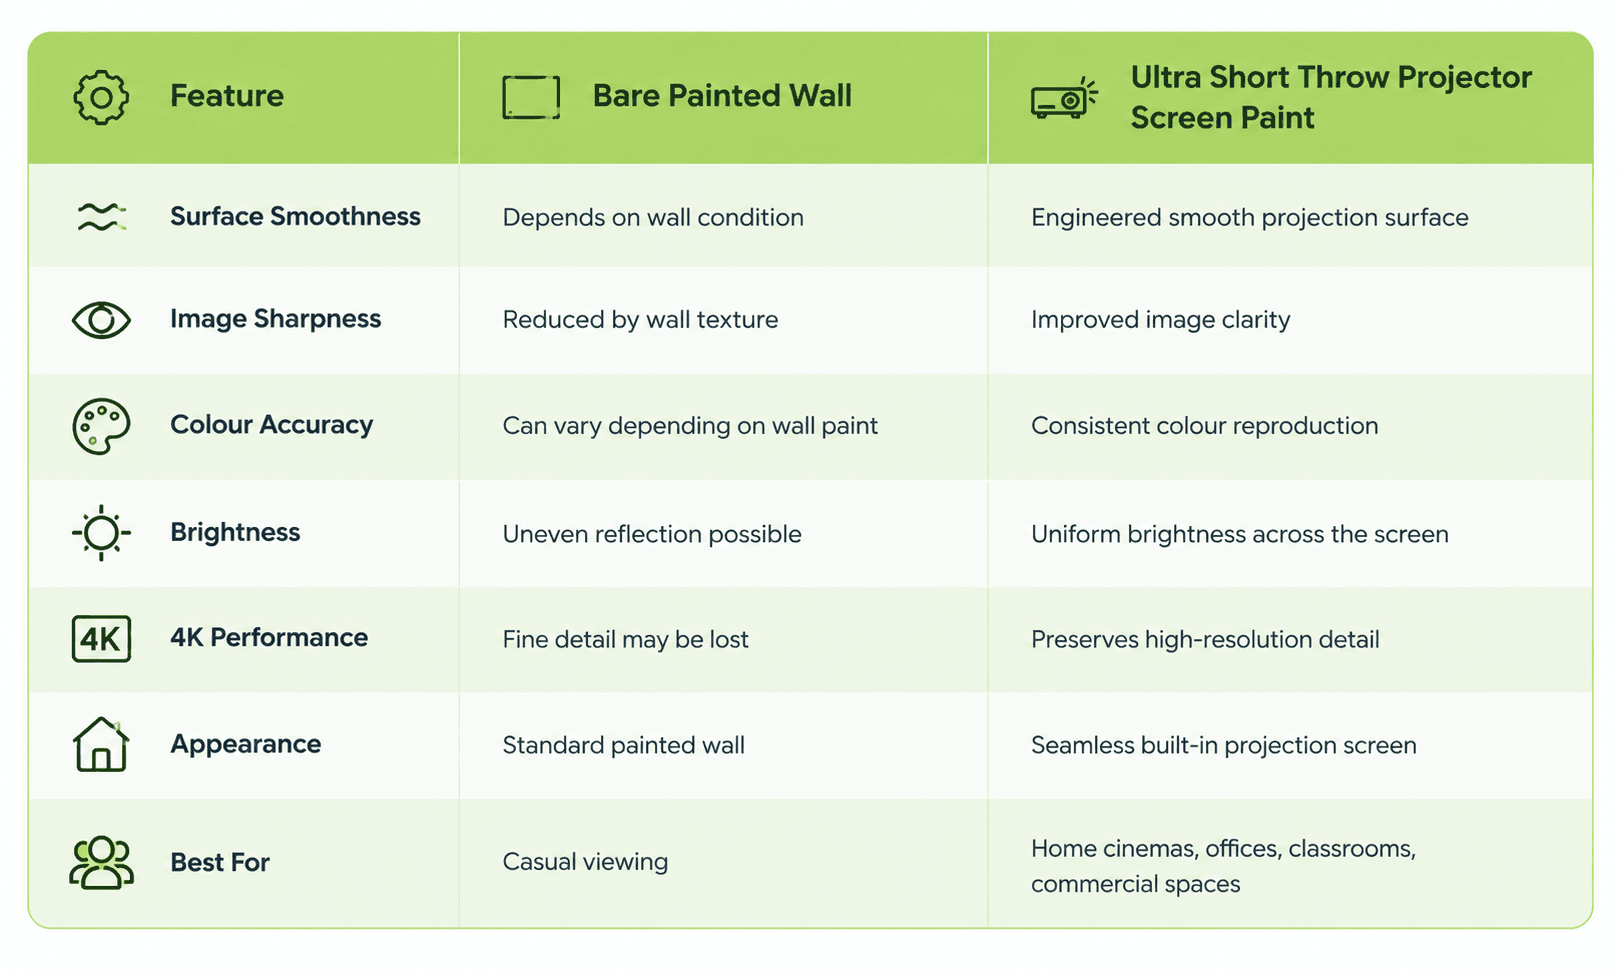
For anyone investing in a premium Laser TV or Ultra Short Throw projector, the projection surface becomes part of the viewing system. Choosing a purpose-built projector screen paint helps maximise projector performance without installing a permanent projector screen.

Ultra Short Throw Projector Screen Paint vs ALR Screen

Ambient Light Rejecting (ALR) screens are often recommended alongside Ultra Short Throw projectors because they help reduce the effects of room lighting. However, they are not the only solution. Ultra Short Throw Projector Screen Paint offers a different approach that prioritises a seamless installation while still delivering excellent projection performance.

An ALR screen uses multiple optical layers to direct projected light towards the viewer while reducing some ambient light from windows or room lighting. These screens typically include a rigid frame and fixed screen size, making them popular for dedicated home cinema installations.

Ultra Short Throw Projector Screen Paint transforms the wall itself into the projection surface. Instead of mounting a visible screen, the painted wall becomes an integrated part of the room, creating a cleaner aesthetic while allowing greater flexibility over screen size.

Ultra Short Throw Projector Screen Paint vs ALR Screen
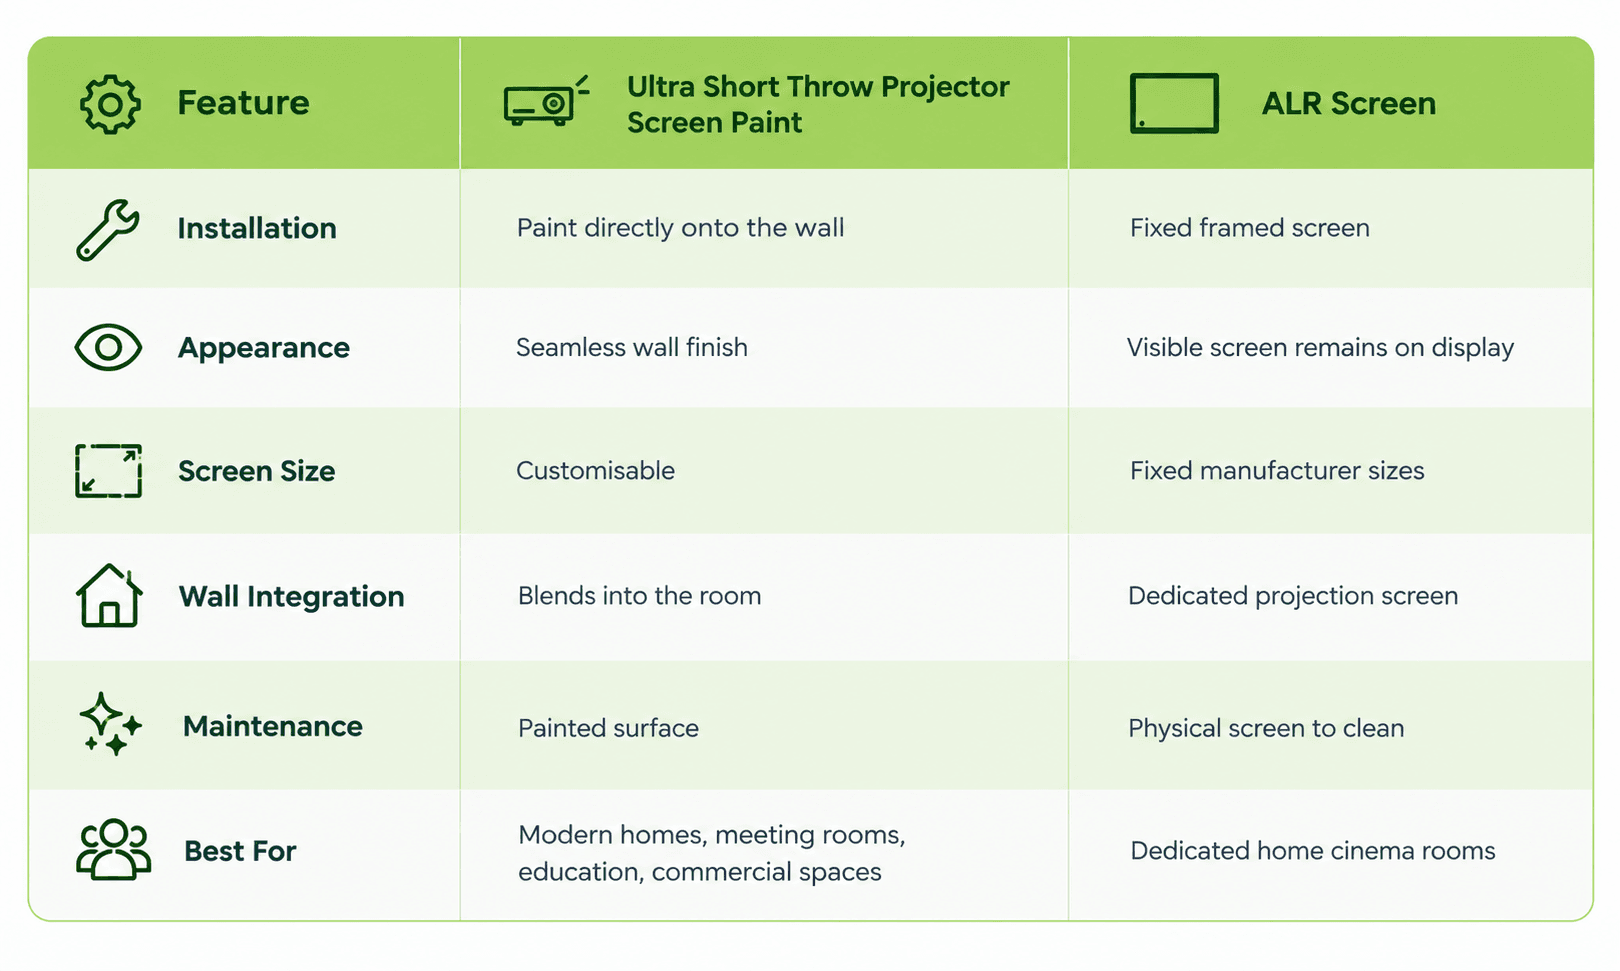
For many residential and commercial installations, projector screen paint provides the cleaner architectural solution. Users wanting a large projection surface without a permanently mounted screen often prefer the flexibility of a painted projection wall.

Projector Screen Paint vs Traditional Projector Screen

Traditional projector screens have been used for decades because they provide a dedicated viewing surface with predictable image quality. However, advances in specialist projection coatings now allow walls themselves to become professional-quality screens.

Projector Screen Paint removes the need for frames, retractable mechanisms, or permanently visible screens. Once applied, the wall functions as the projection surface while maintaining the appearance of a normal painted interior when the projector is switched off.

Projector Screen Paint vs Projector Screen
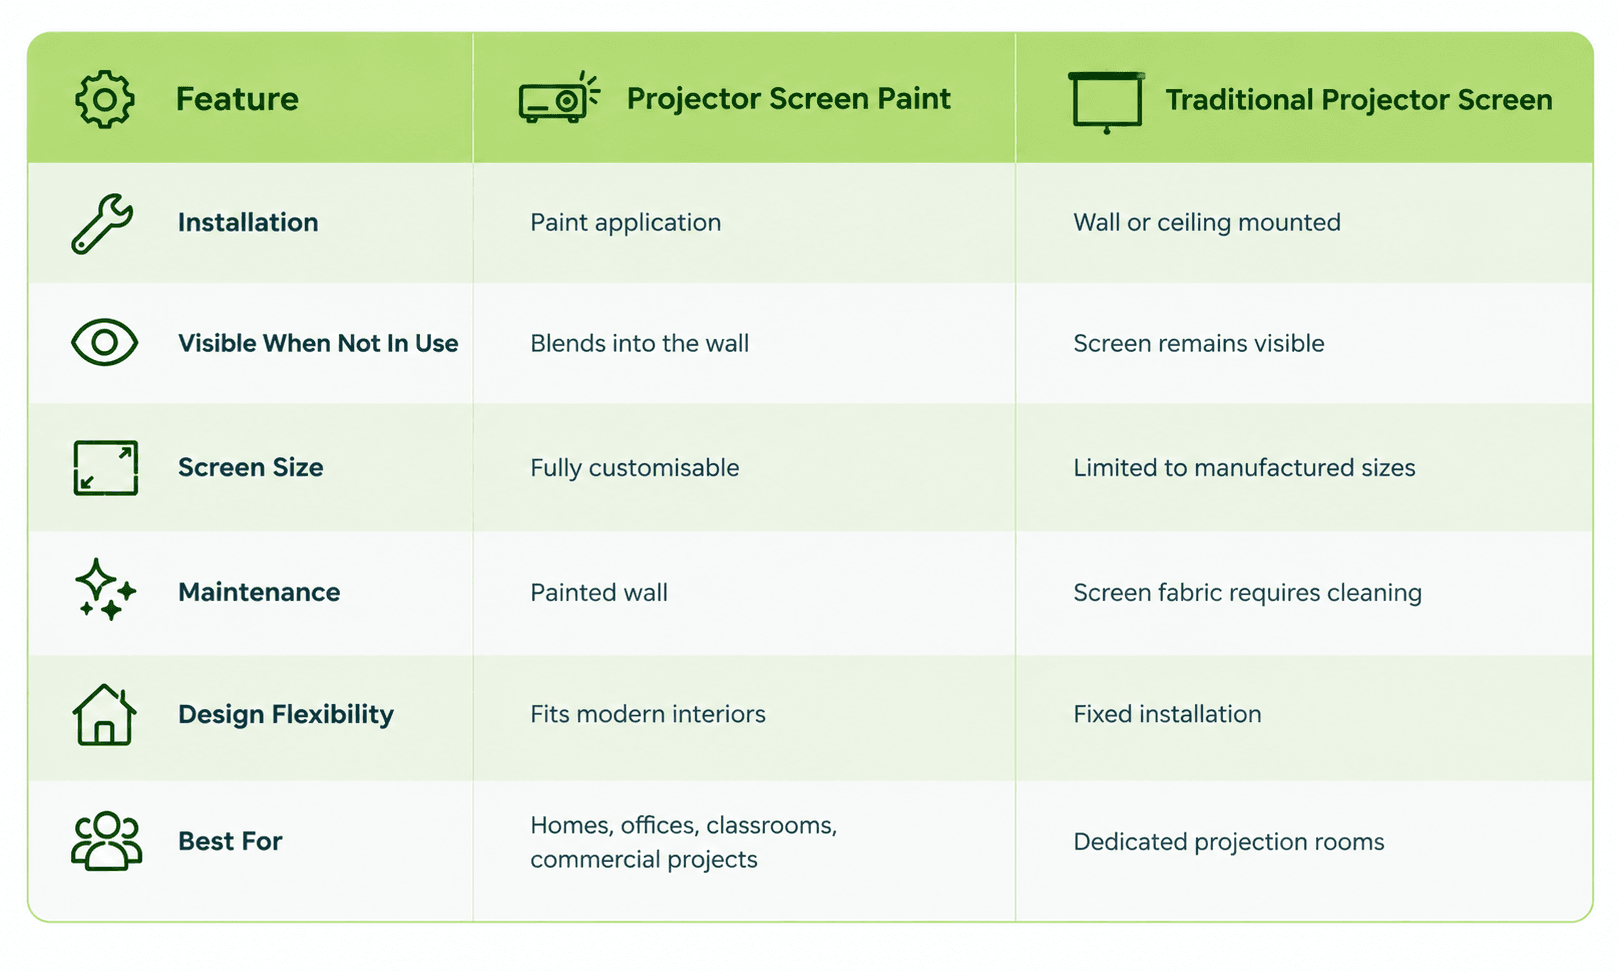
For new build projects, office fit-outs, classrooms, and modern home cinemas, projector screen paint provides greater design flexibility while creating a permanent projection surface that integrates naturally into the room.

How to Choose Ultra Short Throw Projector Screen Paint

Choosing the right Ultra Short Throw Projector Screen Paint depends on more than the projector itself. Room lighting, wall condition, image size, and how the space is used all influence the final viewing experience. Considering these factors before installation helps ensure the projection surface delivers the performance expected from a premium UST projector.
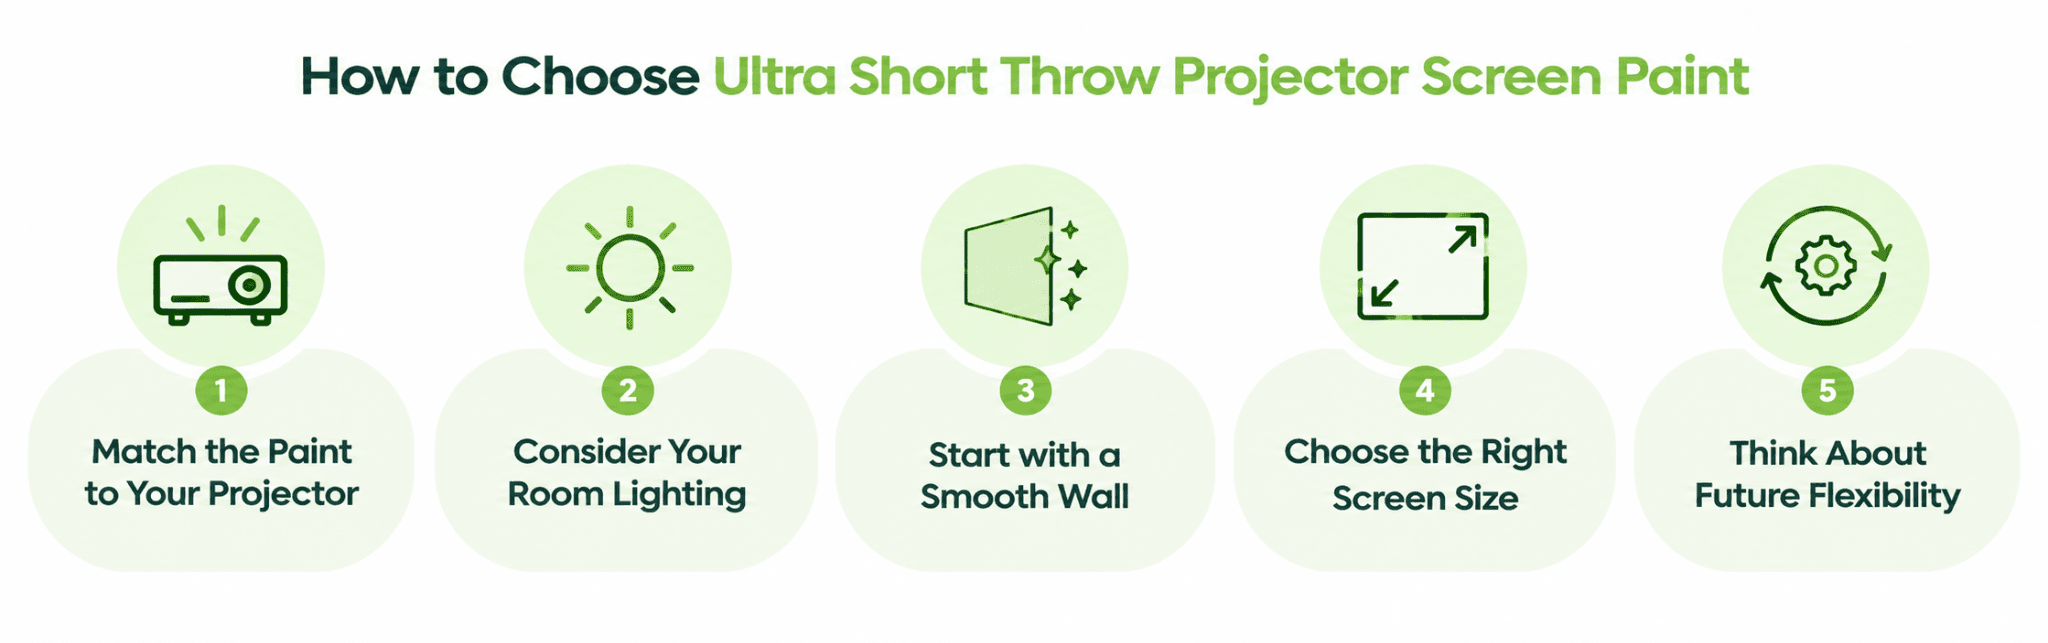
Match the Paint to Your Projector

Ultra Short Throw projectors use a steep projection angle that places greater demands on the projection surface than standard projectors. Always choose a projector screen paint specifically designed for UST projection rather than a standard projector paint. This helps maintain image sharpness, colour accuracy, and consistent brightness across the screen.

Consider Your Room Lighting

Every room has different lighting conditions. A dedicated home cinema with controlled lighting places fewer demands on the projection surface than a bright office, classroom, or living room.

Before choosing a projector screen paint, consider:

  • The amount of natural daylight entering the room
  • Whether curtains or blinds will be used
  • Artificial lighting during presentations or viewing
  • Typical viewing times throughout the day

Reducing unnecessary ambient light will always improve overall image quality, regardless of the projection surface used.

Start with a Smooth Wall

Even the best Ultra Short Throw Projector Screen Paint cannot completely hide poor wall preparation. Since UST projectors magnify surface imperfections, the wall should be clean, smooth, dry, and free from dents, cracks, or heavy texture before application.

Taking time to prepare the surface properly helps achieve a professional-quality finish with maximum image clarity.

Choose the Right Screen Size

One of the biggest advantages of projector screen paint is flexibility. Unlike fixed projector screens, the painted projection area can be customised to suit both the room and the projector.

When planning your screen size, consider:

  • Viewing distance
  • Available wall space
  • Projector specifications
  • Seating layout
  • Aspect ratio required for your content

A properly sized projection surface creates a more immersive viewing experience while making the best use of the available room.

Think About Future Flexibility

A painted projection surface becomes part of the room itself. There are no retractable screens, visible frames, or bulky installations to accommodate. This makes Ultra Short Throw Projector Screen Paint an excellent choice for modern homes, meeting rooms, classrooms, and commercial spaces where clean interior design is just as important as projection performance.

For users looking for a permanent, minimalist projection solution, projector screen paint offers greater flexibility than many traditional projection screen systems.

How to Apply Ultra Short Throw Projector Screen Paint
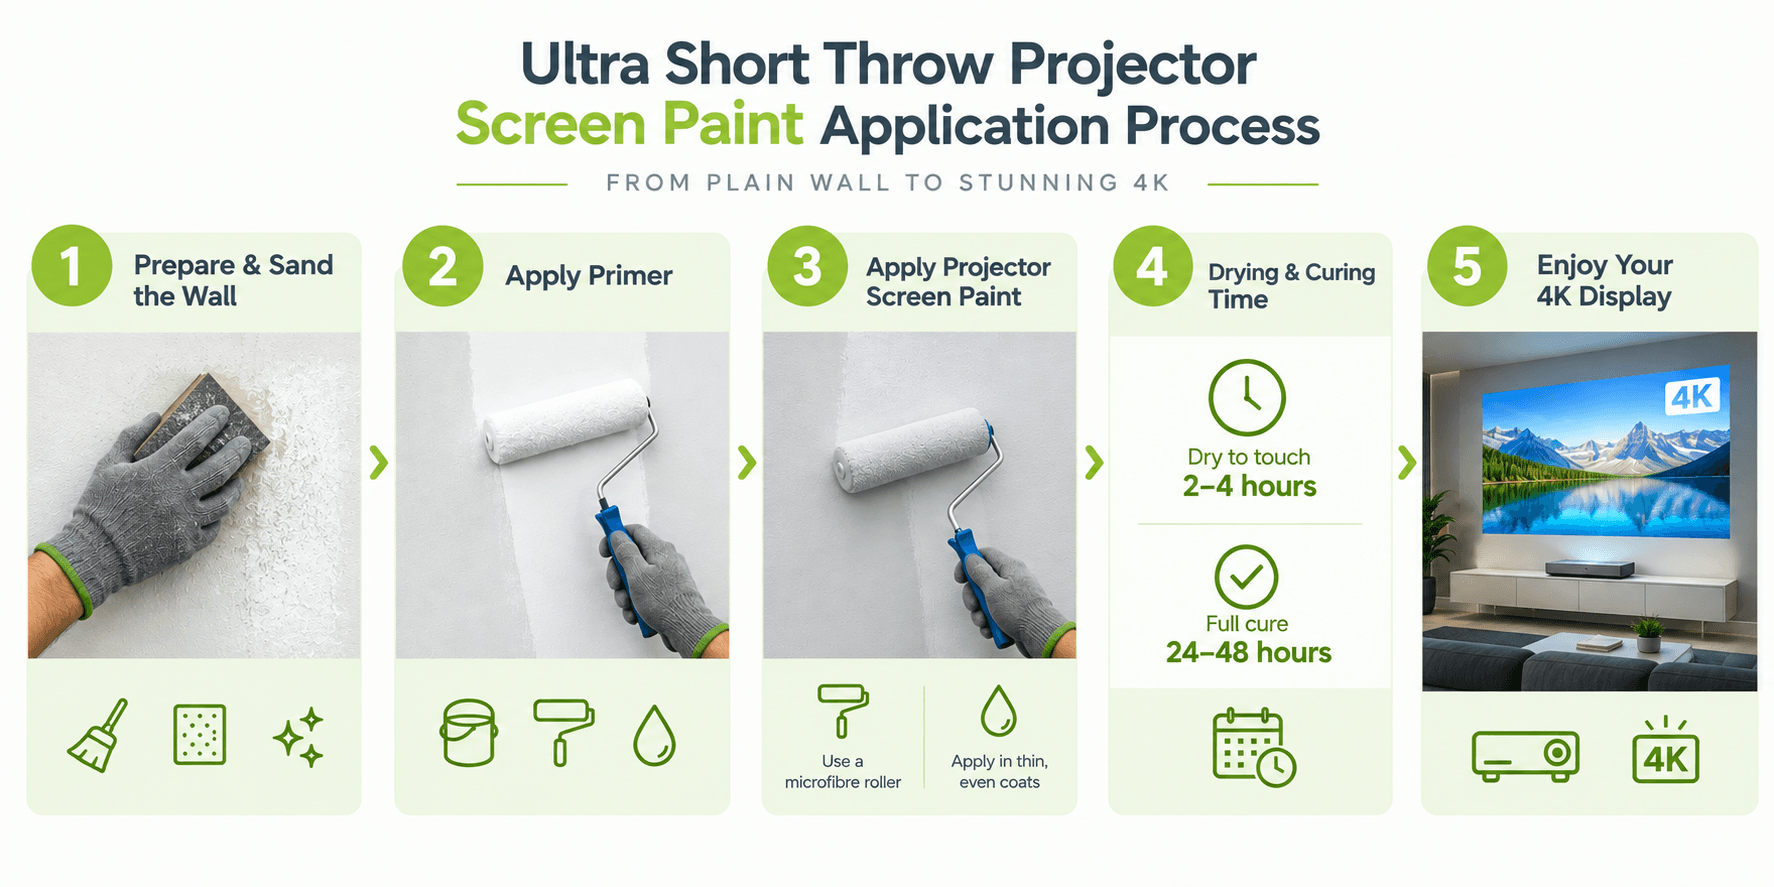
 

Correct application is essential for achieving the smooth, professional-quality surface that Ultra Short Throw projectors require. Because UST projectors sit close to the wall and project at a steep angle, even small imperfections can become visible. Careful preparation and following the recommended application process help maximise image sharpness, colour consistency, and overall projection performance.

Step 1. Prepare the Surface

Ensure the surface is clean, dry, and free from dust, grease, flaking paint, or loose material. Lightly sand the wall to create a smooth finish, as surface texture can become visible with Ultra Short Throw projection. If the wall is bare or unpainted, apply two coats of White Primer and allow it to fully dry before proceeding. Check that the surface is completely smooth before applying the projector paint.

Step 2. Measure and Mask the Projection Area

Measure the intended screen size carefully and mark the projection area using masking tape to create clean, straight edges. Plan the screen dimensions according to your projector setup and desired aspect ratio before painting.

Step 3. Stir the Paint Thoroughly

Before application, stir the projector paint thoroughly to ensure a consistent finish across the entire projection surface. Proper mixing helps maintain even colour and reflectivity.

Step 4. Apply Two Coats Using the Recommended Roller

For best results, apply the paint using a mohair or lint-free short-pile roller sleeve. Apply two even coats, allowing the first coat to dry (in approx 2 hours) before applying the second. Maintaining a consistent finish helps create the smooth surface required for high-quality Ultra Short Throw projection.

Step 5. Allow the Surface to Dry Before Use

The surface will be touch-dry in approximately one hour and ready for use after 24 hours. Allowing the full drying period before using the projector helps ensure optimum projection performance and durability.

Check out the Ultra Short Throw Projector Screen Paint application guide.

Where to Use Ultra Short Throw Projector Screen Paint


Ultra Short Throw Projector Screen Paint is suitable for a wide range of environments where high-quality projection and clean interior design are equally important. Because the wall itself serves as the projection surface, it eliminates the need for bulky projector screens while allowing the space to remain functional when the projector is not in use.

Home Cinemas

Modern home cinemas increasingly use Ultra Short Throw projectors because they require less installation space while producing large, immersive images. Projector screen paint creates a permanent cinema screen without a visible frame, allowing the room to maintain a clean, minimalist appearance when entertainment is not in use.

Living Rooms

Many homeowners use Laser TVs or Ultra Short Throw projectors as an alternative to large televisions. A painted projection surface integrates naturally into the room, providing a discreet solution that avoids the appearance of a permanently mounted projector screen while supporting everyday entertainment.

Offices and Meeting Rooms

Meeting rooms benefit from a dedicated projection surface that is always available without requiring a pull-down screen. Ultra Short Throw Projector Screen Paint creates a professional presentation surface for video conferencing, client presentations, training sessions, and collaborative meetings while keeping the room uncluttered.

Schools and Universities

Educational environments increasingly use Ultra Short Throw projectors because they reduce shadows and glare at the front of the classroom. A dedicated projector screen paint provides a smooth projection surface that improves lesson visibility while allowing teachers to make better use of available wall space.

Commercial Spaces

Retail environments, museums, exhibition spaces, visitor centres, and hospitality venues often require large projected displays without permanently visible screens. Projector screen paint allows designers to incorporate projection into the architecture of the building while maintaining a premium finish.

Choosing the Right Projector Screen Paint

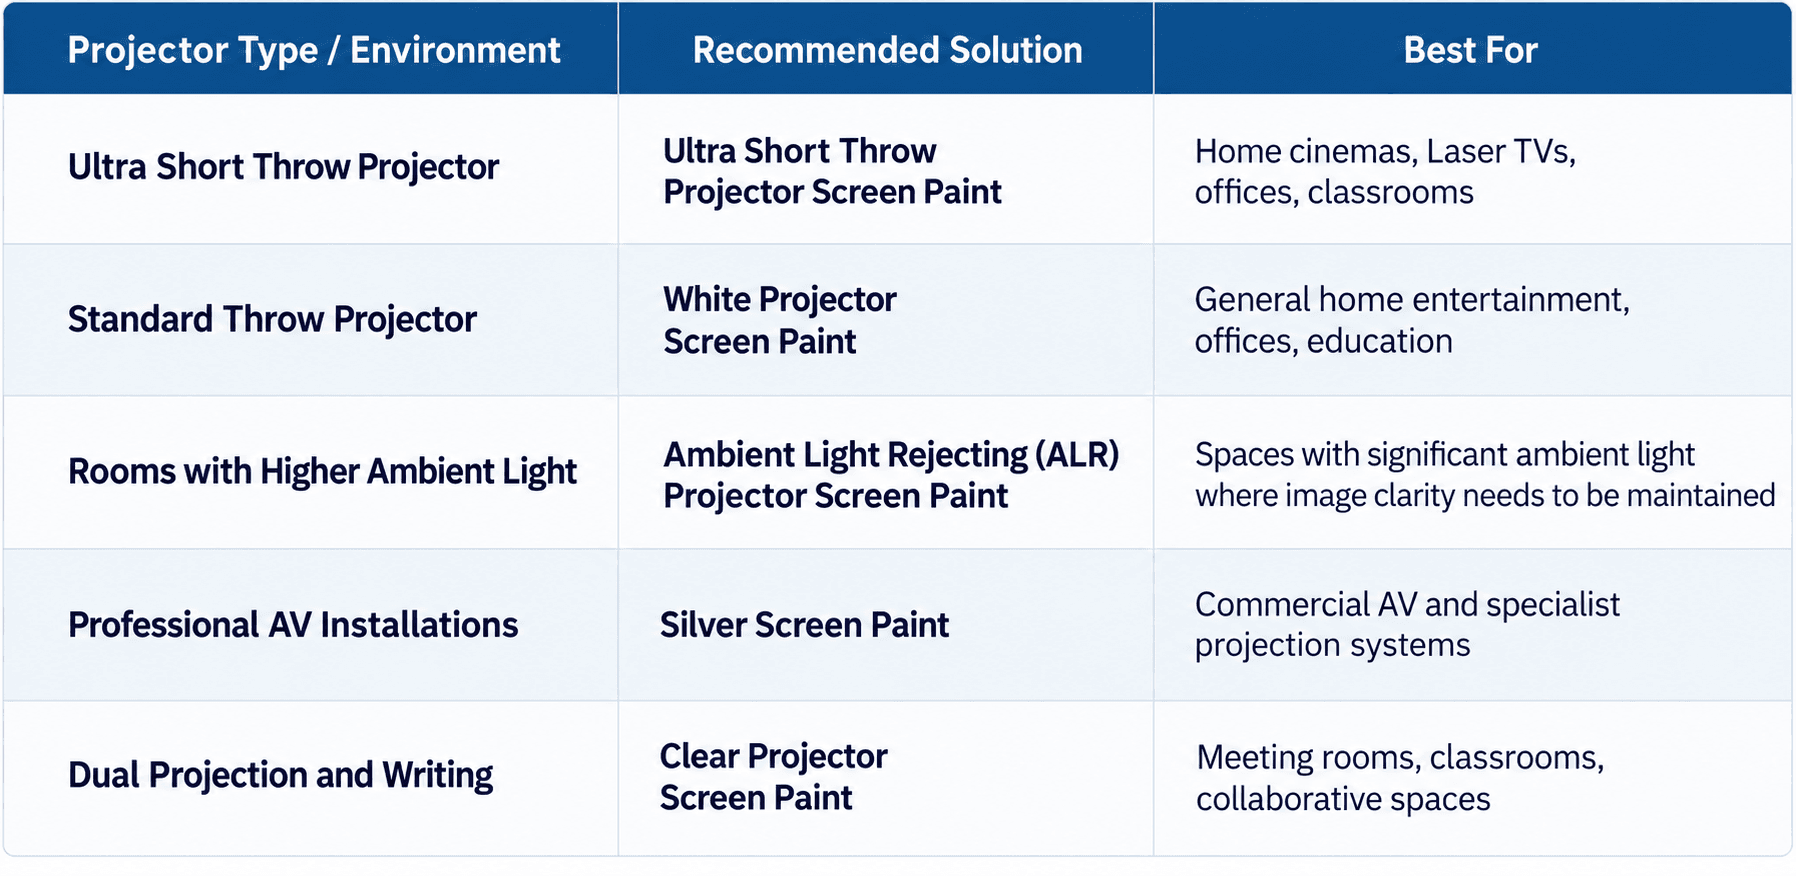
The best projector screen paint depends on the type of projector being used, the viewing environment, and the intended application. While Ultra Short Throw Projector Screen Paint is specifically formulated for UST projectors, other projector screen paints are designed to optimise performance in different lighting conditions and projection setups.
Final Words

Ultra Short Throw projectors have transformed modern projection by delivering large, high quality images from only a short distance away. However, achieving the best possible picture depends on more than the projector itself. The projection surface plays an equally important role in image sharpness, colour accuracy, and overall viewing performance.

Ultra Short Throw Projector Screen Paint creates a purpose-built projection surface that helps premium UST projectors perform at their full potential. Compared with projecting onto a standard painted wall, it delivers a smoother finish, improved image consistency, and a cleaner installation without the need for a permanent projector screen.

Whether you are designing a home cinema, upgrading a meeting room, fitting out a classroom, or planning a commercial AV installation, choosing the correct projector screen paint ensures your investment delivers professional-quality results for years to come.

Manufactured across the UK, Ireland, and Europe, Smarter Surfaces projector screen paints have been trusted in homes, businesses, schools, and commercial projects in more than 20 countries since 2009. The range is independently tested and designed to provide durable, high-performance projection surfaces for a wide variety of applications.

Explore the full range of Projector Screen Paints and find the right solution.

FAQ's

What is Ultra Short Throw Projector Screen Paint?

Ultra Short Throw Projector Screen Paint is a specialist projection coating designed specifically for Ultra Short Throw projectors. It creates a smooth, high-performance projection surface that improves image clarity, colour accuracy, and overall viewing quality compared with projecting onto a standard painted wall.

Can I use a normal painted wall with a UST projector?

Yes, but image quality is often reduced. Standard painted walls can contain texture, roller marks, and uneven finishes that become highly visible with Ultra Short Throw projectors. A dedicated projector screen paint provides a smoother surface for improved projection performance.

Is Ultra Short Throw Projector Screen Paint better than a projector screen?

The right choice depends on the installation. Projector screen paint offers a seamless appearance, custom screen sizes, and a no-frame design, making it ideal for modern interiors. Traditional projector screens remain a suitable option for dedicated projection rooms where a framed screen is preferred.

What is the difference between Ultra Short Throw Projector Screen Paint and ALR screens?

ALR screens use specialised optical layers to reduce the effects of ambient light and are supplied as fixed screens. Ultra Short Throw Projector Screen Paint transforms the wall into the projection surface, creating a cleaner appearance with flexible screen sizing while eliminating the need for a permanent screen.

Can I create a custom screen size?

Yes. One of the main advantages of projector screen paint is that the projection area can be customised to suit the available wall space, projector specifications, and viewing distance.

Is Ultra Short Throw Projector Screen Paint suitable for 4K projectors?

Yes. A smooth projection surface helps preserve the fine detail produced by modern 4K Ultra Short Throw projectors, improving image sharpness and overall viewing quality.

Where can Ultra Short Throw Projector Screen Paint be used?

It is suitable for home cinemas, living rooms, offices, meeting rooms, classrooms, universities, museums, retail spaces, and other commercial environments where a permanent, high-quality projection surface is required.

How do I choose the best Ultra Short Throw Projector Screen Paint?

Choose a projector screen paint specifically designed for Ultra Short Throw projection. Consider your projector type, room lighting, wall condition, desired screen size, and installation environment before selecting the most suitable solution.

Magnetic Plaster vs Magnetic Paint: Which Is Best?

Magnetic Plaster vs Magnetic Paint: Which Is Best?

Blog

by Author | Sep 7, 2026

Introduction

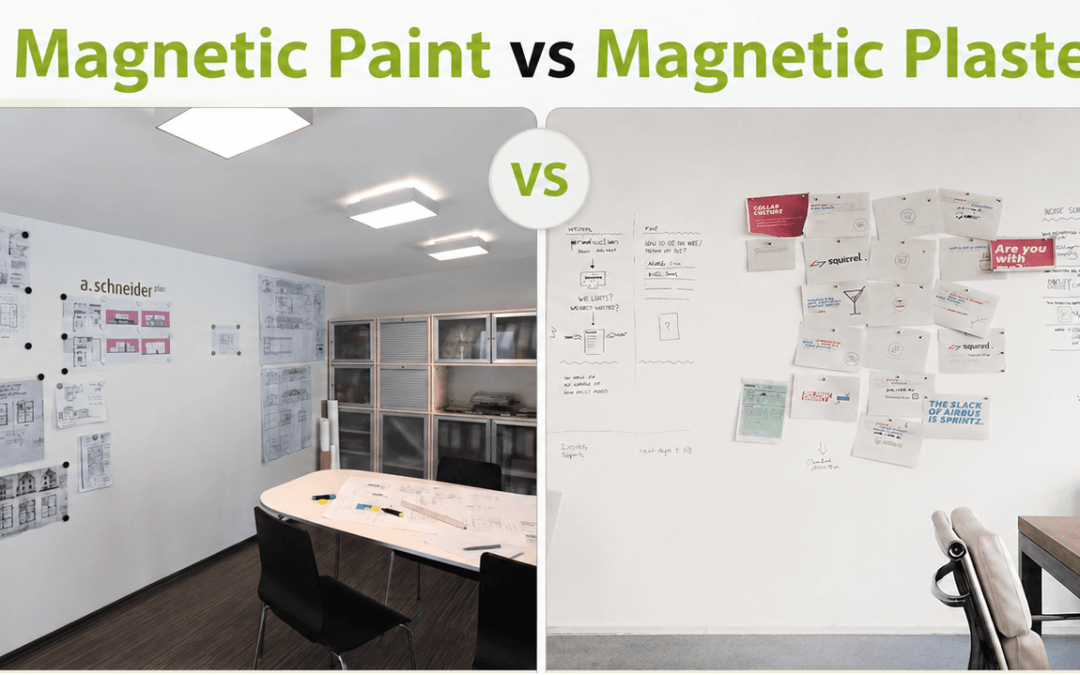
Choosing between magnetic plaster vs magnetic paint comes down to how much magnetic strength you need, your budget, and whether the wall will be installed professionally or as a DIY project. Both turn an ordinary wall into a functional magnetic surface for notes, plans and displays, but they differ in application, holding power and cost.

This guide compares magnetic plaster and magnetic paint across every practical factor and reviews the main magnetic wall options UK buyers consider. It helps you decide between magnetic plaster vs magnetic paint which is best for your home, office, classroom or commercial space.

Both magnetic plaster and magnetic paint from Smarter Surfaces are built to the same safety and environmental standards, so neither option compromises on compliance. Whichever you choose in the magnetic plaster vs magnetic paint decision, you get the same certified, low-emission surface.


What Is Magnetic Plaster?


Magnetic plaster is a trowel-applied wall coating with a high magnetite content that turns a wall into a strong magnetic surface. Smarter Surfaces Magnetic Plaster contains 75% magnetite, holds 8 or more A4 pages with a single magnet, and covers 6m² across two coats.

Once dry, magnetic plaster can be painted, wallpapered or topcoated in any colour. Its thicker application gives it the strongest hold of the magnetic wall options in UK, which makes it best suited for large, high-traffic and commercial walls. It carries a 10-year product guarantee and is low VOC, solvent-free and safe to use around WiFi and electronic devices.


What Is Magnetic Paint?

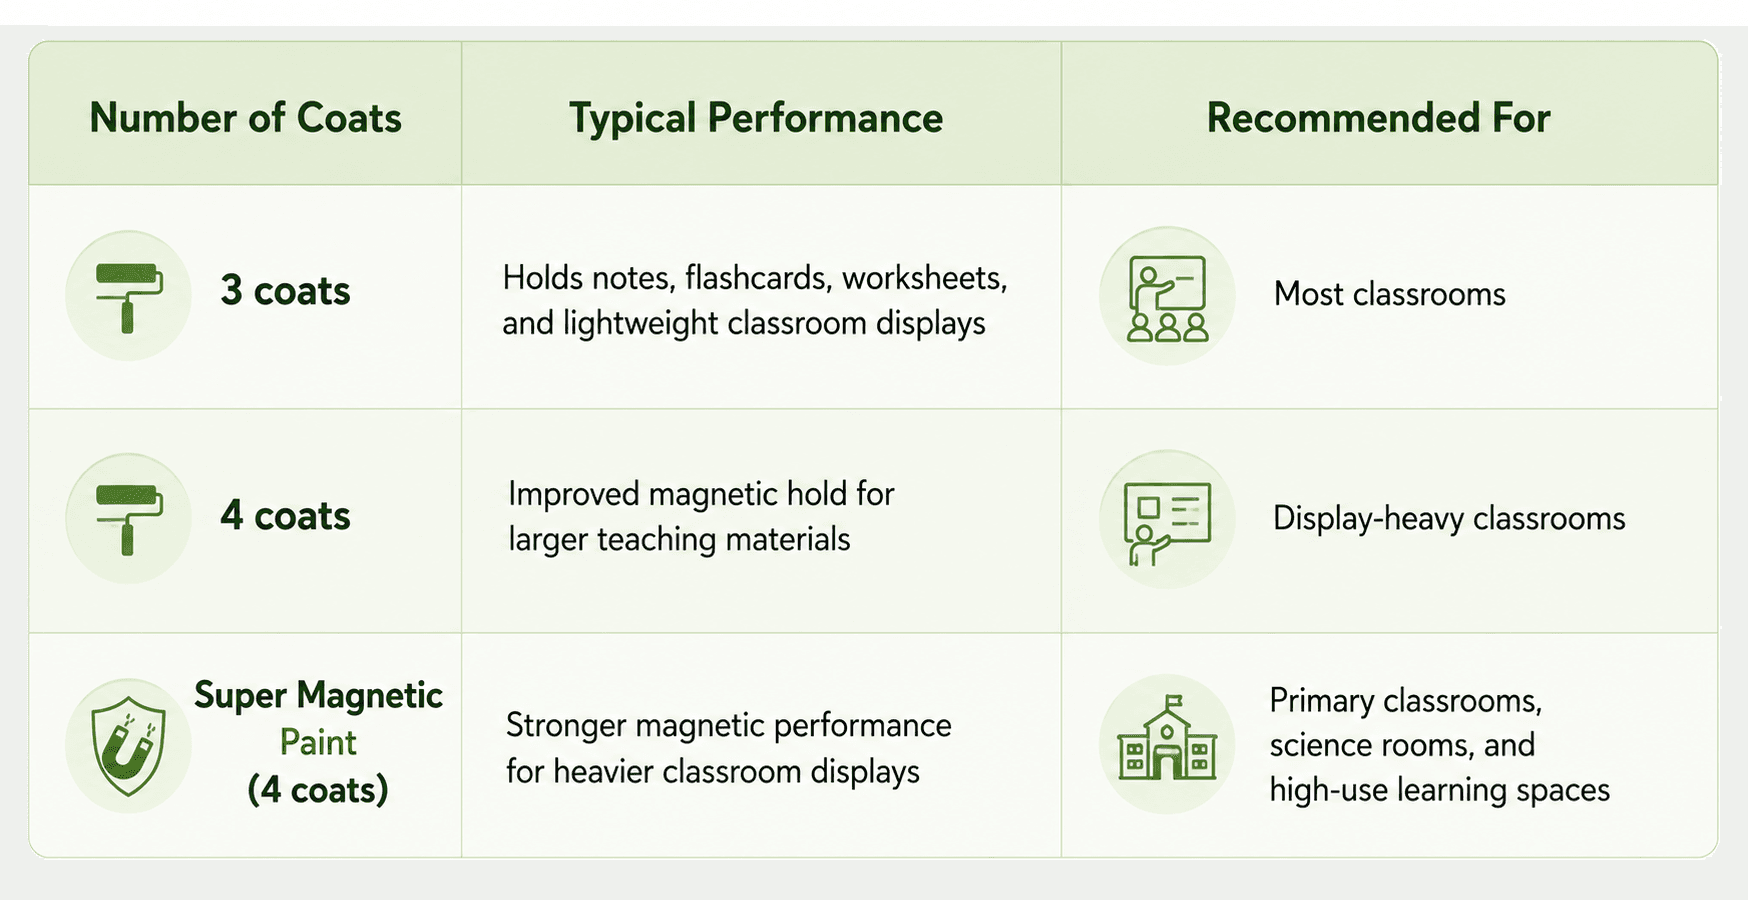
Magnetic paint is a roller-applied coating containing magnetite that creates a magnetic surface without specialist plastering skills. Magnetic Paint from Smarter Surfaces contains 55% magnetite, while Super Magnetic Paint contains 60% and holds 5 or more A4 sheets across three coats.

Magnetic paint dries to a black matt base that can be overpainted in any colour. Because it is applied like ordinary paint, it is the more user-friendly, DIY option and is best suited for lightweight notices, photos and paper displays in homes and smaller offices.

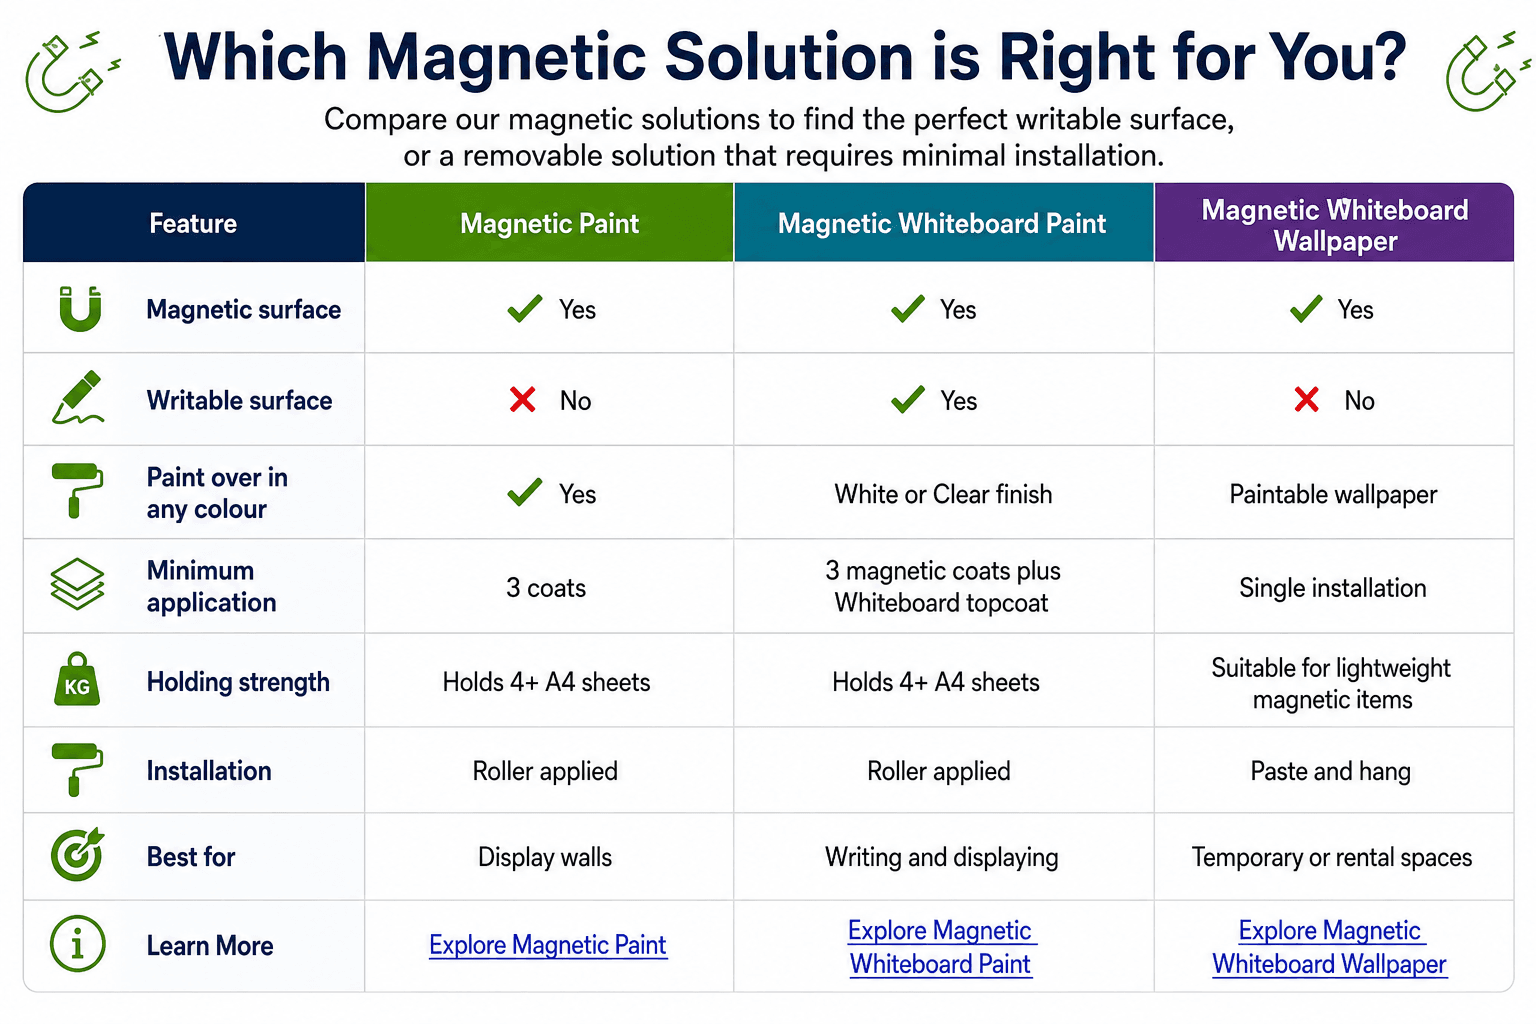
Compare Magnetic Paint and Magnetic Plaster side by side with our Magnetic Products Buying Guide

Magnetic Plaster vs Magnetic Paint: Key Differences

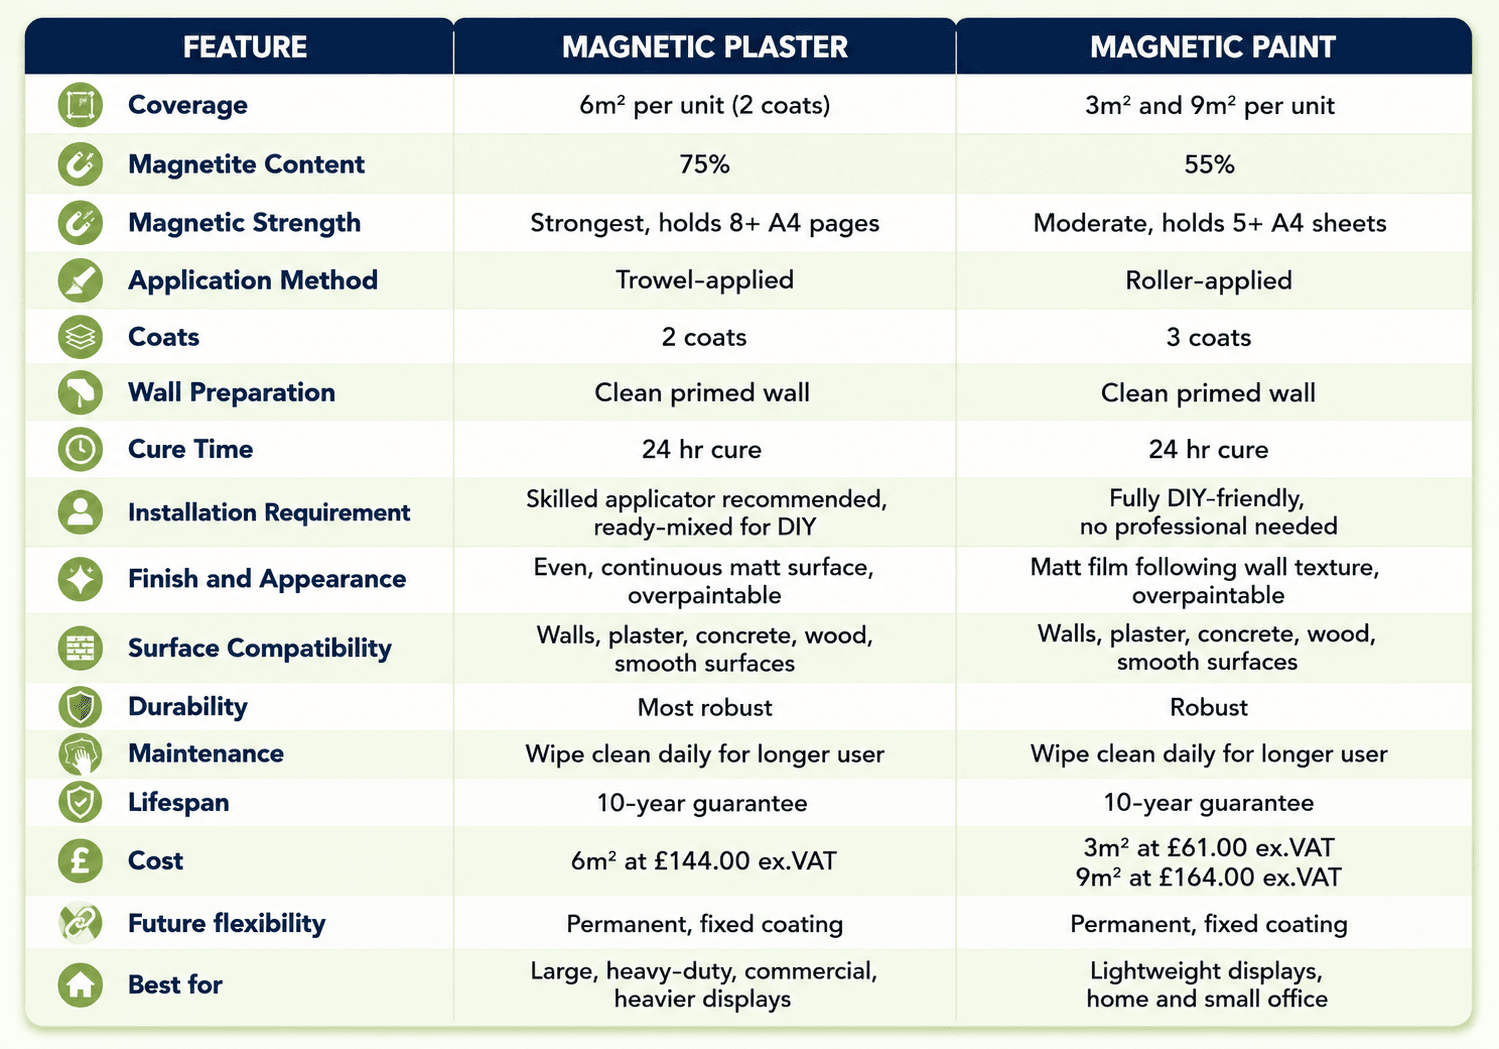
The main difference in magnetic wall paint vs magnetic plaster is strength and installation. Magnetic plaster offers the strongest hold and a plaster finish usually applied by a skilled installer, while magnetic paint is a lower-cost, DIY-friendly option best suited for lighter displays. The table below compares both across the factors that matter.

For magnetic plaster vs magnetic wallpaper in UK, magnetic whiteboard wallpaper is the removable alternative, better suited to rented or frequently redesigned rooms.


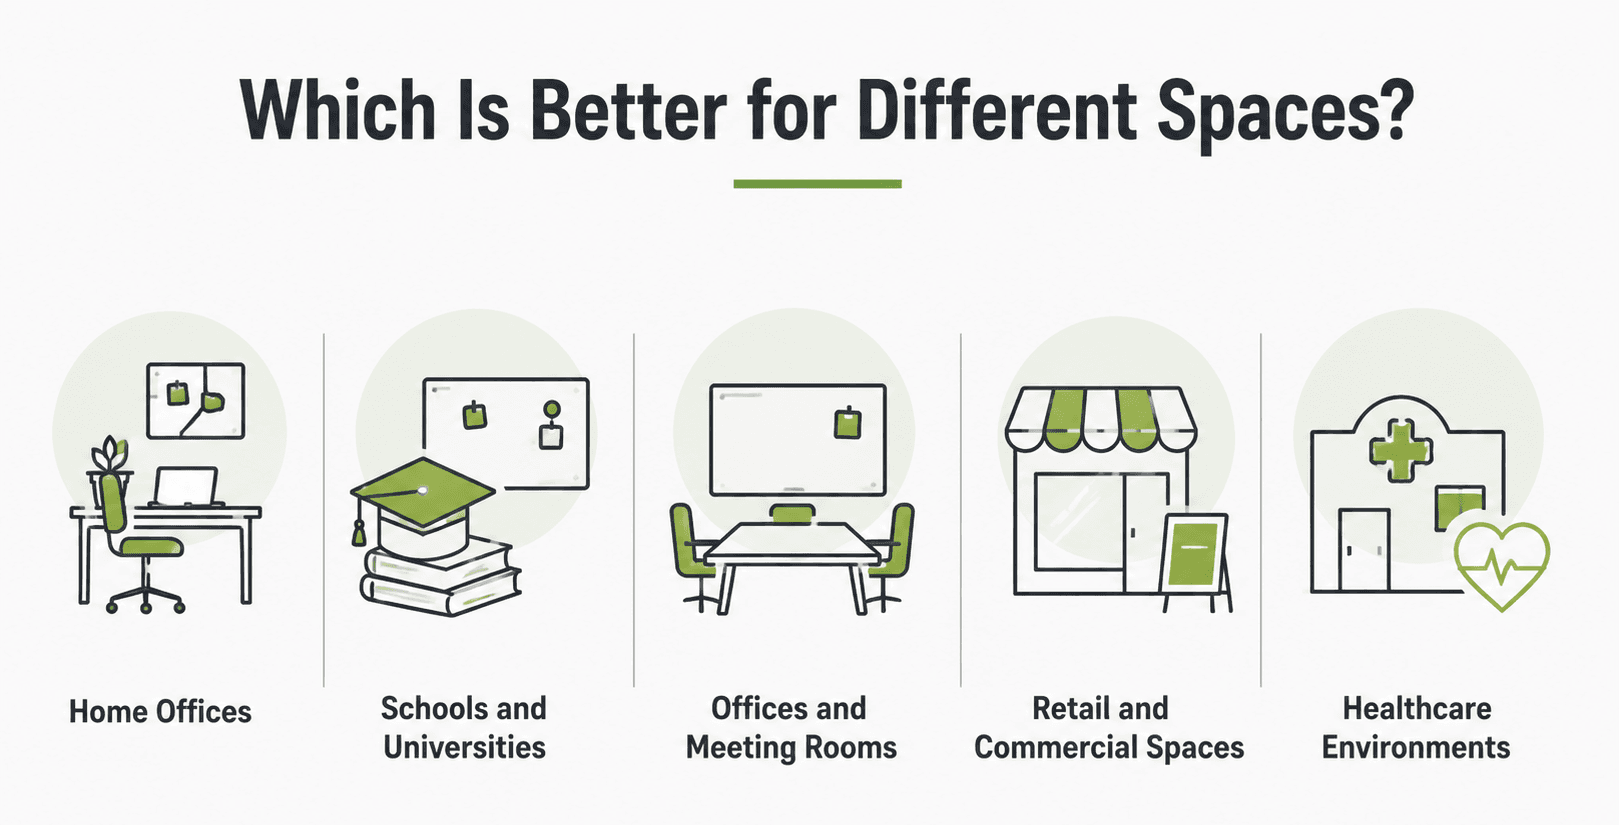
Which Is Better for Different Spaces?

The magnetic plaster vs magnetic paint which is best product depends on the environment, how much weight the wall needs to hold, and how often the space changes. Magnetic paint suits lighter, budget-led and DIY projects, while magnetic plaster suits high-use, large-format and commercial walls. The sections below match each product to common UK settings.

Home Offices

Magnetic paint is usually best suited for home offices, where displays are light and budgets are modest. It is easy to apply as a DIY project and holds notes, plans and reminders reliably. For a stronger feature wall at home, magnetic plaster is a durable alternative.

Schools and Universities

Magnetic plaster is well suited for schools and universities, where walls face heavy daily use and need to hold more material. Its strength supports large classroom displays, and it can be topcoated with whiteboard paint to create a combined teaching surface.

Offices and Meeting Rooms

Magnetic surfaces support collaboration in offices and meeting rooms, which matters as flexible working grows. As per the Office for National Statistics, with 28% of working adults hybrid working in Great Britain between January and March 2025, reconfigurable planning walls help teams share ideas when they are on site. Magnetic plaster suits high-use boardrooms, while magnetic paint suits smaller meeting rooms.

Retail and Commercial Spaces

Magnetic plaster is best suited for retail and commercial spaces that need durable, large-format magnetic walls for displays and signage. Its strength and 10-year guarantee support high-traffic use. Magnetic paint works well for smaller point-of-sale displays and back-office notice areas.

Healthcare Environments

Both products suit healthcare environments because they are low VOC, solvent-free and safe around WiFi, pacemakers or other medical devices. Magnetic plaster provides strong, wipe-clean display walls for wards and administrative offices, while magnetic paint suits lighter notice areas and staff rooms.

Ready to upgrade your experience? Shop Smarter Surfaces’ top-rated products today.

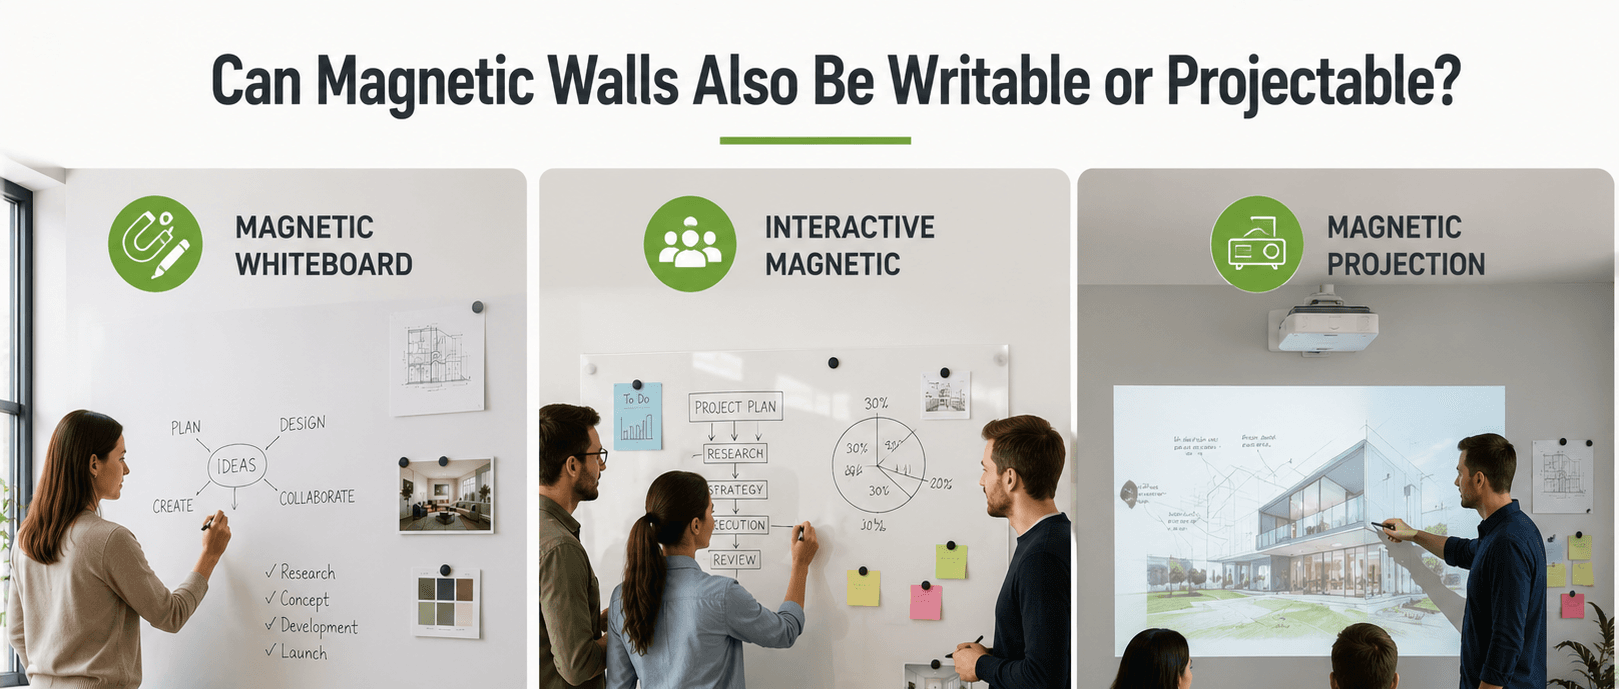
Can Magnetic Walls Also Be Writable or Projectable?

Writable and projectable magnetic wall applications for offices, classrooms, and meeting rooms.

Yes. Magnetic walls can also be made writable or projectable by adding the right topcoat. Applying whiteboard paint over a magnetic base creates a surface you can write on and hold magnets to, while projector paint turns the same wall into a projection screen for presentations.


Combining Magnetic Surfaces with Whiteboard Paint

Apply whiteboard paint over cured magnetic plaster or magnetic paint to create a magnetic whiteboard wall. Magnetic Whiteboard Paint White combines both functions in one product, giving a magnetic surface you can write on and wipe clean.

Creating Interactive Magnetic Whiteboard Walls

A magnetic whiteboard wall lets teams write, erase, and pin material in one place. Super magnetic paint provides the strongest magnetic base, topcoated with whiteboard paint for large collaborative boards in offices and classrooms where both functions are needed daily.

Magnetic Walls with Projector Paint for Collaborative Spaces

Add Magnetic Projector Screen Whiteboard Wallpaper to create a wall that is magnetic and triples as a projection and dry erase inscreen. This suits meeting rooms and lecture spaces where teams display slides, then annotate and pin notes around the projected image.


Magnetic Plaster vs Magnetic Paint Comparison: Pros and Cons

Magnetic plaster offers the strongest magnetic hold in the Smarter Surfaces range, while magnetic paint provides a simpler and more cost-effective way to create a magnetic wall.

Magnetic paint is affordable and DIY-friendly but holds less weight. The lists below summarise the strengths and limitations of each, so you can weigh them against your project.

Magnetic Plaster

Strengths

  • Strongest hold of the magnetic wall options, with 75% magnetite that grips 8 or more A4 pages using a single magnet, making it ideal for heavier and denser displays.
  • Highly durable, as its thicker, denser layer resists knocks and daily wear in high-traffic and commercial environments.
  • Backed by a 10-year product guarantee for long-term reassurance.
  • Gives an even, continuous plaster finish that can be overpainted in any colour or topcoated with whiteboard paint, projector paint or wallpaper.
  • Best suited to large and commercial walls such as boardrooms, classrooms, retail displays and signage areas.
  • Covers 6m² over two coats and is ready to use after 24 hours.
  • Low VOC, solvent-free and safe to use around WiFi, electronic and medical devices.

Limitations

  • Higher material cost per square metre than magnetic paint, reflecting its higher magnetite content.
  • Application involves plastering rather than simply rolling on paint, so achieving a smooth finish may require more application skill and preparation.
  • Thicker application takes more preparation and smoothing time between coats.
  • A fixed coating that is not designed to be removed, so it is less suited to spaces that change often.


Magnetic Paint

Strengths

  • Cost-effective and the lower-cost entry point into magnetic walls.
  • Fully DIY-friendly, rolled on with basic decorating tools and no plastering skills required.
  • Easy to overpaint in any colour, or topcoat with whiteboard paint to create a magnetic whiteboard wall.
  • Best suited for lightweight displays such as notes, photos, plans and paper.
  • Quick-drying coats keep the project moving, and the surface is ready to use after 24 hours.
  • For a stronger hold, Super Magnetic Paint is also available with 60%+ magnetite.
  • Low VOC, solvent-free and safe to use around WiFi and electronic devices.

Limitations

  • Lower holding power than magnetic plaster, so it is best kept to lightweight displays.
  • Needs three coats to build its full magnetic hold, which takes more coats than plaster.
  • Best suited for lighter home and office use rather than heavy or long-term commercial displays.
  • Forms a thin film that follows the existing wall texture rather than smoothing it, so wall preparation matters.

Magnetic plaster is the stronger, more durable choice where holding power and longevity matter most. While magnetic paint is the flexible, cost-effective choice for lighter, DIY-led projects.


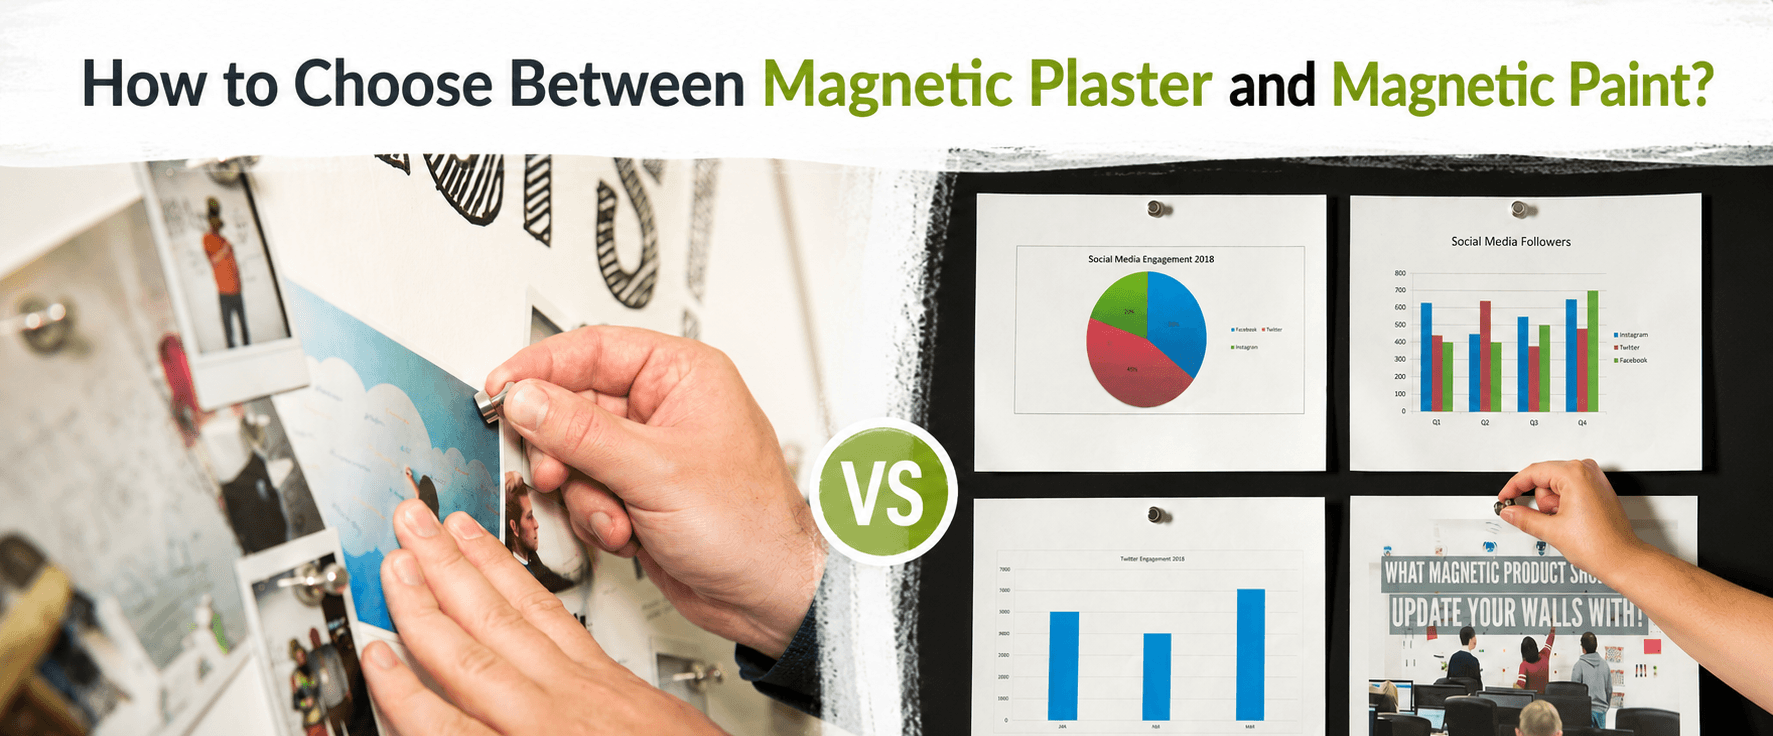
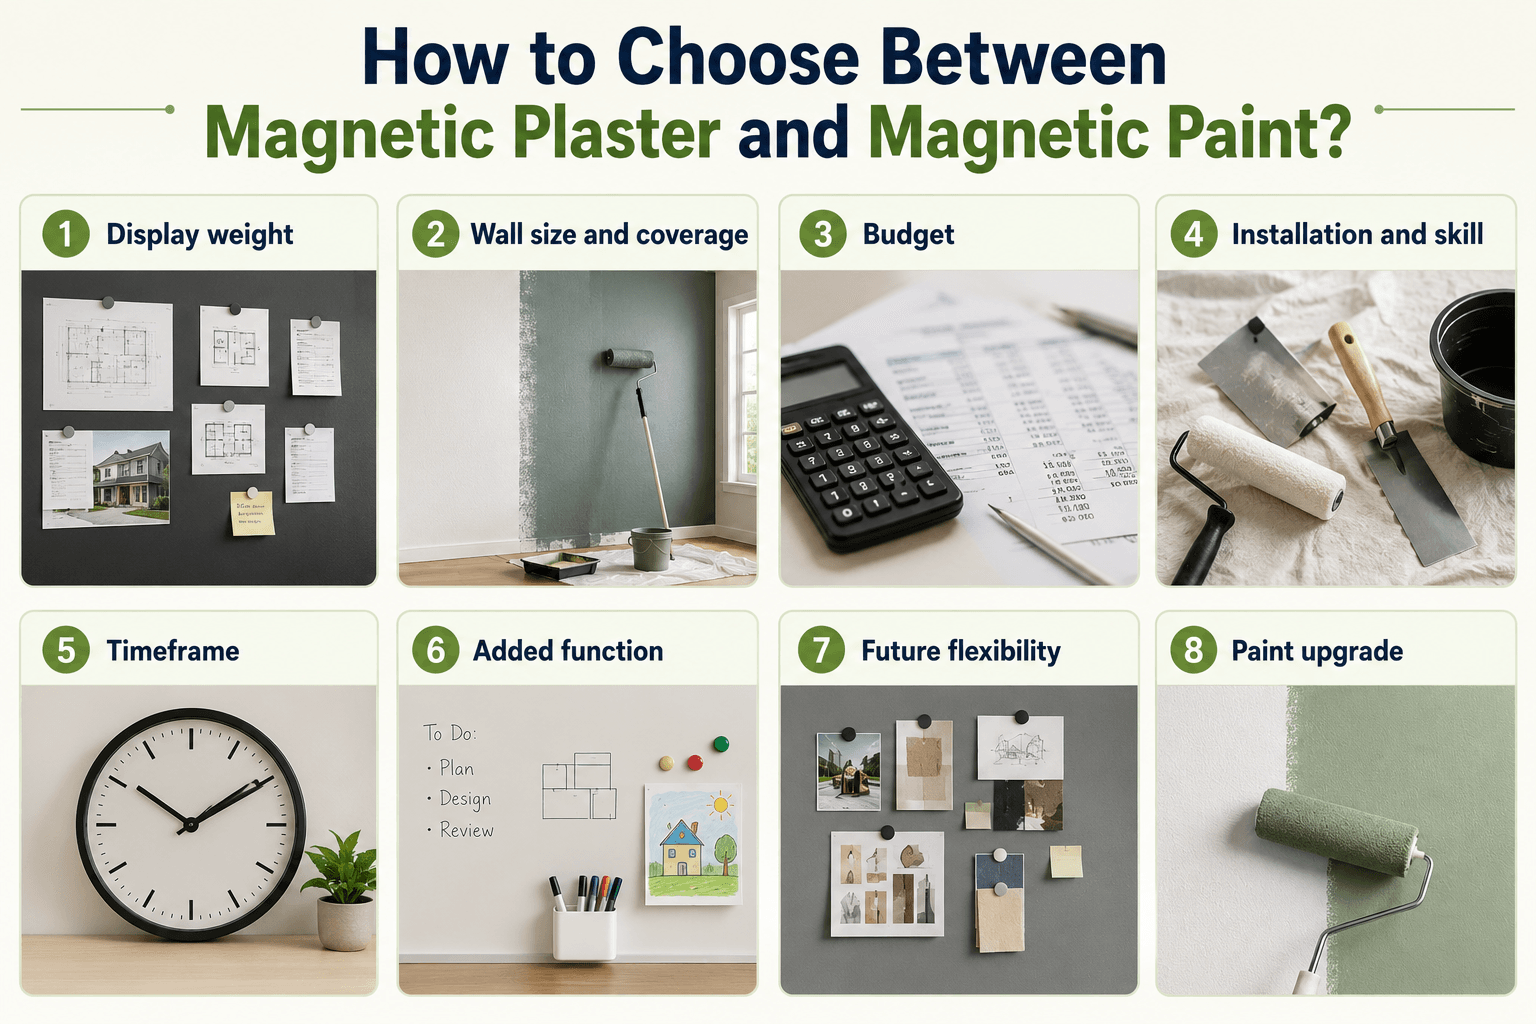
How to Choose Between Magnetic Plaster and Magnetic Paint?

Black chalkboard with paint roller illustrating how to choose between magnetic plaster and magnetic paint

To choose between magnetic plaster and magnetic paint, match the product to your required strength, budget, wall size, and installation route. Choose magnetic plaster for maximum hold and durability on large or commercial walls. Choose magnetic paint for a cost-effective, DIY-friendly surface for lighter displays. Work through the factors below to decide.

Display weight

Magnetic plaster is better than magnetic paint when you need maximum holding power for heavy or dense displays, while magnetic paint comfortably handles lightweight notes, photos, plans and paper.

Wall size and coverage

For a large or full-height wall, magnetic plaster holds more and spreads efficiently across two coats, while magnetic paint suits a single feature wall or smaller area.

 Budget

Magnetic paint is the more cost-effective, entry-level option, while magnetic plaster costs more but adds strength and a 10-year guarantee that can lower long-term replacement costs.

Installation and skill

Magnetic paint suits DIY with basic decorating tools, while magnetic plaster gives its best finish with professional or skilled application.

Timeframe

Both surfaces are ready to use 24 hours after the final coat, but magnetic paint needs three coats (add coats as required) against two for plaster, so factor drying time into your schedule.

Added function

If you want to write on the wall, topcoat either product with whiteboard paint; if you want to project onto it, add projector paint to create a combined magnetic and presentation surface.

Future flexibility

For permanent walls, choose plaster or paint; for rented or frequently redesigned spaces, magnetic whiteboard wallpaper is the removable alternative.

Paint upgrade

For the best magnetic paint for walls in the UK in 2026, Super Magnetic Paint offers the highest paint-grade strength at 60% magnetite.

As a rule, choose magnetic plaster if you need maximum strength, durability and a large, permanent wall for a commercial or high-use space. Choose magnetic paint if you want an affordable, DIY-friendly surface for lighter displays at home or in a smaller office.


Conclusion

In the magnetic plaster vs magnetic paint comparison, the best choice depends on your priorities. Magnetic plaster is the strongest, most durable option, best suited for large, high-traffic and commercial walls, and it carries a 10-year guarantee.

Magnetic paint is the cost-effective, DIY-friendly choice, best suited for lightweight displays in homes and smaller offices.

Both can be topcoated with colour, whiteboard paint or projector paint to add function. Match the product to your required strength, budget and installation route, then explore the full magnetic range to order Magnetic Paint or Magnetic Plaster and start building your magnetic wall.

Table of Contents

Turn Your Wall Into a Smarter Workspace

Upgrade your space with high-performance surface solutions built for productivity.

Try before you buy

Unsure which is the right product for you?

Then choose one of the sample pack options below to try before you buy.

Talk to an Expert

Not sure which projector paint suits your wall?

Get free advice from our surface specialists.

About Author

Sonia Bueno is Senior Manager at Smarter Surfaces, leading sales operations, customer experience, and distributor partnerships globally. With extensive experience supporting education, office, and commercial projects, she shares practical insights on whiteboard paint, magnetic paint, and functional surface solutions to help organisations make informed specification decisions

FAQ's

Is magnetic plaster stronger than magnetic paint?

Yes, magnetic plaster is stronger than magnetic paint. Smarter Surfaces Magnetic Plaster contains 75% magnetite and holds 8 or more A4 pages with a single magnet, while standard Magnetic Paint contains 55% and Super Magnetic Paint contains 60%. Magnetic plaster is the best choice when you need maximum holding power.

Can magnetic paint be applied over existing painted walls?

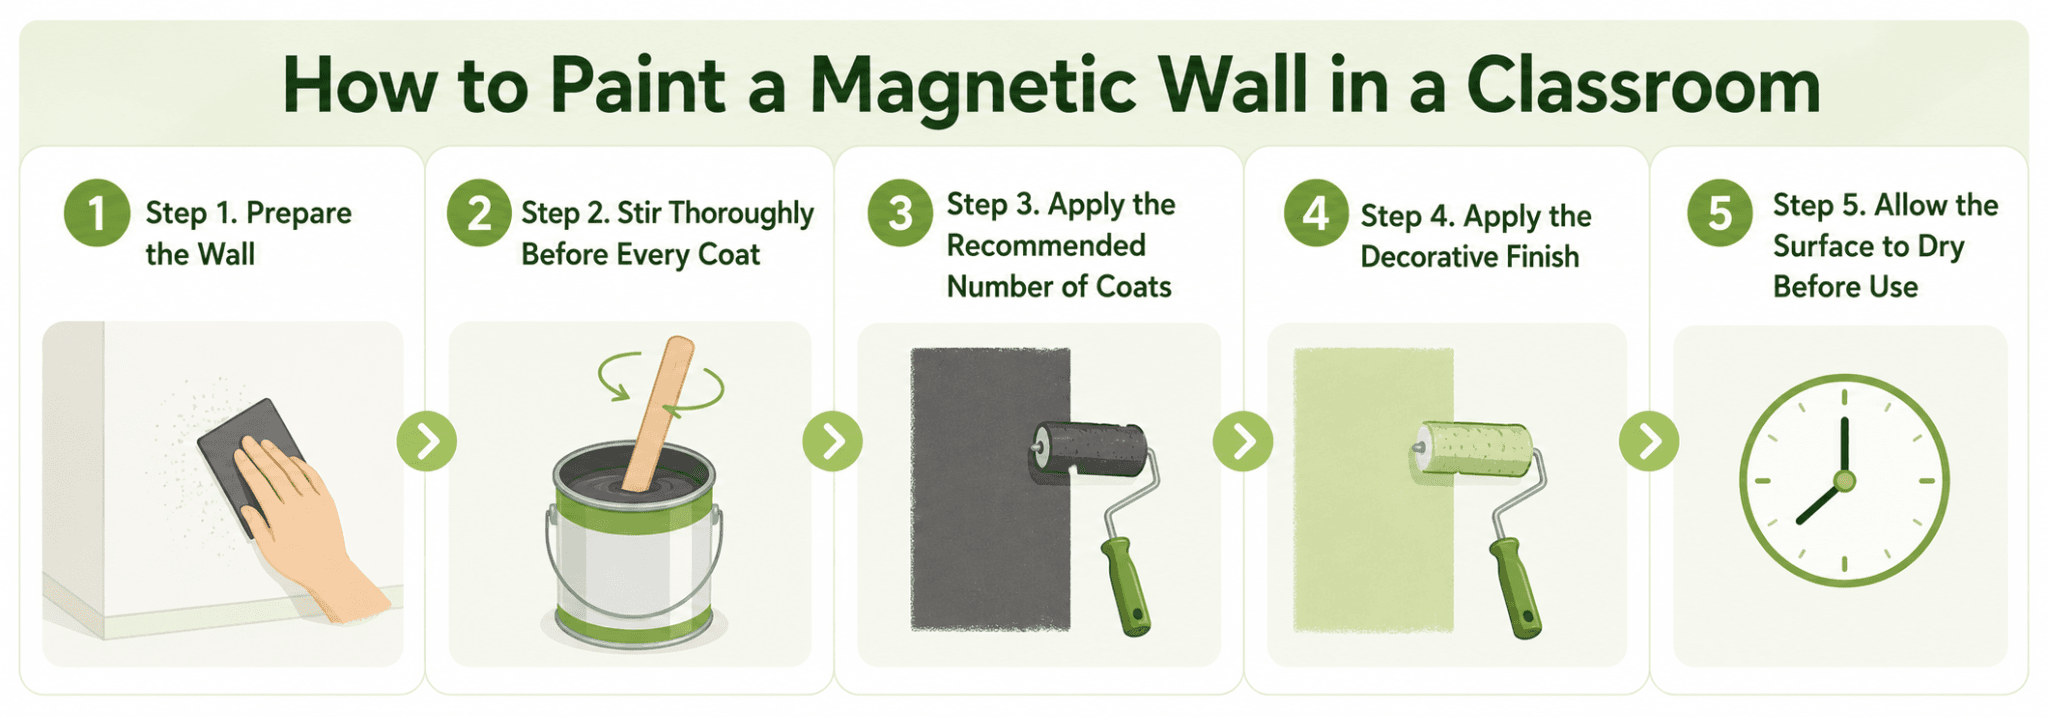
Yes, magnetic paint can be applied over existing painted walls once they are clean, dry and lightly sanded. Apply a white primer first if the surface is absorbent, then roll on the recommended three coats. Allow each coat to dry before adding a colour topcoat.

Does magnetic plaster require professional installation?

Traditional magnetic plaster is usually applied by a professional plasterer for the smoothest finish, but it does not always require one. Smarter Surfaces Magnetic Plaster is ready-mixed and can be applied by a confident DIYer, though large or highly visible walls benefit from a skilled installer.

Can either product be used with whiteboard paint?

Yes, both magnetic plaster and magnetic paint can be topcoated with whiteboard paint to create a magnetic whiteboard wall. Smarter Surfaces Magnetic Whiteboard Paint White combines both functions in a single product, giving a surface you can write on, wipe clean, and use with magnets.

Which option lasts longer?

Both magnetic plaster and magnetic paint last for years when applied correctly, but magnetic plaster is the more durable long-term surface. Its thicker, denser layer resists wear in high-traffic spaces, and Smarter Surfaces Magnetic Plaster carries a 10-year product guarantee.

What magnets work best on magnetic walls?

Neodymium or rare-earth magnets work best on magnetic walls, as they are far stronger than standard household magnets. On a magnetic plaster or magnetic paint surface, neodymium magnets provide the firmest hold for notes, photos, and lightweight displays.

How to Create an Interactive Classroom with Projection and Writable Walls

How to Create an Interactive Classroom with Projection and Writable Walls

Blog

by Author | Aug 25, 2026

Introduction

An interactive classroom setup turns ordinary walls into teaching surfaces that students can write on and project onto. For UK schools, projection and writable walls offer a cost-effective, scalable alternative to fitting expensive panels in every room. By combining a projection wall with a writable wall, teachers gain large, flexible surfaces for active lessons across every subject. This guide explains what an interactive classroom setup involves, how to set one up, how it compares with interactive flat panels, and the benefits for education.

The coatings of each surface of Smarter Surfaces products are fire safety certified (Euroclass fire rating), and approved for commercial and educational use. The products have low VOC content, are solvent-free, and are isocyanate-free under our Green Guarantee, supporting healthier indoor air in rooms full of children.

What Is an Interactive Classroom Setup?

An interactive classroom setup is a learning space where students actively engage with lesson content rather than watching it, usually by writing and interacting on large wall surfaces. At its simplest, it pairs a projection wall with a writable wall so teachers can display, annotate, and collaborate on a single surface, making it a practical interactive classroom setup for schools across the UK.

Unlike a standard classroom built around a single fixed board, an interactive classroom uses the wall itself as the display and writing area. This removes the need for separate screens and boards, frees up floor space, and lets several students work at the wall at once. The surface can be created with projection paint, a writable coating, or a dual-purpose surface that does both.


Why Combine Projection and Writable Walls?

Combining projection and writable walls into one surface lets teachers display content and annotate it by hand at the same time, without switching between separate equipment. This dual functionality increases student participation, makes better use of wall space, and provides a flexible teaching surface suited to every subject and year group. Schools worldwide have already invested heavily in interactivity, with more than 4.6 million interactive whiteboards and 10.4 million interactive flat panels now installed in classrooms globally.


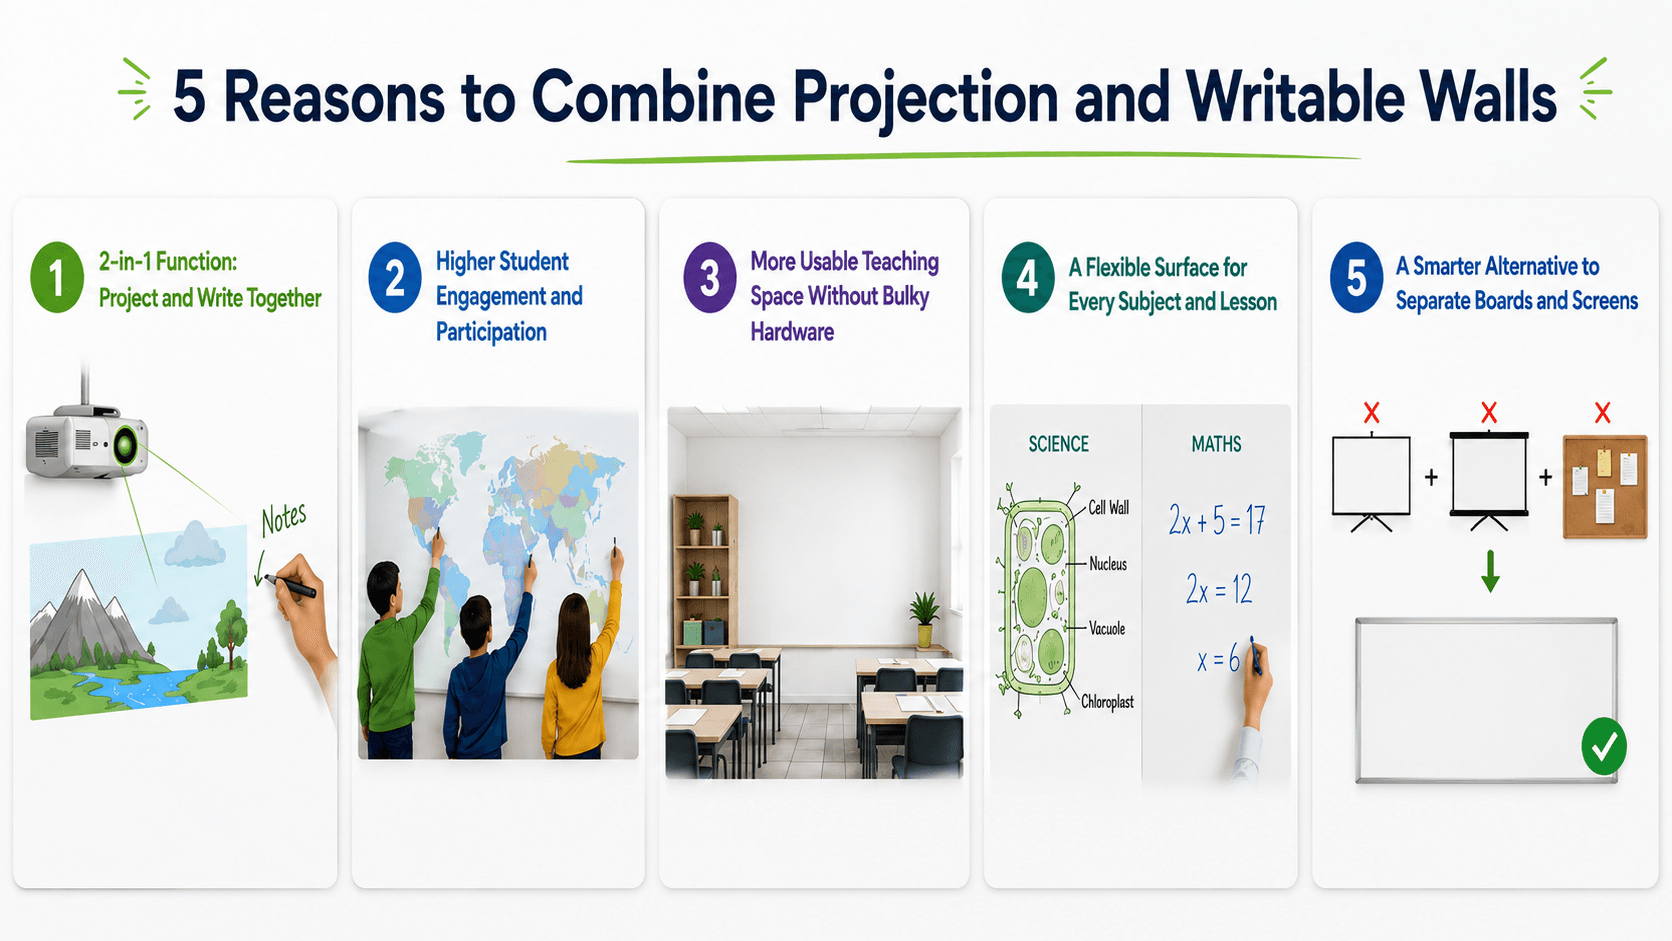
Five benefits of combining projection and writable walls in classrooms

2-in-1 Function: Project and Write Together

A combined surface lets you project an image and write over it with standard markers in the same place. Smarter Surfaces Projector Whiteboard Wallpaper is built for this, with a low-sheen finish that reduces glare while staying fully writable.

Higher Student Engagement and Participation

Interactive surfaces raise engagement by getting students out of their seats to write, label, and solve problems at the wall. Around 71% of teachers using interactive displays report higher engagement than with traditional projection. Similarly, UK research by Clevertouch found that 76% of educators say students are more engaged when using an interactive display.

More Usable Teaching Space Without Bulky Hardware

Turning a wall into the display removes freestanding boards and screens, freeing floor space and decluttering the teaching area. A single surface replaces several pieces of equipment competing for room.

A Flexible Surface for Every Subject and Lesson

One write-and-project wall adapts to any subject, from labelling diagrams in science to working through equations in maths. For rooms that also need to display work, a 3-in-1 magnetic projector screen whiteboard surface adds full write + magnetic + project functionality without tape or pins.

A Smarter Alternative to Separate Boards and Screens

Rather than buying a separate board, a projector screen, and a pinboard, a projection and writable wall delivers these roles on one coated surface, lowering cost and maintenance over time.

How to Set Up an Interactive Classroom with a Projector and Whiteboard Wall

To set up an interactive classroom with a projector and whiteboard wall, prepare a smooth wall, apply a projection or whiteboard surface, then position and calibrate a projector to match it.


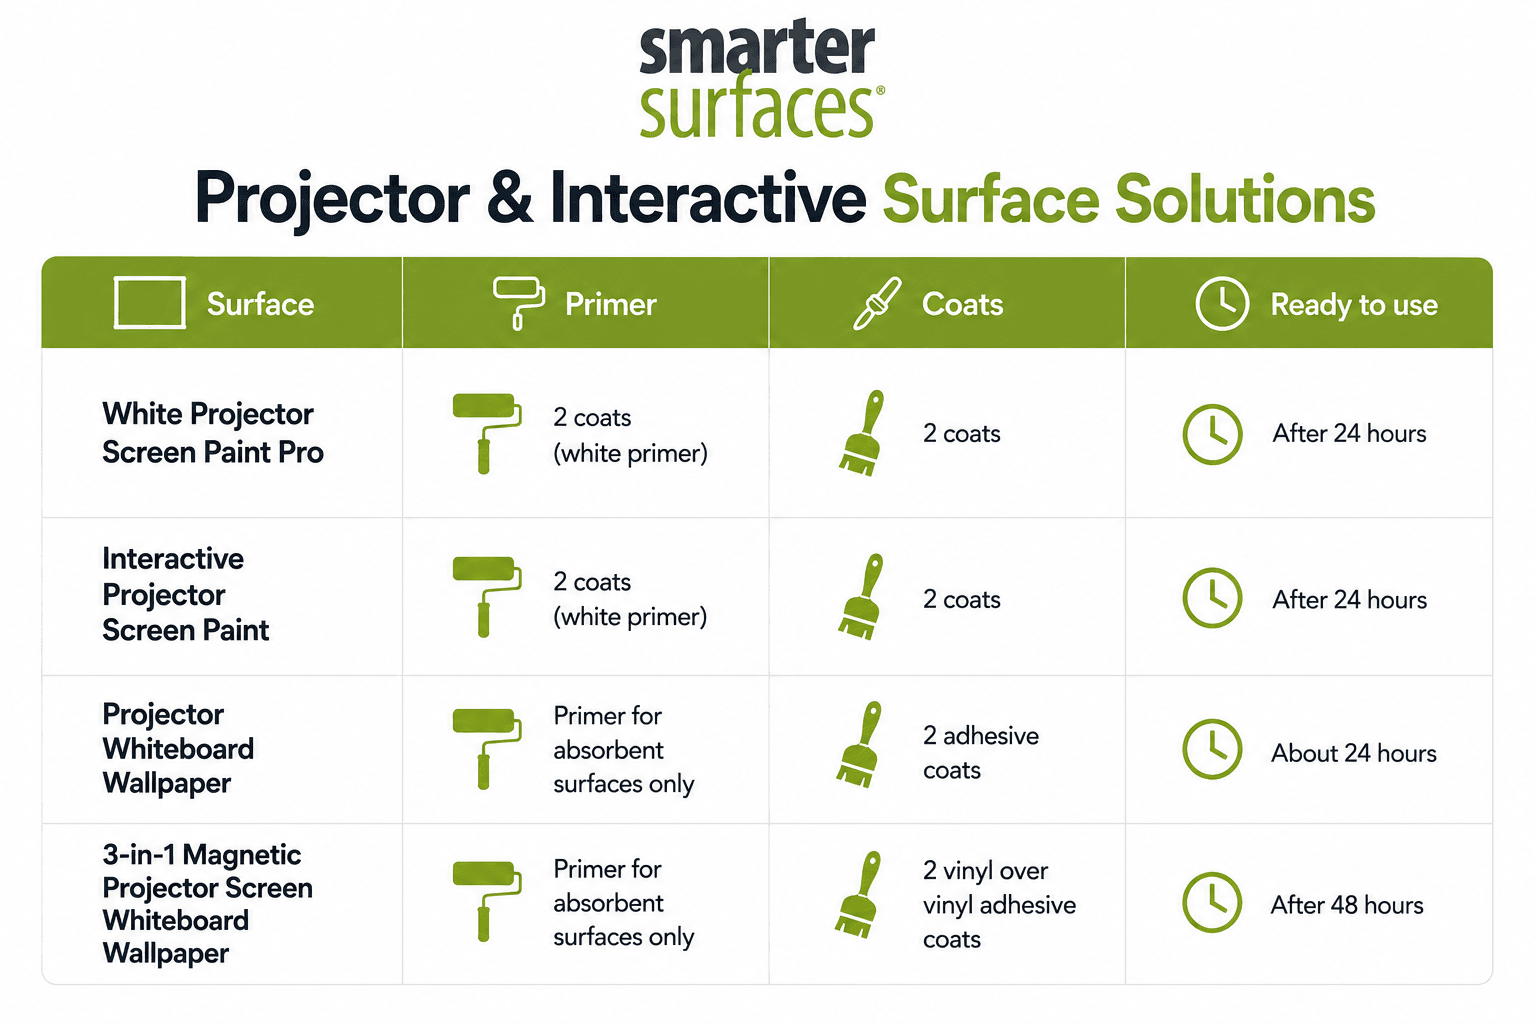
The projection wall classroom setup is simple. Most surfaces are applied in-house, with projection paints ready in around 24 hours and dual-purpose wallpapers in about 48 hours, so installation fits around lessons. Writable whiteboard paint needs up to four days to fully cure before writing. See the coats and timing table below.


Before listing the process, let's first look at the tools required.

Tools and Materials Required

  • Decorator’s filler, sandpaper, and a dust cloth to prepare a smooth wall
  • White primer for bare or absorbent surfaces
  • A lint-free or short-pile roller and tray (supplied in Smarter Surfaces paint kits)
  • Your chosen surface kit: projection paint, whiteboard paint, or projector whiteboard wallpaper
  • For wallpaper: vinyl-over-vinyl adhesive, a smoothing spatula, and sharp scissors or a utility knife
  • Masking tape and a spirit level to mark the projection area squarely
  • A projector and mount, plus high-quality whiteboard markers and the supplied microfibre cloth


Now that we know what is required, let’s read how to create an interactive classroom setup.

Step 1: Choose and Prepare the Right Wall

Start by selecting a smooth, unobstructed wall with clear sightlines from every seat. Fill and sand any imperfections, then prime the surface so the coating adheres evenly. Choose a wall away from direct sunlight, or control glare with blinds.

Step 2: Choose Your Projection and Whiteboard Surface

Match the surface to the room's light levels and intended use. These are smart projector wall paint options for schools that need durable, large-format surfaces. The main choices are:

 Coats and Timing by Surface

Step 3: Turn a Classroom Wall into a Projector Screen

To turn a classroom wall into a projector screen, apply two coats of projection paint over the primer and allow it to cure. Once dry, the wall performs as a full-size screen with no frame or fabric required. Smarter Surfaces projection paints are ready to use 24 hours after application.

Step 4: Position and Calibrate the Projector

Mount the projector at the manufacturer's recommended throw distance and align it squarely with the coated area. Adjust the angle to remove any hotspots or shadows, and use keystone correction so the image fits the surface precisely.

Step 5: Set Up for Daily Interactive Teaching

Equip the room with quality whiteboard markers and a microfibre cloth, and establish a simple weekly cleaning routine using a dry erase cleaner. Pairing the wall with an interactive projector lets students control content directly on the surface.

 Common Mistakes to Avoid While Setting Up an Interactive Classroom Setup

  • Applying to a textured or uneven wall. Any bumps show through and cause hotspots, so fill and sand first.
  • Skipping primer on bare or absorbent walls, which weakens adhesion and finish quality.
  • Choosing a glossy write-only surface for a projection wall, which causes glare and hotspots. Use a low-sheen surface instead.
  • Cleaning with alcohol-based products, which shortens the surface’s life. Use a standard whiteboard cleaner.


 Troubleshooting Your Projection and Writable Wall

  • Image Looks Washed Out In Daylight

Check the projector meets the surface's minimum brightness (1,500 lumens for Projector Screen Paint Pro) and fit blinds, or switch to a High Contrast or ambient-light-rejecting finish.

  • A Bright Hotspot Appears In The Image

This usually means the surface sheen is too high or the projector angle is too steep; use a low-sheen surface and adjust the mounting angle and keystone correction.

  • Marker Ghosting Or Staining

Confirm the surface has completed its full cure time before first use, and clean weekly with a whiteboard cleaner rather than household sprays.

  • Peeling Or Patchy Finish

This is almost always a missing primer coat on an absorbent wall; sand back the affected area, prime it, and reapply the topcoat.

Explore Smarter Surfaces Projector Screen Paint Pro and turn any classroom wall into a high-performance projection surface at a fraction of the cost of fixed panels.

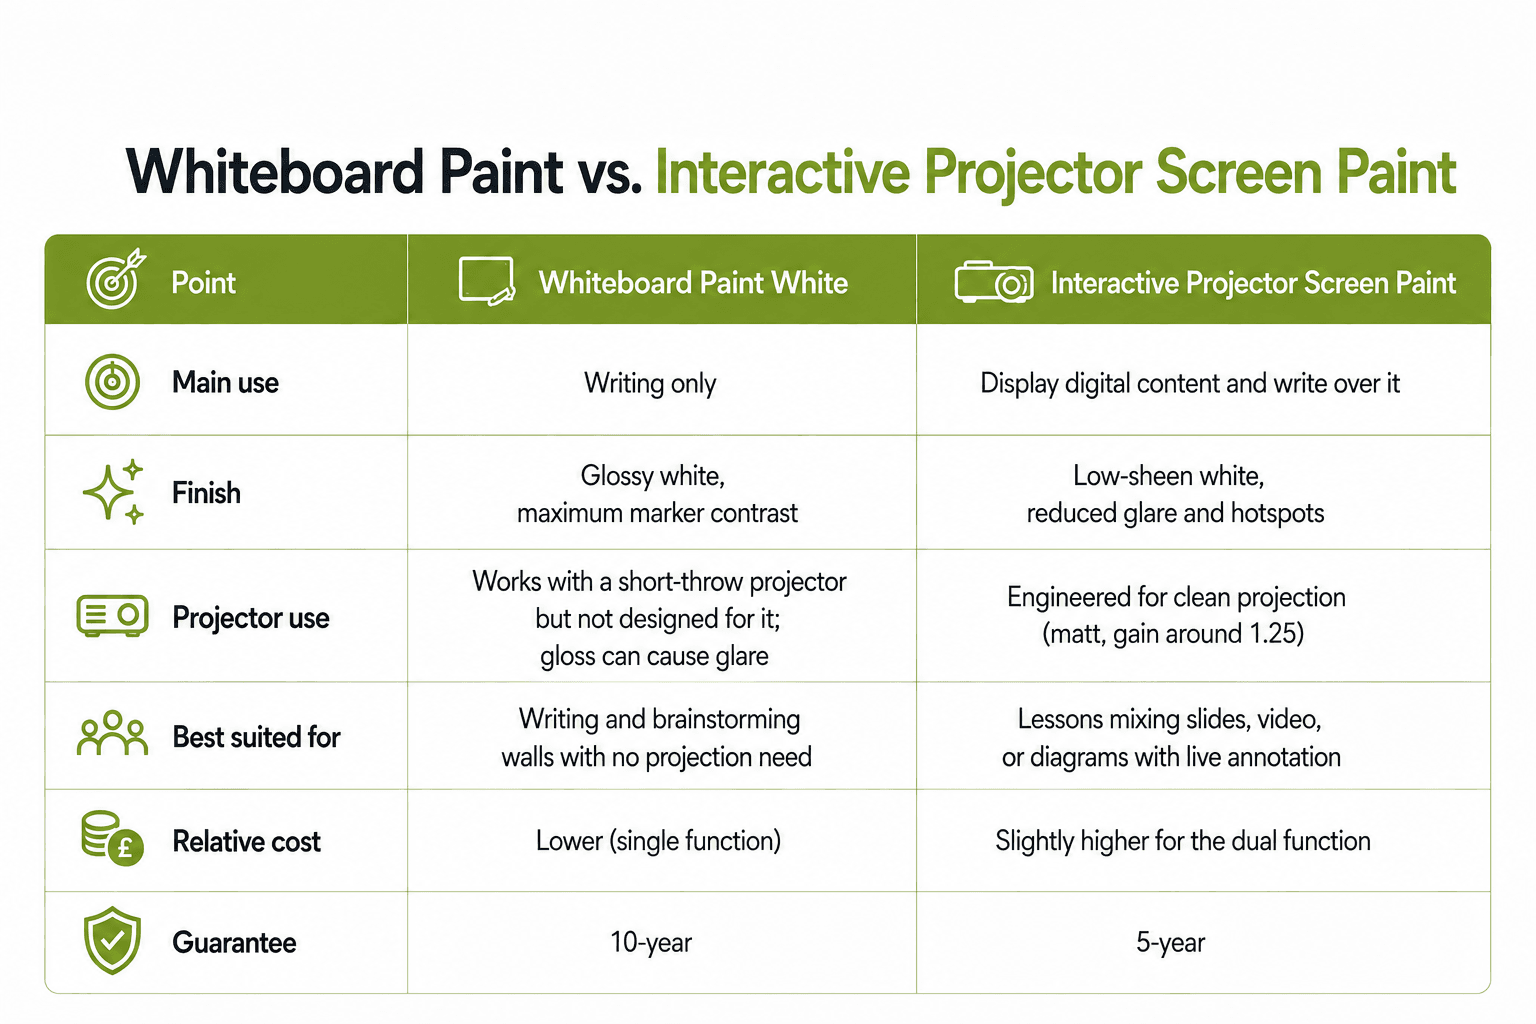
Whiteboard Paint White vs Projection Whiteboard Wall: Which Does Your Classroom Need?

Before choosing a surface, decide whether the room needs to write only or to write and project. A writable wall has a gloss finish and is built purely for writing, while a projection whiteboard wall has a low-sheen finish engineered for projection and writing. Choosing the wrong one is the most common and most expensive early mistake.

Ready to upgrade your experience? Shop Smarter Surfaces’ top-rated products today.

Interactive Flat Panel vs Projection Wall for Your Classroom

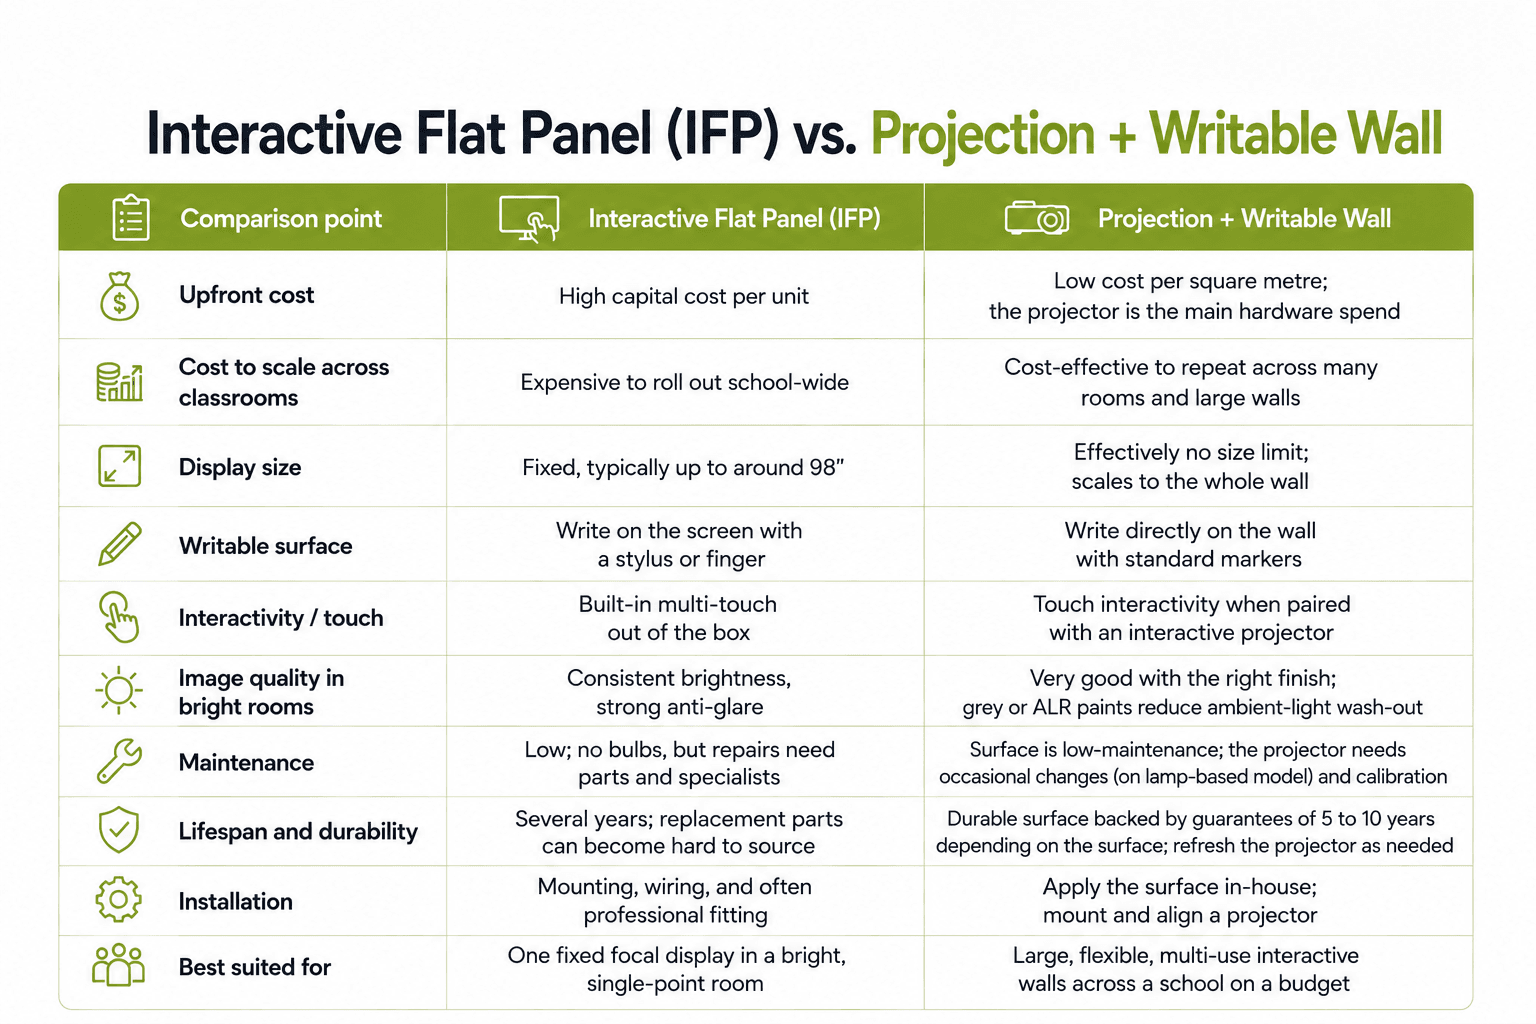
When weighing an interactive flat panel vs a projection wall for the classroom, the main differences are cost, scale, and surface size. An interactive flat panel is a fixed touchscreen that offers plug-and-play touch in bright rooms. While, a projection wall turns the wall itself into a much larger projected and writable surface at a lower cost per classroom, making it more scalable across a school.

According to Global Market Insights, the interactive flat panel market was valued at USD 12.6 billion in 2024 and continues to grow at over 7.5% annually, driven largely by the education sector. Both technologies have a place; the table below compares them for classroom use.

An interactive flat panel is the simplest plug-and-play option for a single bright-room focal point, while a projection and writable wall gives schools far more surface area, dual write-and-project use, and a lower cost per classroom, making it the more scalable choice for whole-school interactive setups.

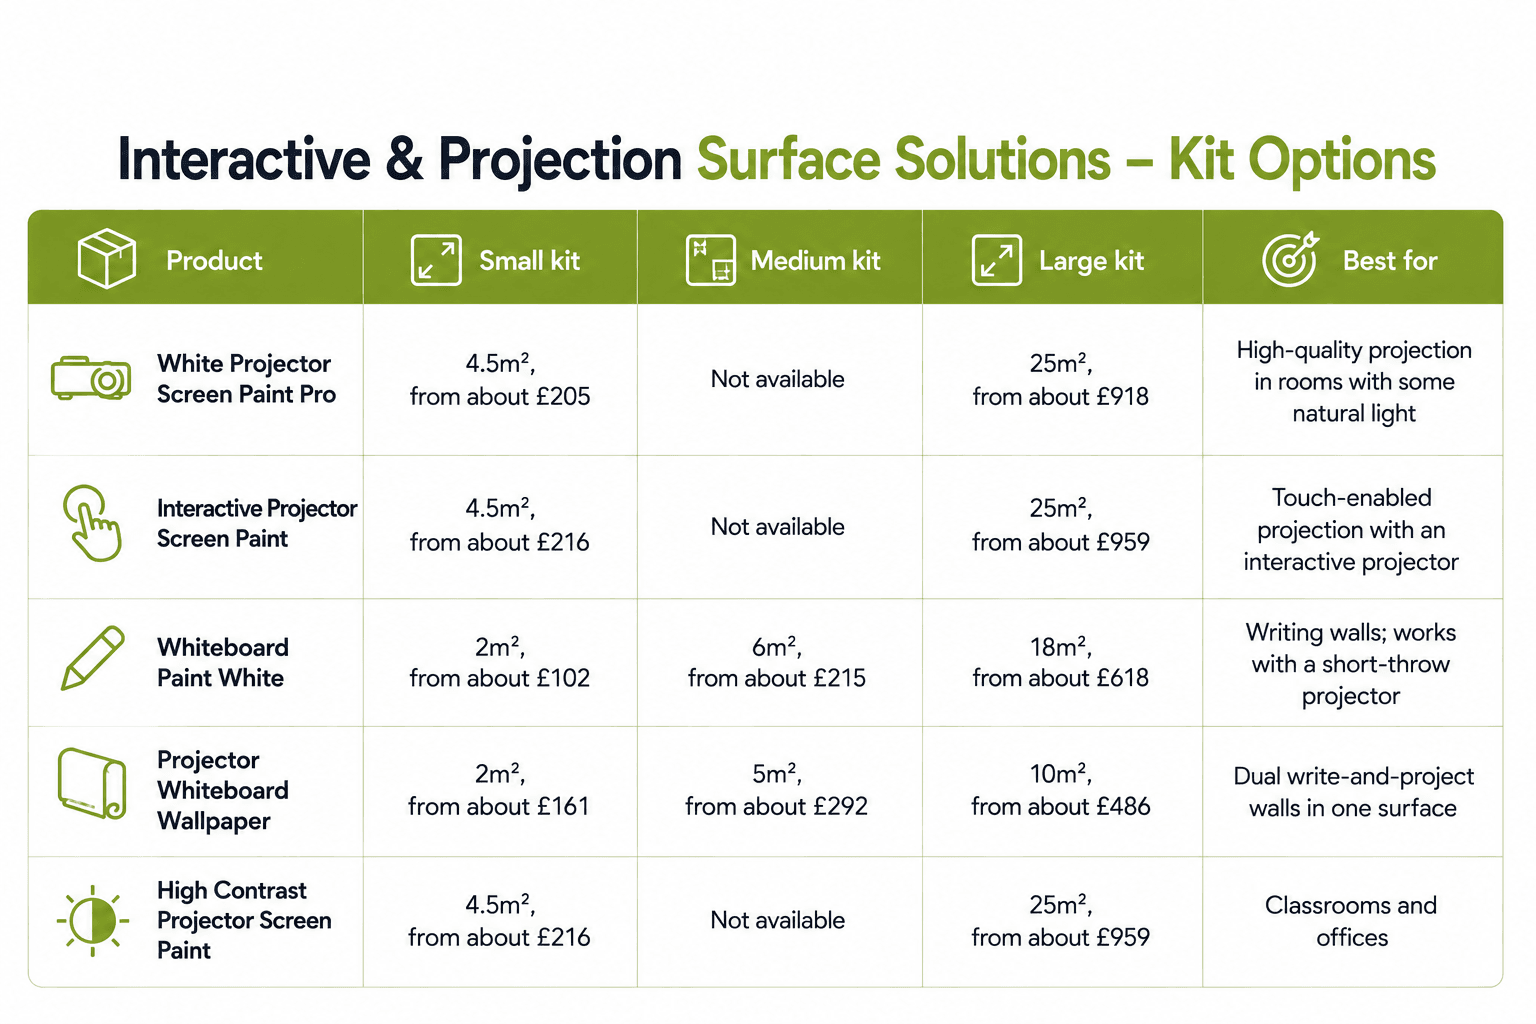
Exact costs vary by kit size, so check the live product pages, where every Smarter Surfaces kit lists a starting-from price and the coverage it delivers. The table below compares the five surfaces most relevant to an interactive classroom by starting kit, coverage, finish, cost, and main use.

The smaller projection kits (4.5m²) suit a single classroom wall, while the 25m² paint kits and 10m² wallpaper rolls are more cost-effective per square metre when equipping several rooms at once.

For more on this, see the Smarter Surfaces guide to the benefits of projectors in education.

Interactive Classroom Design Ideas by School Type

This section breaks down interactive classroom design ideas by school type, so you can plan a space that fits the age group, the curriculum, and the way teachers in that setting actually work.


Early Years and Kindergarten: Design for Movement and Touch

Children aged three to five learn through physical exploration, so interactive surfaces belong at child height, within the bottom 1.2 metres of the wall. A low writable wall zone supports drawing and letter formation, while a magnetic wall lets staff set up letter tiles, number lines and matching games children can rearrange. Choose low-VOC, certified coatings and keep all zones within easy reach of small hands.

Primary Schools: Flexible Zones for Whole-Class and Group Work

Primary classrooms switch between whole-class, group and independent work several times a day, so flexibility is the design priority. A full-height writable wall gives teachers a larger teaching surface and a space where students solve problems in front of the class. While magnetic walls display work and timetables without pins or tape. Lightweight, reconfigurable tables and a glare-free projection surface complete the room.

Secondary Schools: Subject-Specific Interactivity

At secondary level, classroom design should follow the subject rather than a single template. Maths and science rooms gain most from full writable walls where students stand and solve problems in groups, humanities rooms combine writable planning space with magnetic display zones, and art rooms need durable, pin-free magnetic walls for rotating exhibitions. Movable seating lets every room shift between instruction, debate and group work in one period.

Sixth Form and Further Education Colleges: Prepare for the Workplace

Post-16 spaces should resemble the universities and offices students are moving towards. Seminar-style layouts surrounded by writable walls let any group stand, work through a problem, photograph the wall and wipe it clean for the next class. A projector-ready presentation zone gives students a professional setting to practise the presenting skills most courses now assess.

Universities and Higher Education: Active Learning at Scale

Higher education is shifting from lecture delivery to active learning, and room design follows. With grouped tables and writable walls, even a class of 60 can run multiple group discussions at once and everyone's working stays on display. Writable corridors, columns and study rooms extend collaboration beyond the timetable, while painted projection surfaces solve sightline problems in wide lecture theatres.

SEN and Specialist Settings: Interactivity Without Overload

Special educational needs (SEN) classrooms need to be engaging without causing sensory overload. Clear or low-sheen writable coatings keep walls functional without visual noise, and can even be applied over a calm existing wall colour. Magnetic surfaces support visual timetables and now-and-next boards that staff adjust in seconds, while muted palettes, matt finishes and quiet corners help students self-regulate.

Design Principles That Apply to Every School Type

Whatever the setting, the same rules hold: plan surfaces before furniture, since walls are the largest unused asset in any classroom; match the height of every interactive zone to its users; specify certified, guaranteed, low-VOC materials that survive daily use; and design for reset, so walls wipe clean and tables move back in minutes for the next lesson.


Want a projection board instantly for your class?

Order Projector Whiteboard Wallpaper to create a write-and-project classroom wall in a short span of time.

Benefits of Projection and Writable Walls in Education

Benefits of projection and whiteboard walls, highlighting improved and accessible learning, low maintenance, and sustainable teaching.

Projection and writable walls deliver benefits beyond engagement, including improved retention, inclusivity, safety, sustainability, and long-term value. Because the surface is applied directly to the wall, schools gain large, durable, low-maintenance teaching areas that meet UK fire and air-quality standards and last for years.

Improved Learning Outcomes and Retention

Large visual surfaces help students absorb and retain information, since most classroom learning is visual. Researchers estimate around 80% of classroom learning is visual. Writing and projecting on the same wall reinforces concepts through both demonstration and practice.

Inclusive and Accessible Learning for All Students

Wall-sized surfaces let several students work together at once and suit a range of learning needs, including SEN. Low-sheen finishes reduce glare for clearer visibility across the room.

Safer, Cleaner Classrooms with Certified Surfaces

Smarter Surfaces coatings are low-VOC, solvent-free, and isocyanate-free, supporting healthier indoor air, and carry independent fire certification for use in public buildings. This makes them well suited to school environments.

Long-Term Value and Low Maintenance

For interactive classroom walls UK schools can rely on, painted and papered surfaces need little upkeep beyond routine cleaning and are backed by a 10-year guarantee. Only the projector requires occasional maintenance such as lamp changes.

Sustainable, Paper-Free Teaching

Projecting and writing directly on the wall reduces printing and paper waste, supporting schools' sustainability goals while lowering consumable costs.


Learn about the benefits of Interactive Whiteboards in classrooms and why schools are adopting it.


Read Here

Conclusion

An interactive classroom setup built on projection and writable walls gives UK schools a cost-effective, scalable way to modernise teaching without filling every room with expensive hardware.

By combining a high-quality projection surface with a writable wall, teachers create large, flexible spaces that engage students, suit every subject, and last for years with low maintenance.

Whether you start with projection paint, a writable coating, or a dual-purpose surface, the wall becomes your most versatile teaching tool.

Table of Contents

Turn Your Wall Into a Smarter Workspace

Upgrade your space with high-performance surface solutions built for productivity.

Try before you buy

Unsure which is the right product for you?

Then choose one of the sample pack options below to try before you buy.

Talk to an Expert

Not sure which projector paint suits your wall?

Get free advice from our surface specialists.

About Author

Sonia Bueno is Senior Manager at Smarter Surfaces, leading sales operations, customer experience, and distributor partnerships globally. With extensive experience supporting education, office, and commercial projects, she shares practical insights on whiteboard paint, magnetic paint, and functional surface solutions to help organisations make informed specification decisions

FAQ's

What is the best paint for an interactive classroom projection wall?

The best paint for an interactive classroom projection wall depends on the room's light levels. Projector Screen Paint Pro gives the brightest image in rooms with natural light, while a dual-purpose Projector Whiteboard Wallpaper suits classrooms that need to both project and write on the same surface. For touch control, choose an interactive projector screen paint

What type of projector works best with a projection wall?

Standard, short-throw, and interactive projectors all work with a projection wall. Choose an interactive projector screen paint if you want students to control content by touching the surface, and an ultra-short-throw model to reduce shadows in smaller classrooms. Match the projector's brightness to the room's ambient light for the clearest image.

Canp rojector screen paint be applied over wallpaper?

Yes, it can be applied. But, it's genuinely not recommended because wallpaper texture – even seemingly smooth vinyl – creates surface irregularities that show up as imperfections in projected images.
If you want to paint over wallpaper, it needs to be completely smooth, firmly adhered with no bubbles or lifting edges, and ideally sealed with a primer first.

Is a writable projection wall for primary school classroom a good choice?

Yes, a writable projection wall is well suited to a primary school classroom. Low, large surfaces let young students write and draw directly at the wall, and low-sheen, low-VOC finishes keep glare and fumes to a minimum. The surface works with the standard markers schools already use.

s a classroom projection and whiteboard wall a cost-effective option for UK schools?s a classroom projection and whiteboard wall a cost-effective option for UK schools?

In small rooms, the most effective interactive classroom design ideas use the wall itself instead of freestanding equipment. Converting one wall into a combined projection and writing surface frees floor space and gives a clear teaching focal point without extra furniture.

What are some interactive classroom setup ideas for secondary schools?

Interactive classroom setup ideas for secondary schools include projecting exam questions for students to solve on the wall, building large revision mind-maps, and annotating scientific diagrams during demonstrations. The wall's size lets more students work at once than a single board allows.

Do projection walls work in bright classrooms?

Projection walls can work well in bright classrooms with the right surface. Grey or ambient-light-rejecting projection finishes reduce wash-out from daylight, and controlling glare with blinds improves clarity further. For very bright, single-point rooms, an interactive flat panel may be the better fit.

How long does an interactive classroom wall surface last?

Projection walls can work well in bright classrooms with the right surface. Grey or ambient-light-rejecting projection finishes reduce wash-out from daylight, and controlling glare with blinds improves clarity further. For very bright, single-point rooms, an interactive flat panel may be the better fit.

Can a projection and writable wall be installed without disrupting lessons?

In most cases, yes. Many projection and writable surfaces are applied in-house and are ready to use within roughly 24 to 48 hours, so installation can be scheduled around weekends or holidays. This lets schools upgrade classrooms with minimal disruption.

Is a classroom projection and whiteboard wall a cost-effective option for UK schools?

Yes. A classroom projection and whiteboard wall is a cost-effective choice for UK schools because the surface covers large areas at a low cost per square metre and scales easily across many rooms. The coatings also meet UK fire and VOC standards and are backed by a 10-year guarantee.

Clear Whiteboard Paint: When to Choose Transparent Over White

Clear Whiteboard Paint: When to Choose Transparent Over White

Blog

by Author | Aug 24, 2026

Image answers question when to use clear whiteboard paint, featuring icons and text on a light green wall with a desk setup.

Knowing when to use clear whiteboard paint in the UK comes down to one question: does the existing wall colour or design need to be preserved? Clear whiteboard paint creates an invisible coating that adds full marker functionality without changing the appearance of the surface beneath it. White whiteboard paint remains a practical choice for blank or neutral surfaces, transparent whiteboard paint delivers an advantage in spaces where aesthetics, branding, or design continuity matter.

This guide outlines the specific scenarios in which clear dry erase paint is the more effective choice, covering offices, classrooms, home offices, and specialist surfaces, so you can make an informed decision for your project.

What sets clear whiteboard paint apart from white whiteboard paint?

Standard whiteboard paint applies a white, opaque finish to any wall, converting it into a writable surface. Clear whiteboard paint, by contrast, creates an invisible transparent coating that sits over the existing surface without changing its appearance. Both options deliver the same erasable performance; the difference lies entirely in what happens to the surface beneath.

The key distinction is surface preservation. White paint covers and replaces your wall's colour. Clear paint retains it. Both finishes support standard dry erase markers and deliver the same high-performance writable surface. But, the decision between them depends entirely on whether your wall's existing colour or design needs to be preserved.

Smarter Surfaces Clear Whiteboard Paint is independently certified to LEED, M1, VOC, and fire safety standards, and is backed by a 10-year guarantee. This makes it a durable, commercial-grade option suitable for a wide range of applications.

Important Note: Clear whiteboard paint is best suited to coloured surfaces. For white or near-white walls, white whiteboard paint is the appropriate choice, as a transparent finish offers no benefit on those surfaces.


When to Choose Transparent Whiteboard Paint Over White

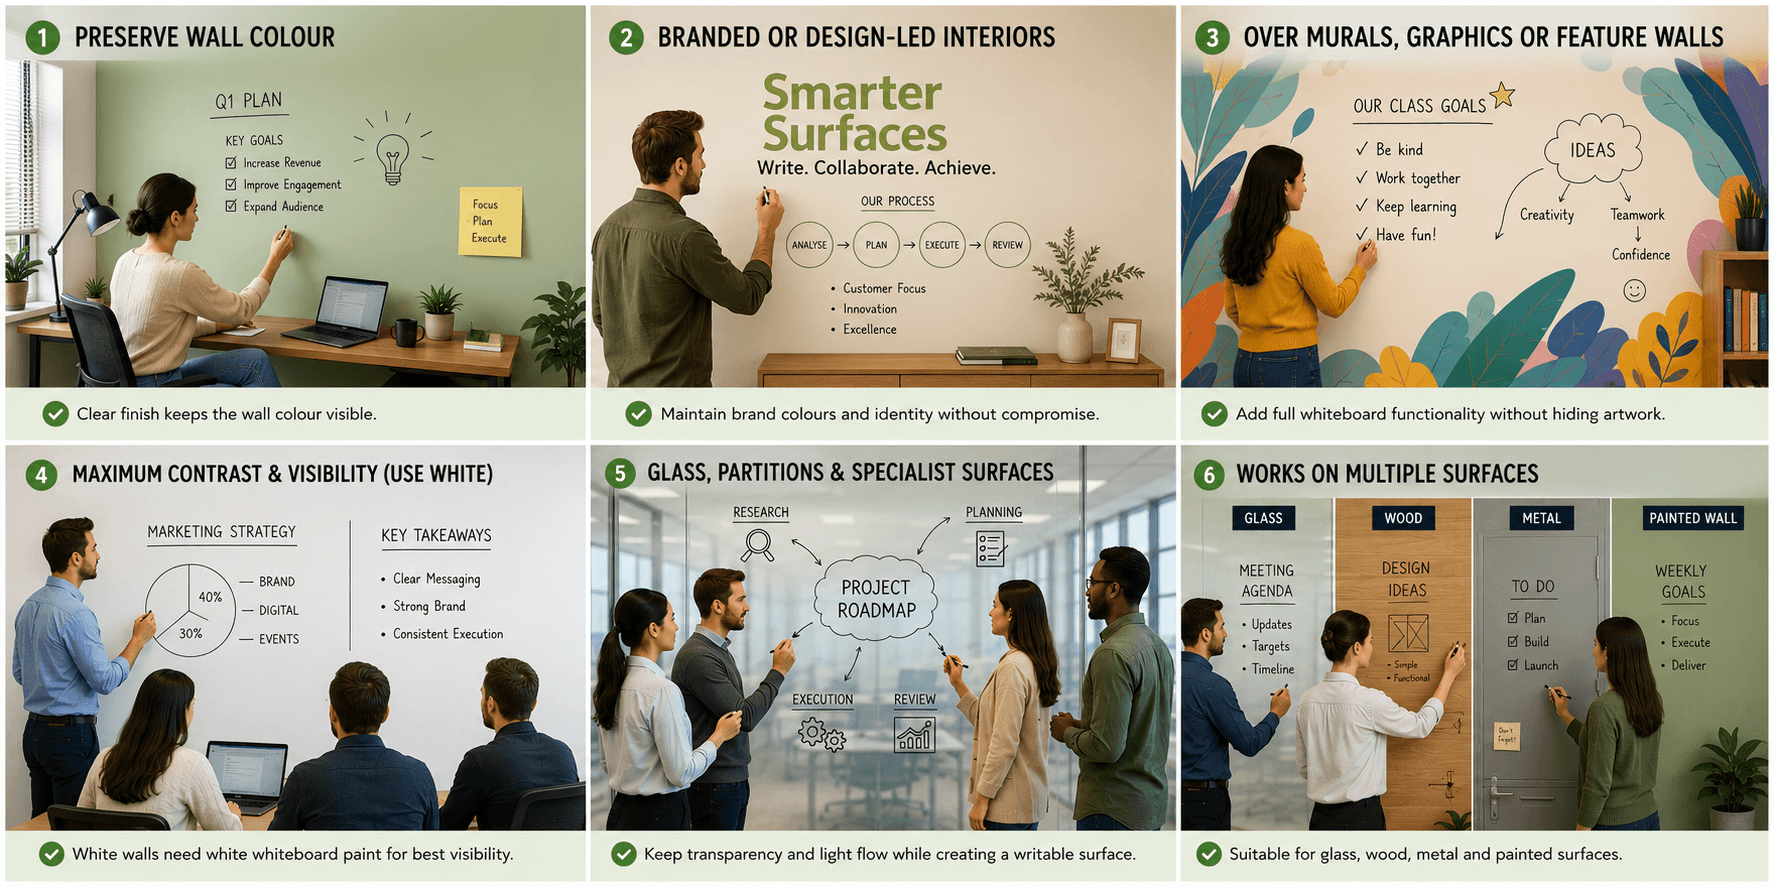
Six panel graphic comparing transparent whiteboard paint and white whiteboard paint across offices, classrooms and surfaces.

The decision between clear and white is rarely about performance, since both deliver the same writable result. It is about the surface beneath. The six factors below cover the most common scenarios that determine when to use clear whiteboard paint in the UK, from colour preservation through to specialist surfaces such as glass.

When the Wall Colour Must Be Preserved

The most common reason to select clear over white is the presence of a coloured wall. White whiteboard paint would cover that colour completely, so any investment in a feature wall, a corporate shade, or a chosen interior palette would be lost. Clear dry erase wall paint retains the colour in full, while adding complete writable functionality, which makes it the default choice for whiteboard paint for coloured walls in the UK.

For Branded or Design-Led Interiors

In commercial environments, wall colour is rarely arbitrary. Brand guidelines and interior specifications define how a space looks, and an opaque white finish would break that visual consistency. Transparent whiteboard paint office applications allow teams to write and collaborate directly on branded walls without any visible change, preserving the design while adding function.

When Working Over Murals, Graphics, or Feature Walls

Where a wall carries a mural, printed graphics, or decorative detail, a white finish would erase it. A clear coating overlays the artwork without altering it, so the surface gains dry erase functionality while the design remains intact. This is particularly relevant in schools, creative agencies, and customer-facing spaces.

When Maximum Contrast Matters: Marker Visibility and Wall Tone

White remains the better choice where marker visibility is the single most important factor, such as large lecture halls or presentation rooms with viewing distance. A white surface provides maximum contrast for any marker colour. Clear paint over brilliant white can cause a slight yellowing effect from how light interacts with the white paint underneath, which is why white whiteboard paint is recommended instead. Clear is not recommended for white and light colours including beige, vanilla and similar tones. .

For Glass, Partitions, and Specialist Surfaces

Clear whiteboard paint can be applied to glass surfaces, partitions, wood, and metal. The clear finish maintains the appearance of the original material. On glass partitions in particular, a transparent coating preserves light transmission while turning the panel into a functional work surface, something a white finish cannot achieve. It is recommended to use primer before applying the paint.

Choose Paint Based on Wall Tone: Why Clear Is Not Suited to White Walls

The base colour of the wall is the final deciding factor. Clear dry erase wall paint performs across virtually all colours, but it is best suited to mid-tone and darker surfaces where the transparency delivers a visible benefit. On white or very light walls, the white finish is recommended instead, since there is no colour to preserve.

Clear Whiteboard Paint vs White Whiteboard Paint

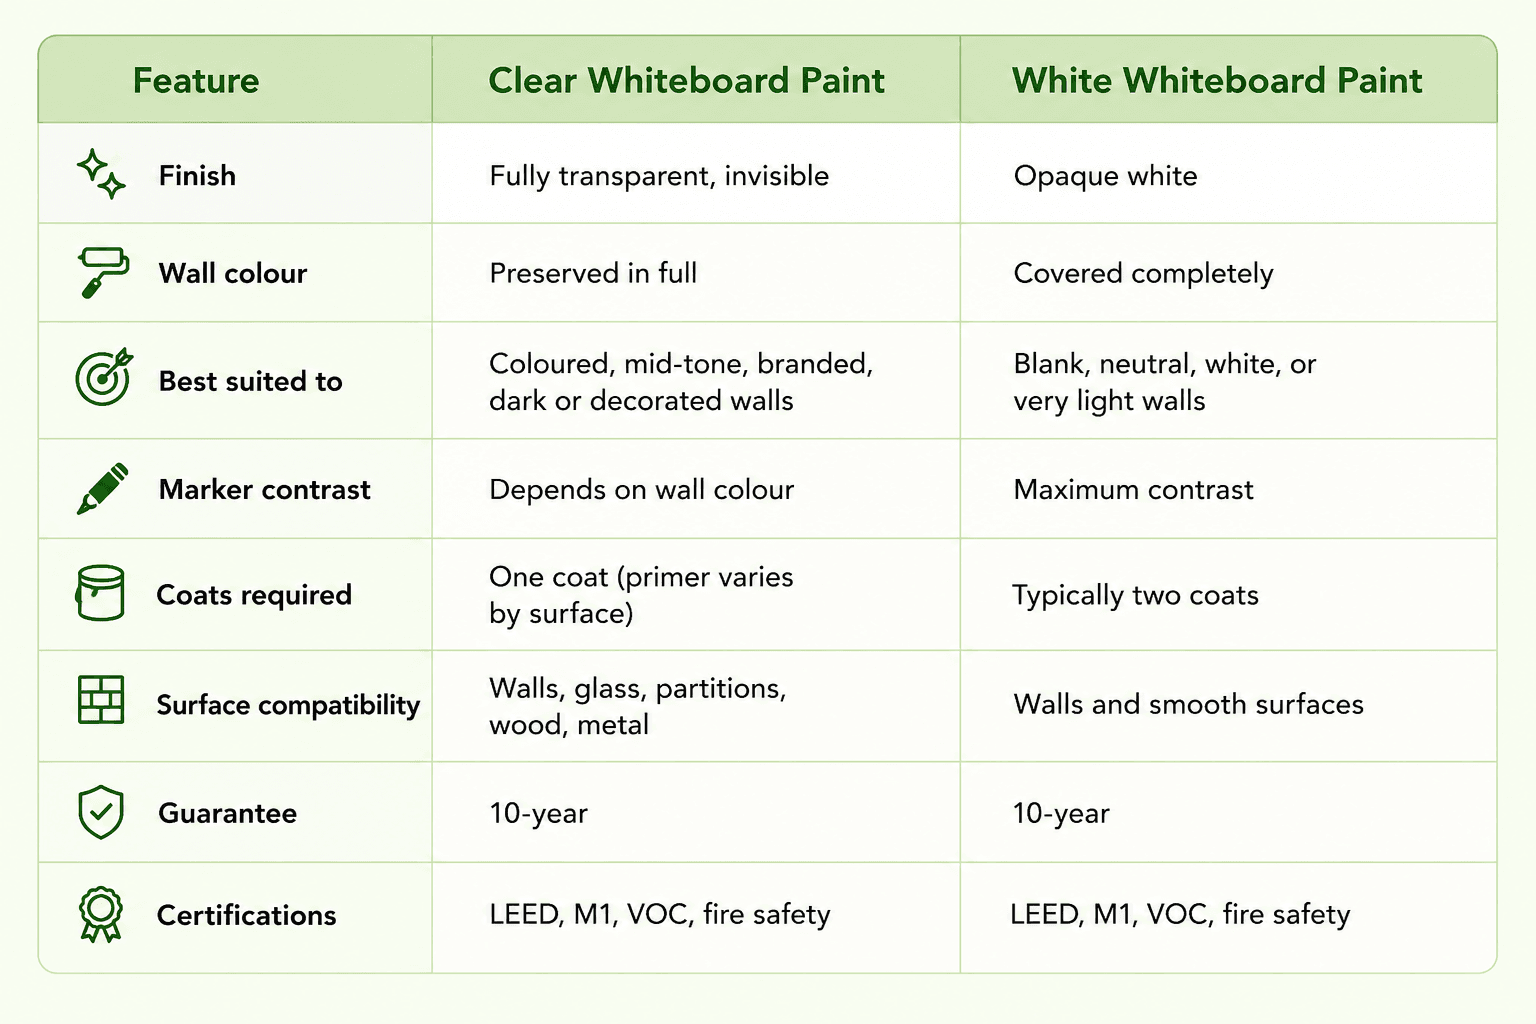
Clear whiteboard paint preserves the existing wall colour in full, while the white version replaces it with an opaque finish; performance is otherwise identical. The right choice depends on the application context, the tone of the wall, and whether its colour or design carries value.

The table below summarises the core differences to support the choice between the two finishes.

For permanent installations over coloured walls in offices, classrooms, or commercial spaces, Clear whiteboard paint preserves the existing wall colour in full. While the white version replaces it with an opaque finish; performance is otherwise identical. The right choice depends on the application context, the tone of the wall, and whether its colour or design carries value.

Ready to upgrade your experience? Shop Smarter Surfaces’ top-rated products today.

Whiteboard Paint white for wall

Matt Whiteboard Paint

From £198.00 ex.VAT

Magnetic whiteboard paint white

Whiteboard Paint White

From £85.00 ex.VAT

Where Transparent Whiteboard Paint Is the Better Choice

Four settings where transparent whiteboard paint is the better choice, including murals, home walls and glass partitions.

Certain environments consistently favour a transparent finish because design continuity matters as much as function. Offices, classrooms, home working spaces, and glass partitions are the settings where clear is most often the correct decision in the UK. The sections below explain why each environment benefits from an invisible coating rather than an opaque white finish.

In Offices

In design-led workplaces, co-working spaces, and corporate headquarters, wall colour forms part of the brand identity. Transparent whiteboard paint office installations allow these walls to remain on-brand while functioning as writable surfaces. The result is a professional-grade dry erase area that integrates fully into the workspace.

According to a Knight Frank survey of global businesses, 55% expect to increase the proportion of collaborative space in their offices, reinforcing demand for writable surfaces that support teamwork without compromising design. For brand-led teams, this preserves the corporate identity of a space while adding room to think, plan, and collaborate on the wall itself.


In Classrooms

Schools frequently use murals, colour zones, and learning displays that support the curriculum. Transparent whiteboard paint classroom applications convert these walls into dry erase surfaces without covering the existing artwork. For wider education projects, Smarter Surfaces provides dedicated guidance for schools.


One coat of clear whiteboard paint creates a full writable surface regardless of the wall's base colour. Applying whiteboard paint over wallpaper is possible on smooth wallpaper only, but we don't recommend it. You can use two coats of Clear Primer first (if the wallpaper is porous). Textured wallpaper is not suitable. The coating is also isocyanate-free, low odour, and certified as a low-VOC product, so it is safe to apply and use in occupied classrooms around children.

In Home Office

The growth in remote working across the UK has increased demand for functional, design-conscious home offices. Dry erase paint for home office wall projects benefits from a clear finish because the room is usually part of the wider living space.

A coloured or feature wall can gain writable functionality without being covered in white, preserving the room's character. It also removes the need for a bulky wall-mounted board, keeping a home office looking like part of the home rather than a corporate fit-out. Smarter Surfaces Clear Whiteboard Paint is low odour and certified low VOC, making it suitable for residential application with standard ventilation.

On Glass, Partitions, and Special Surfaces

Clear whiteboard paint glass surface applications turn glass dividers and panels into writable areas while maintaining transparency and light flow. In open-plan offices and meeting rooms, this allows existing partitions to double as work surfaces. Where magnetic functionality is also required, Magnetic Whiteboard Paint Clear combines both in one invisible system.

The same transparent coating can convert an entire room into a dry erase space without any visible change, producing an invisible whiteboard paint wall effect across every surface while keeping the chosen colour scheme intact.


Application and Performance Considerations for Clear Dry Erase Wall Paint

ur content goes here. Edit or remove this text inline or in the module Content settings. You can also style every aspect of this content in the module Design settings and even apply custom CSS to this text in the module Advanced settings.

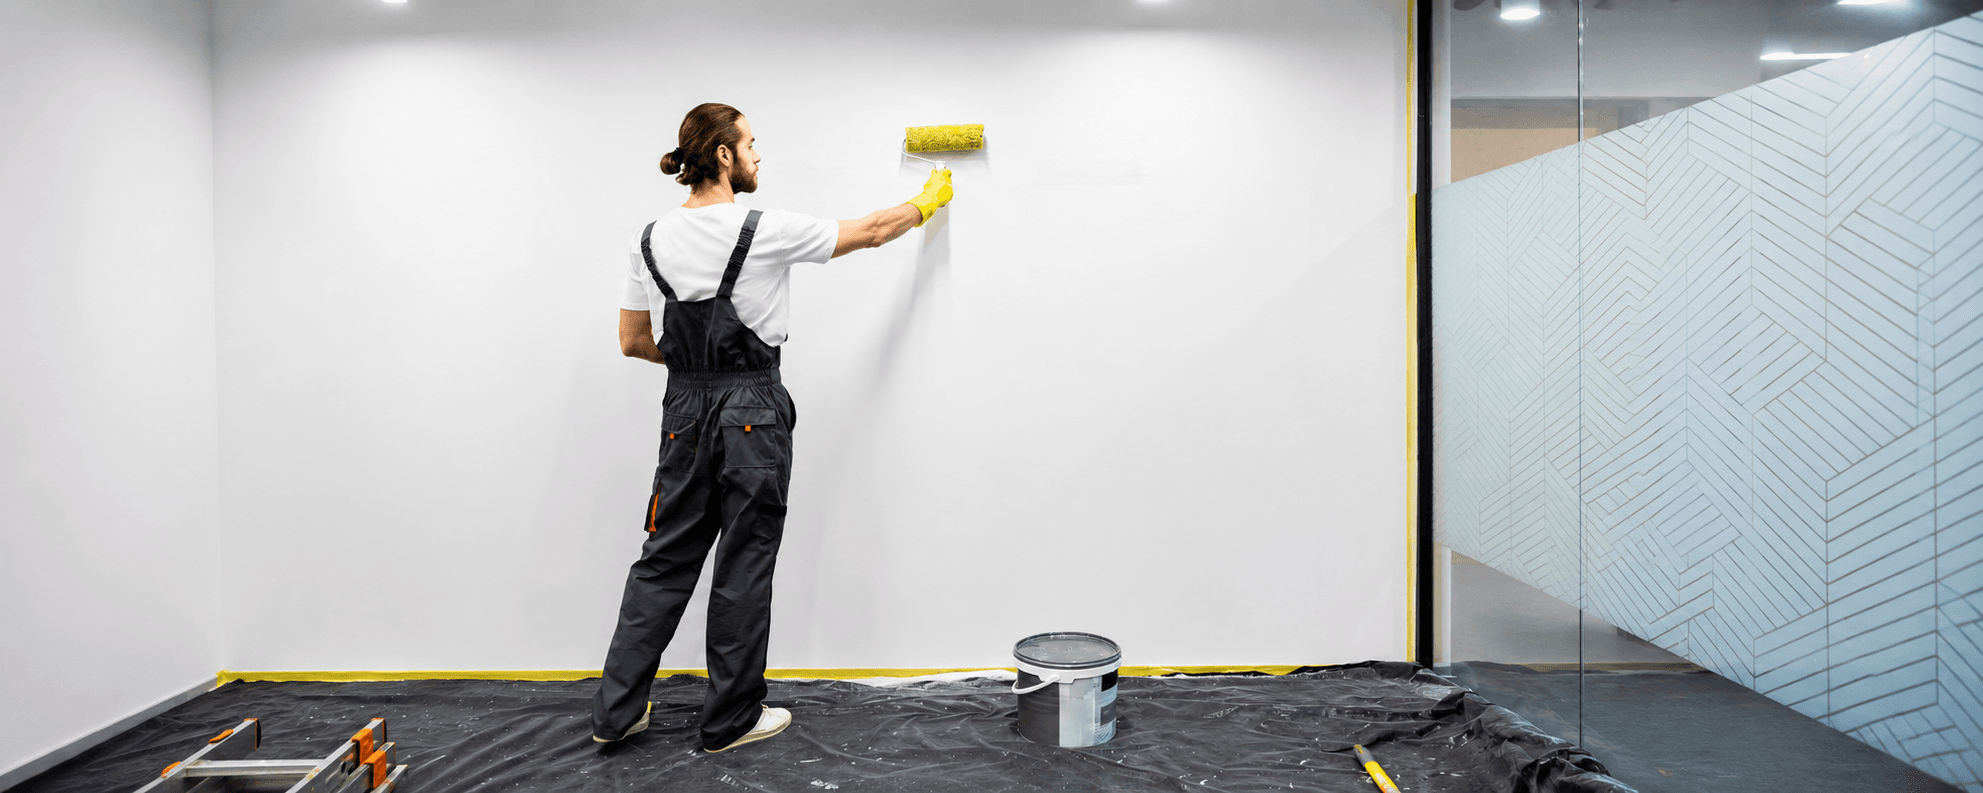
Decorator applying clear dry erase wall paint to a white wall with a roller, with masking tape, floor protection sheets and a paint tub in place.

Application requirements for clear whiteboard paint vary by surface. On a painted coloured wall, no primer is usually needed, while absorbent surfaces require priming first. The guidance below covers coats, cost, and how to prevent ghosting.

How Many Coats of Paint and Primer are Required?

One coat of clear whiteboard paint is sufficient to create a full dry erase surface. Any of our whiteboard paints, whether the transparent version or any other type, must be applied very carefully. It is important to avoid over-applying the product. The recommended coverage rate for the specified area and dimensions should always be followed.

Applying too much product, either by using more coats than recommended or by applying a thicker coat, can negatively affect the final finish and the performance of the whiteboard surface.

The surface must be fully smooth before application. Any texture, imperfections, or rough areas will affect both the finish quality and the performance of the dry erase coating.

If the surface is not smooth or there is fresh plaster then apply white primer with ideal 1-2 coats (to seal the surface to and make it non absorbent). You can use clear primer if you want the same finish surface or wall.

H3- Clear Whiteboard Paint Cost Per Square Metre

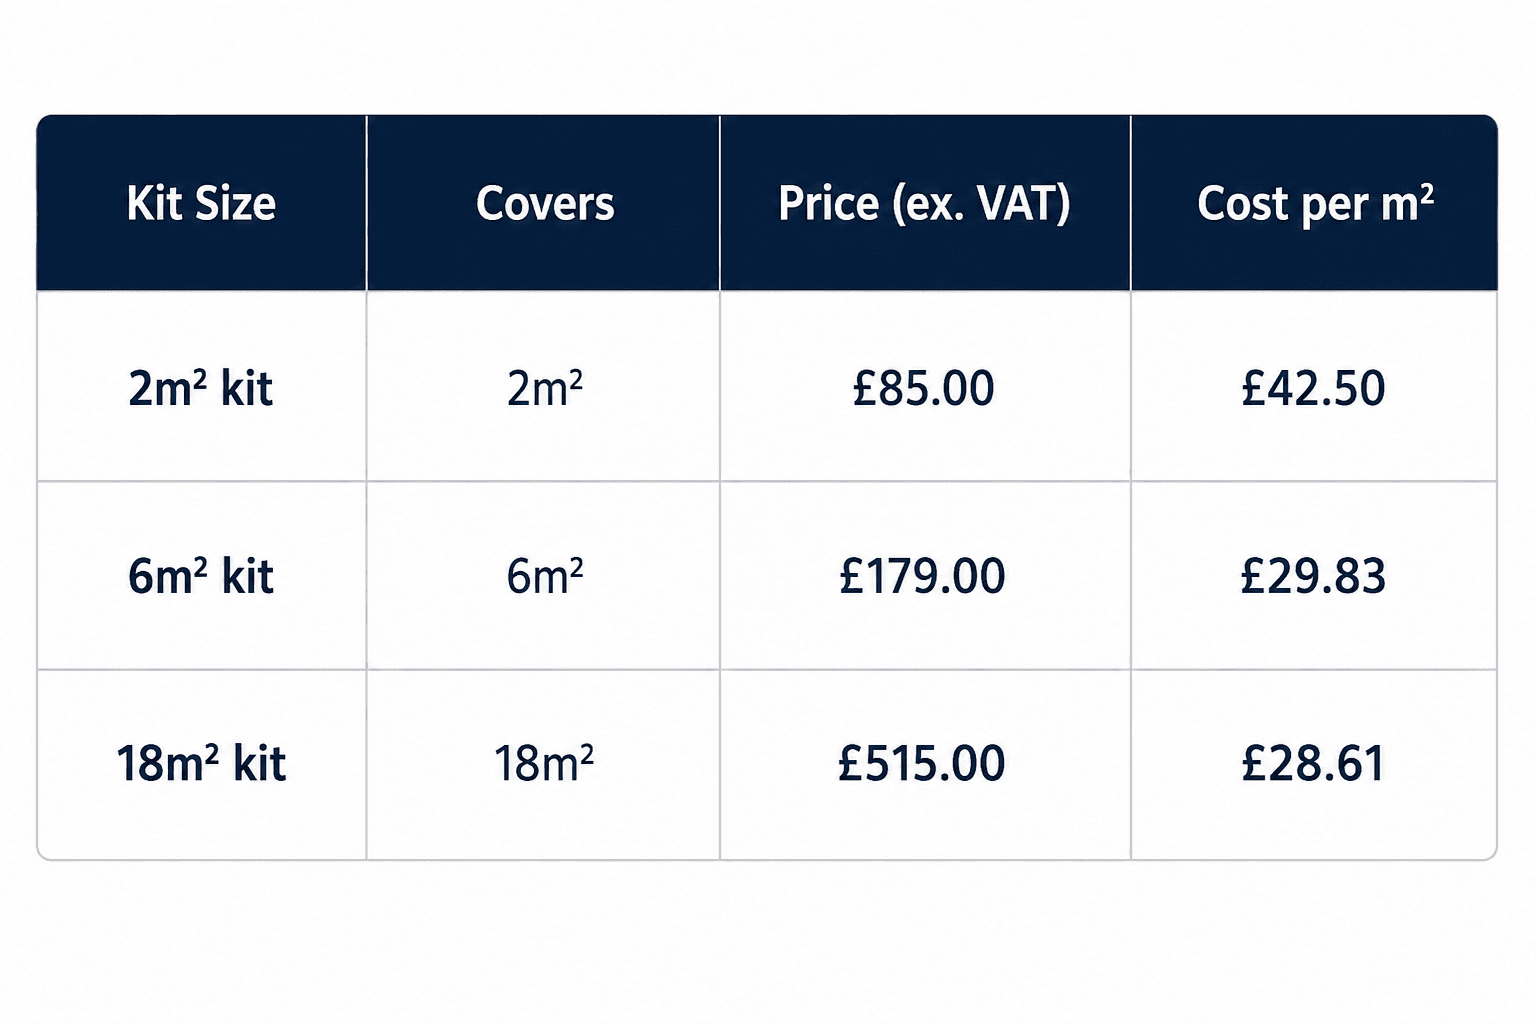
Clear whiteboard paint cost per square metre varies depending on the kit size you choose, and larger kits work out cheaper per square metre. Before ordering, it helps to measure your surface: to find the area in square metres, simply multiply the width by the height in metres. A wall that is 2 metres wide and 3 metres high, for example, covers 6 square metres (2 x 3 = 6).

Smarter Surfaces Clear Whiteboard Paint is available in three kit sizes to suit everything from small feature walls to commercial projects. The table below shows the price and cost per square metre for each. All prices are ex. VAT.

As the table shows, the cost per square metre falls as the kit size increases, so the 18m² kit offers the best value for larger installations. If your surface falls between two sizes, choose the next kit up to ensure full coverage, as one even coat is needed across the whole area. For current pricing, primer options, and coverage details, see the clear whiteboard paint product page.


How to Avoid Whiteboard Paint Ghosting?

Whiteboard paint ghosting, the faint residue left by markers after wiping, is a performance concern that can be avoided through correct application and maintenance. Key steps to prevent ghosting include:

  • Applying the paint to a fully smooth surface, using Smarter Surfaces Clear Primer first on absorbent surfaces such as natural wood or polished concrete. Drying time takes 2-4 hours between coats and 12 hours after the final coat has been applied.
  • Only after 12 hrs apply the paint and let it sit for some time. The paint will be touch dry after five hours
  • Allowing full four-day cure period before use. The cure period allows the two-part coating to fully cross-link and harden. Writing on the surface before this point, even if it feels touch-dry, is the most common cause of premature ghosting and marker staining
  • Using high-quality dry erase markers rather than permanent markers
  • Cleaning the surface daily during the first 30 days using the supplied microfibre cloth
  • Using a standard whiteboard cleaning spray for regular maintenance, and Smarter Surfaces Permanent Ink Remover for stubborn marks

Smarter Surfaces Clear Whiteboard Paint is specifically formulated to resist ghosting and staining, provided these guidelines are followed consistently.

Order Smarter Surfaces Clear Whiteboard Paint today and create a high-performance writable surface that preserves your wall's colour and design.

Conclusion

Knowing when to use clear whiteboard paint comes down to one straightforward question: does the existing wall colour or design need to be preserved? If yes, transparent whiteboard paint is the correct choice.

It delivers the same high-performance dry erase functionality as white variants, while keeping the surface appearance entirely intact. This makes it the preferred solution for branded office environments, colour-coded classrooms, design-led home offices, and specialist surfaces such as glass.

With a 10-year guarantee, independent certifications, and a formulation engineered to resist ghosting and staining, Smarter Surfaces Clear Whiteboard Pa 

Table of Contents

Turn Your Wall Into a Smarter Workspace

Upgrade your space with high-performance surface solutions built for productivity.

Try before you buy

Unsure which is the right product for you?

Then choose one of the sample pack options below to try before you buy.

Talk to an Expert

Not sure which projector paint suits your wall?

Get free advice from our surface specialists.

About Author

Sonia Bueno is Senior Manager at Smarter Surfaces, leading sales operations, customer experience, and distributor partnerships globally. With extensive experience supporting education, office, and commercial projects, she shares practical insights on whiteboard paint, magnetic paint, and functional surface solutions to help organisations make informed specification decisions

FAQ's

What surfaces work with clear whiteboard paint?

Clear whiteboard paint can be applied to walls, glass, partitions, wood, metal, and other smooth surfaces. The surface must be clean, dry, and free from imperfections before application. Rough or textured surfaces are not suitable without prior sanding and priming. The slipper surfaces such as metal or glass would always require primer.

Is clear whiteboard paint suitable for white walls?

No. Clear whiteboard paint is not recommended for white or near-white surfaces, as the transparent finish provides no visual contrast benefit in these cases. White whiteboard paint is the appropriate choice for white or light-coloured walls.

How many coats of clear whiteboard paint are needed?

One coat of clear whiteboard paint is sufficient for most surfaces. For fresh plaster and absorbent surfaces, white primer is required. If you want the finish of the coloured surface, then you can use clear primer; paint is sufficient.

Is it possible to apply whiteboard paint over wallpaper?

Yes, it's possible, but we do not recommend as our Whiteboard Paints are designed to apply over walls. If Whiteboard Paint is applied over porous wallpaper, two coats of Clear Primer should be applied first to seal the surface properly before the whiteboard paint is applied.

How do I avoid ghosting with clear whiteboard paint?

Allow the full four-day cure period before use, clean the surface daily during the first 30 days with a microfibre cloth, and use only high-quality dry erase markers. Regular cleaning with a standard whiteboard spray and the use of Permanent Ink Remover for stubborn marks will also help prevent ghosting over time.

What is the difference between whiteboard paint and whiteboard film?

Whiteboard paint vs whiteboard film comes down to permanence and scale. The paint creates a permanent coating best suited to full walls and long-term installations, backed by a 10-year guarantee, while self-adhesive film is best suited to temporary applications, smaller areas, or refurbishing old boards. Both deliver an erasable marker finish.

Will clear whiteboard paint be noticeable on my wall?

A writable wall paint with a clear finish preserves the wall's colour in full, but the coating reflects ambient light slightly differently from standard paint. It gives a glossy finish. For this reason, Smarter Surfaces recommends coating the full wall rather than a single section, so the finish looks uniform across the whole area and remains effectively invisible in day-to-day use.

What is the cost of clear whiteboard paint per m² in the UK?

Cost per square metre depends on the kit size. The 2m² kit is £85.00 (£42.50/m²), the 6m² kit is £179.00 (£29.83/m²), and the 18m² kit is £515.00 (£28.61/m²), all ex. VAT. Larger kits offer a lower cost per square metre, so it is worth measuring your full surface area before choosing a kit.

Magnetic Paint for Schools: Transforming Classroom Walls

Magnetic Paint for Schools: Transforming Classroom Walls

Blog

by Author | Aug 19, 2026

Classroom walls often become crowded with notice boards, paper displays, and temporary teaching resources that quickly need replacing. Over time, drawing pins, Blu Tack, and adhesive strips can damage wall surfaces, leaving classrooms looking worn while limiting the amount of usable display space.

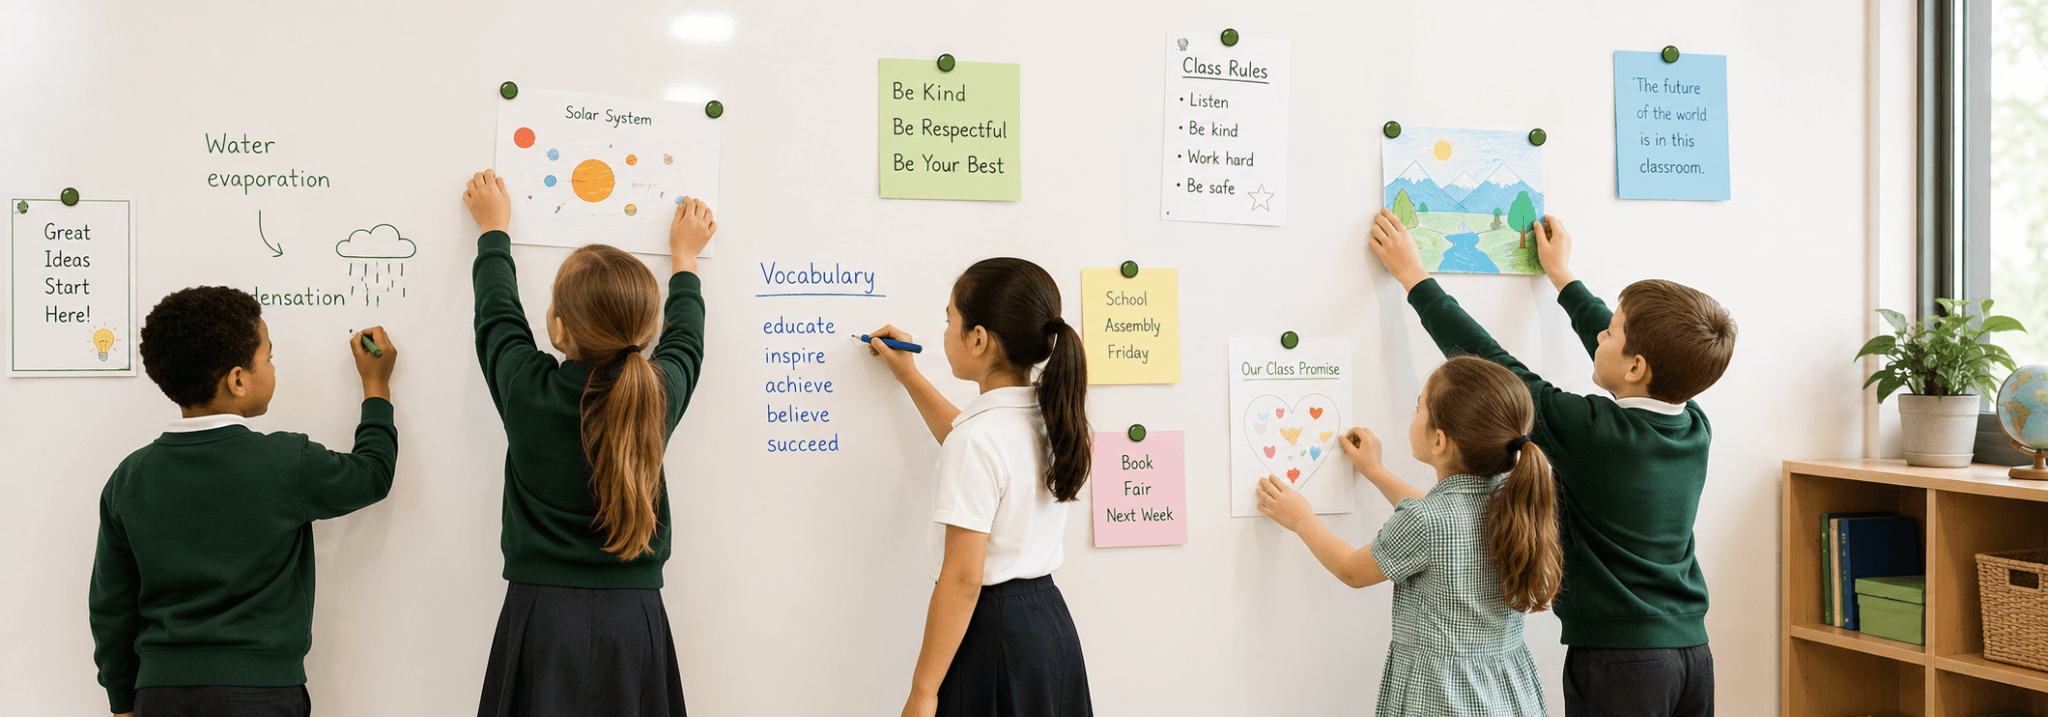
Magnetic paint for schools offers a more flexible alternative. Applied directly to smooth walls, it transforms ordinary surfaces into magnetic display areas where teachers can attach lesson resources, student work, classroom schedules, and visual learning materials using magnets. From individual display panels to full feature walls, magnetic paint helps schools make better use of existing classroom space without installing additional fixtures.

This guide explains how magnetic paint for classrooms works, where it delivers the greatest value, how it compares with other magnetic wall solutions, and how to choose the right product for different learning environments.

Why Trust This Magnetic Paint for Schools Guide

Why Schools Are Choosing Magnetic Paint

Schools are continually looking for ways to maximise teaching space without increasing classroom clutter or investing in costly building alterations. Magnetic paint provides a practical solution by converting existing walls into reusable display surfaces that support everyday teaching while preserving the appearance of the classroom.

Unlike traditional notice boards, a magnetic wall can cover an entire classroom wall or a custom-sized section. Teachers are no longer restricted to a single cork board or display rail. Instead, lesson materials, timetables, flashcards, student artwork, maps, and educational posters can be arranged across a much larger surface and repositioned whenever lessons change.

A magnetic display wall for schools also helps reduce maintenance. Walls remain free from drawing pin holes, Blu Tack residue, and adhesive marks, making classrooms easier to maintain throughout the school year. Because the magnetic layer sits beneath the final decorative finish, schools can choose colours that complement their learning environment without sacrificing functionality.

As teaching methods become increasingly collaborative, magnetic walls also encourage more interactive learning. Teachers can quickly rearrange lesson materials during class, while students can participate by moving magnets, organising ideas, and displaying their own work on the wall.

For schools planning summer refurbishments, magnetic paint provides a cost-effective classroom upgrade that continues delivering value long after installation.

What Is Magnetic Paint?

Magnetic paint is a specialist coating containing fine magnetite particles that create a magnetic surface once applied to a wall. Unlike decorative paints, its purpose is to allow magnets to securely hold lightweight classroom materials without damaging the wall.

After application, Magnetic Paint dries to a dark finish which can then be painted over using standard emulsion in almost any colour. This allows schools to maintain their preferred classroom design while adding hidden magnetic functionality beneath the decorative topcoat.

It is important to understand that magnetic paint does not create a writable whiteboard surface on its own. Schools requiring both magnetic and dry erase functionality should instead choose Magnetic Whiteboard Paint, which combines magnetic performance with a glossy whiteboard finish in a single system.

Magnetic Paint vs Magnetic Whiteboard Paint

For schools that only require a magnetic display wall, Magnetic Paint offers the simplest and most economical solution. Where teachers need to write directly on the wall as well as display resources, Magnetic Whiteboard Paint provides both functions in one surface.

Ready to upgrade your experience? Shop Smarter Surfaces’ top-rated products today.

Benefits of Magnetic Paint in Classrooms

Magnetic paint creates flexible learning environments that adapt to changing lessons, teaching styles, and classroom layouts. Rather than relying on fixed notice boards or permanent displays, schools gain a reusable magnetic surface that supports everyday classroom activities.

Create Interactive Learning Displays

An interactive magnetic wall classroom encourages teachers and students to engage directly with lesson materials. Flashcards, maps, diagrams, timelines, vocabulary cards, and mathematical resources can all be repositioned throughout the lesson without damaging walls or requiring new display boards.

Interactive activities become easier to manage because resources can be moved, grouped, and rearranged in real time to support collaborative learning.

Display Student Work Without Damaging Walls

Student artwork and project work often change throughout the school year. Magnetic paint allows teachers to refresh classroom displays quickly using magnets instead of drawing pins or adhesive strips.

This not only protects classroom walls but also gives students a dedicated space to showcase their work while making it simple to rotate displays for new topics or seasonal projects.

Support Flexible Teaching Spaces

Modern classrooms frequently change layout depending on the subject being taught. A school wall magnetic surface provides teachers with greater flexibility by allowing displays to move alongside evolving lesson plans.

Whether organising science experiments, literacy activities, history timelines, or group presentations, magnetic walls help teachers adapt their classroom without installing additional fixtures.

Reduce Classroom Clutter

Replacing multiple notice boards with one continuous magnetic surface creates a cleaner and more organised classroom. Teachers can display schedules, classroom rules, visual aids, and teaching resources on the same wall while making better use of available space.

For corridors, libraries, reception areas, and shared learning spaces, magnetic paint also provides a professional display solution that can evolve throughout the school year without leaving permanent wall damage.

How Strong Is Magnetic Paint? What Will It Hold?

Teachers often ask whether magnetic paint is strong enough for everyday classroom resources. The answer depends on the number of coats applied, the type of magnets used, and which magnetic product is selected.

Magnetic Paint creates a reliable display surface for lightweight classroom materials. Applying the recommended three coats provides enough magnetic strength for everyday teaching resources, while stronger products such as Super Magnetic Paint or Magnetic Plaster provide additional holding power for heavier displays.

Always use high-strength neodymium magnets rather than standard fridge magnets for the best performance.


What Can Magnetic Paints Hold?

Need More Holding Strength?

If your classroom displays large numbers of teaching resources or heavier learning materials throughout the year, increasing the magnetic strength is simple.

  • Magnetic Paint- ideal for everyday classroom displays.
  • Super Magnetic Paint- contains 60% magnetite and offers stronger holding power for multiple documents and magnetic accessories.
  • Magnetic Plaster- contains approximately 75% magnetite and is designed for permanent, high-capacity magnetic walls, holding 8+ A4 sheets with a suitable magnet. It is best suited to new builds and major classroom refurbishments.

Best Places to Use Magnetic Paint in Schools

Magnetic paint is suitable for far more than classroom display walls. Because it can be applied to almost any smooth wall, schools can create magnetic surfaces wherever information needs to be displayed, updated, or organised. The best location depends on how the space is used and the level of magnetic performance required.

Classrooms

A magnetic wall for classroom display gives teachers the flexibility to change resources throughout the school day. Flashcards, vocabulary cards, lesson plans, visual aids, and student work can all be attached using magnets instead of drawing pins or adhesive strips. As lessons evolve, displays can be rearranged quickly without damaging the wall surface.

Primary School Classrooms

Magnetic paint for primary school classrooms is particularly effective because younger pupils learn through interaction. Alphabet magnets, number activities, phonics resources, storytelling cards, and educational games can all be moved around the wall as part of everyday teaching.

For classrooms requiring stronger magnetic performance to support heavier learning materials, Super Magnetic Paint offers improved holding strength while retaining the same simple roller application.

School Corridors

Corridors often become display areas for student artwork, certificates, photographs, and school announcements. A magnetic wall provides a cleaner alternative to traditional notice boards, making it easier to refresh displays throughout the year while preventing damage caused by repeated pinning and taping.

For schools looking for the best magnetic paint for school corridor walls, Magnetic Paint provides an economical solution for lightweight displays, while Super Magnetic Paint is better suited to larger displays and heavier materials.

Staff Rooms and Administration Areas

Magnetic walls are equally valuable outside the classroom. Staff rooms benefit from organised planning boards where rotas, meeting notes, safeguarding updates, and school calendars can be displayed and updated regularly. When staff also need to write directly on the wall, Magnetic Whiteboard Paint combines magnetic functionality with a durable dry-erase surface.

Magnetic Paint vs Magnetic Whiteboard Paint vs Magnetic Wallpaper

Schools have several options when creating magnetic teaching surfaces. The right choice depends on whether teachers need magnetic functionality alone, a combined magnetic and writable surface, or a removable solution that requires minimal installation.

Which Magnetic Wall Solution Should Schools Choose?

For schools that only need a magnetic display wall, Magnetic Paint remains the most cost-effective option. Once painted over in the desired colour, it blends seamlessly into the classroom while providing a practical surface for displaying teaching resources and student work.
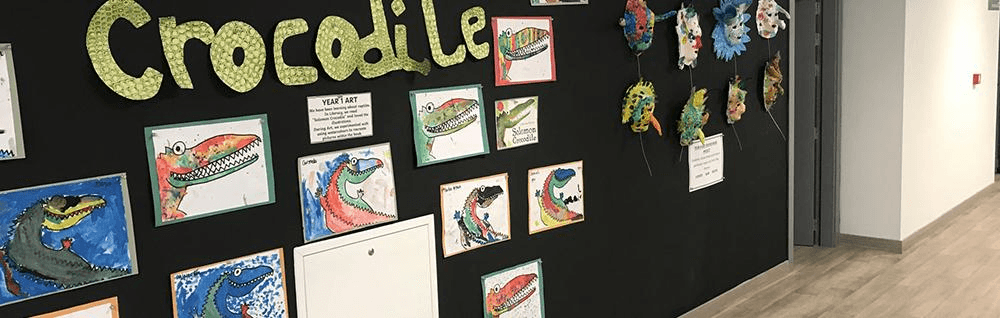
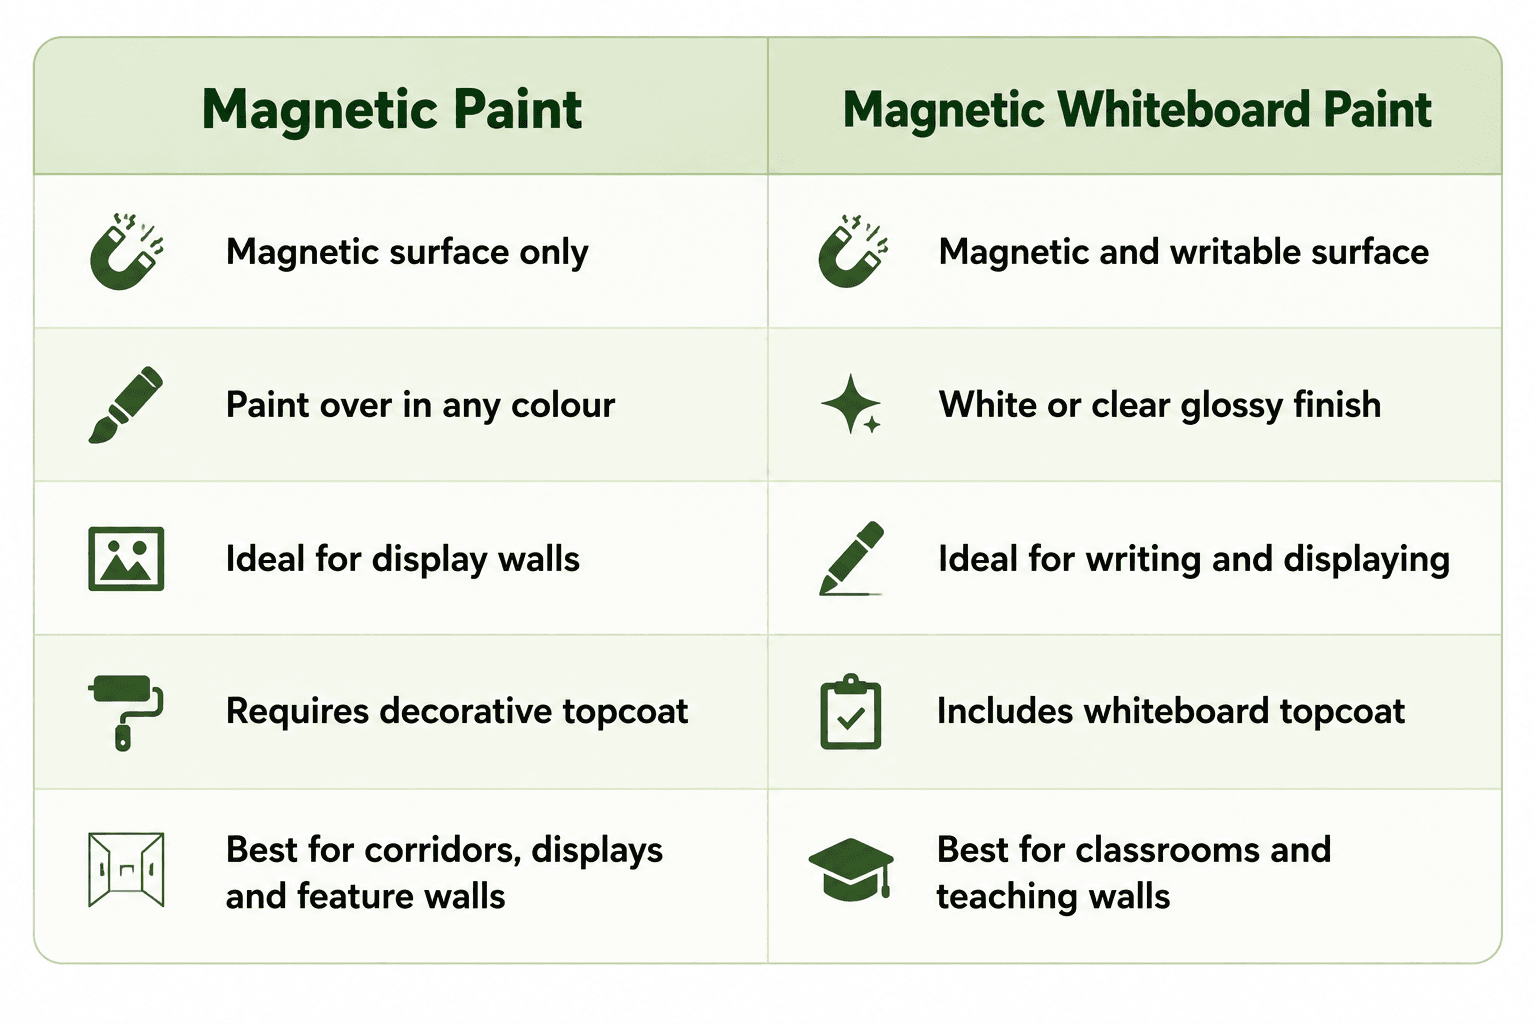
Magnetic Whiteboard Paint is the preferred solution for most classrooms because it combines two functions in one wall. Teachers can write directly on the surface while also using magnets to display worksheets, posters, and visual learning materials. This reduces the need for separate whiteboards and notice boards, making better use of classroom wall space.

Magnetic Whiteboard Wallpaper is best suited to temporary installations or projects where painting is not practical. It installs quickly, requires no magnetic paint application, and provides a convenient magnetic display surface that can be removed when required.

For schools requiring the strongest magnetic performance, Super Magnetic Paint offers increased magnetite content and greater holding strength than standard Magnetic Paint, making it suitable for display-heavy classrooms and specialist teaching environments.

How to Paint a Magnetic Wall in a Classroom

How to paint a magnetic wall in a classroom, showing wall preparation, stirring paint, applying coats, and using magnets

Step 1. Prepare the Wall

Begin with a clean, smooth, and dry surface. Remove dust, grease, flaking paint, and any loose material before starting. Highly absorbent or newly plastered walls should be primed according to the product instructions to create an even surface for the magnetic paint.

Step 2. Stir Thoroughly Before Every Coat

Magnetite particles naturally settle at the bottom of the container. Stir the paint thoroughly before application and again before every subsequent coat to ensure the magnetic particles are evenly distributed throughout the paint.

Skipping this step is one of the most common reasons for reduced magnetic performance.

Step 3. Apply the Recommended Number of Coats

Apply a minimum of three coats using a short-pile roller, allowing approximately 2 hours drying time between coats. Each additional coat increases the concentration of magnetite on the wall, improving magnetic strength.

Schools planning to display heavier classroom resources should consider 4 coats of Super Magnetic Paint, which contains a higher concentration of magnetic particles and provides stronger holding power.

Step 4. Apply the Decorative Finish

Once the magnetic paint has dried, the surface can be painted over using a standard water-based emulsion in almost any colour. Keeping the decorative topcoat thin helps maintain the magnetic performance of the wall.

Step 5. Allow the Surface to Dry Before Use

After completing the magnetic coats and any decorative finish, allow the surface to cure for at least 24 hours before attaching magnets or displaying classroom materials. Following the recommended curing time helps achieve the strongest possible magnetic performance.

View the Magnetic Paint application guide for step-by-step installation advice.

How Many Coats of Magnetic Paint Does a Classroom Need?

The number of coats directly affects the strength of the magnetic surface. While three coats provide reliable performance for everyday classroom displays, additional coats improve the wall's ability to hold heavier learning materials.

Is Magnetic Paint Safe for School Use?


Safety is an important consideration when specifying products for schools. Magnetic Paint has been developed for indoor environments and is suitable for classrooms, corridors, libraries, offices, and other educational spaces when applied according to the manufacturer's instructions.

Smarter Surfaces Magnetic Paint is formulated to be:

  • Low VOC
  • Solvent free
  • Isocyanate free
  • Suitable for indoor educational environments

The product is independently certified by recognised testing organisations, including Eurofins Indoor Air Comfort (M1) and BTTC fire certification, giving schools confidence when specifying magnetic wall solutions for occupied buildings.

During application, classrooms should be well ventilated in accordance with the product instructions. Once fully dry, the surface becomes a durable magnetic wall suitable for everyday educational use.

Choosing the Right Magnetic Wall Solution for Your School

The best magnetic wall solution depends on how the space will be used, the strength of magnetic hold required, and whether teachers also need a writable surface.

For most classrooms, Magnetic Whiteboard Paint offers the best balance of functionality by combining magnetic performance with a writable surface. Where writing is not required, Magnetic Paint provides a cost-effective magnetic display wall that can be painted in any colour, while Whiteboard Paint is required for writing functionality, suitable for a staff room.

Schools requiring greater magnetic strength for heavier displays should consider Super Magnetic Paint and Magnetic Plaster for a science room or STEM lab. At the same time, temporary learning spaces benefit from the quick installation offered by Magnetic Whiteboard Wallpaper and Self Adhesive Whiteboard Film.

Schools planning fully interactive teaching environments should also consider 3-in-1 Magnetic Projector Screen Whiteboard Wallpaper. It combines a writable whiteboard surface, magnetic functionality, and a projection screen in one product, making it suitable for smart classrooms where teachers want to write, display learning resources, and project lesson content on the same wall.

What Does It Cost to Create a Magnetic Classroom Wall?

Planning a classroom refurbishment often starts with the available budget. The cost depends on the wall size, the product selected, and whether schools need a magnetic display wall, a writable surface, or both. The comparison below provides a starting point using current pricing.

Final Words

Magnetic paint is a practical way for schools to transform ordinary classroom walls into flexible teaching and display surfaces. Whether used in classrooms, corridors, libraries, or staff rooms, it helps maximise wall space while reducing the need for notice boards, drawing pins, and adhesive fixings. As teaching methods and classroom layouts continue to evolve, magnetic walls provide a reusable solution that adapts alongside changing lesson plans and student activities.

For schools that only require a magnetic display surface, Magnetic Paint offers an economical and easy-to-apply solution that can be painted over in almost any colour. When teachers also need to write directly on the wall, Magnetic Whiteboard Paint combines magnetic functionality with a durable dry-erase finish. For classrooms requiring stronger magnetic performance, Super Magnetic Paint provides increased holding strength for heavier learning materials and larger displays.

Manufactured across the UK, Ireland, and Europe, Smarter Surfaces products have been trusted by schools, educational institutions, homes, and businesses in more than 20 countries since 2009. All products carry a 10-year guarantee and are independently certified for low VOC, solvent-free, and isocyanate-free formulations, making them suitable for long-term use in educational environments.

Explore the Educators Programme for schools to access exclusive pricing, new product launches & more.

Table of Contents

Turn Your Wall Into a Smarter Workspace

Upgrade your space with high-performance surface solutions built for productivity.

Try before you buy

Unsure which is the right product for you?

Then choose one of the sample pack options below to try before you buy.

Talk to an Expert

Not sure which projector paint suits your wall?

Get free advice from our surface specialists.

About Author

Sonia Bueno is Senior Manager at Smarter Surfaces, leading sales operations, customer experience, and distributor partnerships globally. With extensive experience supporting education, office, and commercial projects, she shares practical insights on whiteboard paint, magnetic paint, and functional surface solutions to help organisations make informed specification decisions

FAQ's

What is magnetic paint for schools?

Magnetic paint for schools is a specialist coating that contains magnetite particles, allowing classroom walls to hold magnets after application. It transforms smooth walls into magnetic display surfaces where teachers can attach worksheets, posters, timetables, flashcards, and student work without using drawing pins or adhesive strips.

How many coats of magnetic paint should be applied in a classroom?

A minimum of three coats is recommended to create an effective magnetic surface. Allow approximately 2 hours drying time between coats. For classrooms displaying heavier teaching materials or larger educational resources, four coats of Super Magnetic Paint offers stronger magnetic performance than standard Magnetic Paint.

Is magnetic paint safe for school use?

Yes. Smarter Surfaces Magnetic Paint is low VOC, solvent-free, and isocyanate-free. It is independently tested for indoor air quality and is suitable for classrooms, corridors, libraries, and other educational environments when applied according to the product instructions.

Can magnetic paint be painted over?

Yes. Once the magnetic coats have dried, the surface can be painted over using a standard water-based emulsion in almost any colour. Applying a thin decorative topcoat helps preserve the magnetic performance while allowing the wall to match the classroom design.

What is the difference between Magnetic Paint and Magnetic Whiteboard Paint?

Magnetic Paint creates a magnetic display surface that can be painted in any colour but is not writable. Magnetic Whiteboard Paint combines magnetic functionality with a dry-erase finish, allowing teachers to write on the wall while displaying lesson materials with magnets.

Can magnetic paint be used on school corridor walls?

Yes. Magnetic paint is an excellent solution for school corridors where student artwork, achievement boards, school notices, and event information need to be updated regularly. It reduces wall damage caused by repeated use of drawing pins, Blu Tack, and adhesive tapes while creating a cleaner display area.

What is the best magnetic wall solution for most classrooms?

For most teaching spaces, Magnetic Whiteboard Paint provides the greatest flexibility because it combines magnetic performance with a writable surface. Schools that only need a

How to Make a Magnetic Wall: Complete DIY Guide for Homes

How to Make a Magnetic Wall: Complete DIY Guide for Homes

Blog

by prasanna hegde | Aug 17, 2026

Table of Contents

A magnetic wall can be one of the most useful surfaces in a home. A kitchen panel that holds the week's meal plan. A bedroom wall that displays artwork without a single pinhole. A home office section that keeps projects visible and organised.

Getting there is simple, but the details matter: the right product, enough coats, the right magnets, and the right sequence. Skip one of those, and the results will disappoint.

This guide covers every step: how to create a magnetic wall for the home, which product to choose for your room, how to apply it correctly, how many coats to use, and what to do if the hold is not as strong as expected.

 What Is a Magnetic Wall?

A magnetic wall is an interactive, magnet-friendly surface designed to display notes, photos, artwork, planning tools, educational resources, and business documents without Blu Tack marks, nail holes, drawing pins, or adhesive tape. It helps reduce wall damage while keeping information organised and easily accessible.

Magnetic walls are used in homes, classrooms, offices, meeting rooms, and commercial environments, where they transform unused wall space into practical display and collaboration areas. They can cover an entire wall or a smaller feature section depending on the application.

Depending on your project requirements, a magnetic wall can be created using Magnetic Paint, Magnetic Whiteboard Paint, Super Magnetic Paint, Magnetic Whiteboard Wallpaper, or Magnetic Plaster. Each solution offers different installation methods, surface finishes, and levels of magnetic strength. While paints and wallpaper are well suited to DIY home projects, Magnetic Plaster provides the strongest magnetic performance and is typically specified for professional renovations and commercial installations.

Magnetic Wall vs. Traditional Alternatives

Before choosing a magnetic wall, it helps to compare it with other popular home organisation solutions. Unlike cork boards, fridge doors, or standard notice boards, a magnetic wall creates a larger, clutter-free surface that integrates seamlessly into your decor while keeping notes, photos, reminders, and artwork organised. Magnetic Paint and Super Magnetic Paint can be painted over in virtually any colour, allowing the wall to match your existing decor while retaining its magnetic functionality. It can cover an entire wall or a custom-sized section, giving you far more flexibility than smaller magnetic surfaces.

For added functionality, Magnetic Whiteboard Paint combines magnetic performance with a durable dry-erase finish, allowing you to write, erase, and display items on the same surface. If you prefer a classic writable finish without magnetic functionality, Chalkboard Paint provides a practical alternative for creative spaces, family message centres, and children's play areas.

Which Magnetic Product Is Right for a Home DIY Project?

For most home DIY projects, Magnetic Paint or Magnetic Whiteboard Paint is the right starting point. Both are beginner-friendly, applied by roller like standard emulsion, and well-suited to kitchens, home offices, hallways, and children's bedrooms. Super Magnetic Paint is a step up if you need a stronger hold. Magnetic Whiteboard Wallpaper suits renters or anyone who cannot apply paint.

Here is how the home-friendly products compare:

If maximum magnetic strength is the priority, Magnetic Plaster is the highest-performance option. It contains approximately 75% magnetite and can hold 8+ A4 sheets with a suitable magnet, making it ideal for study rooms, home offices, and display walls. Because it requires professional plaster application, it is generally recommended during renovations or new builds rather than DIY home projects.

Ready to upgrade your experience? Shop Smarter Surfaces’ top-rated products today.

Which magnetic wall product is right for you?

For the Home

If you want a magnetic wall in a kitchen, hallway, or living space to display shopping lists, family photos, children's artwork, or reminders while matching your existing decor, Super Magnetic Paint is the recommended choice. Its stronger magnetic performance allows you to paint over the magnetic layer with your chosen interior wall colour without compromising functionality. The result is a discreet magnetic wall that blends seamlessly into your home while providing a practical surface for everyday organisation.

For a Home Office or WFH Setup

Need a space to organise tasks, calendars, meeting notes, and documents? Magnetic Whiteboard Paint creates a wall that is both magnetic and writable, making it ideal for planning and productivity without taking up desk space. The white or clear finish - which allows you to have a whiteboard and magnetic surface of the colour you choose - means   no additional topcoat is needed, and the surface is wipe-clean from day one.

For Families and Kids' Rooms

Super Magnetic Paint is the stronger option for a children's bedroom or playroom. Its higher magnetic hold keeps educational magnets, artwork, chore charts, alphabet letters, and multiple photos securely in place. A practical step up for any space that sees heavy daily use.

For Creative Spaces

Artists, designers, and hobbyists can use Magnetic Whiteboard Paint to sketch ideas, plan projects, and display inspiration boards. The combination of a writable and magnetic surface works well for visual workflows and mood boards.

For Renters and Temporary Spaces

If you cannot paint your walls, Magnetic Whiteboard Wallpaper offers a practical alternative to paint-based solutions. It creates a durable magnetic dry-erase surface without requiring whiteboard or magnetic paint, making it ideal for smooth walls and other flat or curved surfaces. With both writable and magnetic functionality, it is well suited to home offices, study spaces, and other areas where a professional, collaborative surface is needed.


How to Make a Magnetic Wall at Home with Paint: Step-by-Step

Step-by-step magnetic wall paint DIY for homeowners showing preparation, painting, curing, and neodymium magnet testing

Here is the process to create a wall using Magnetic Whiteboard Paint:

Step 1: Prepare the surface

The wall must be clean, dry, and smooth. Fill any cracks or holes and sand down rough patches. If the wall is absorbent (bare or new plaster), apply White Primer first and allow it to dry fully.

Step 2: Mask the area

Use painter's tape to mark the edges of the area you want to treat. This keeps lines clean and makes application easier.

Step 3: Stir the magnetic paint

Stir thoroughly before every coat. Iron particles settle in transit and again between coats. A thorough stir before each coat costs nothing and makes a significant difference to final performance.

Step 4: Apply the magnetic layer

Use a short-pile or mohair roller for an even, consistent coat. Apply using overlapping strokes. Work steadily. Allow the first coat to dry fully (after approximately 2 hours) before applying the next coat.

Step 5: Apply multiple coats

Plan for a minimum of three to four coats of the magnetic layer. More coats equal a stronger hold. We test every batch of Magnetic Paint at our manufacturing site for particle density: three coats consistently meet the 4+ A4 sheet specification on a properly primed wall. Four coats reliably exceed it, which is why we recommend four for the best home result.

Step 6: Apply the whiteboard topcoat

Once all magnetic coats are fully dry, apply two coats of White Primer, or continue until the black magnetic surface is completely covered. Allow the primer to dry between coats. Once the primer is dry, apply one coat of Whiteboard Paint using a brand-new roller to prevent iron particles from transferring from the magnetic coats. Allow the surface to cure fully before writing on it.

Step 7: Test with neodymium magnets

Use small neodymium (rare earth) magnets for best results. Standard ceramic fridge magnets are much weaker and will not perform reliably on a magnetic paint surface.

How Many Coats Does Magnetic Paint Need?

The number of coats you apply has the biggest impact on how well your magnetic wall performs. Each coat adds more iron particles to the surface, increasing the magnetic strength and allowing magnets to hold more securely. Rushing the coat count is the single most common reason magnetic walls underperform.Between each coat, allow the paint to dry fully (approx 2 hours) before recoating. Applying a second coat over a wet first coat traps moisture and reduces the effectiveness of both layers.

Once all magnetic coats are fully dry, apply two coats of White Primer, or continue until the black magnetic surface is completely covered. After the primer has dried, apply one coat of Whiteboard Paint using a clean, new roller to achieve a smooth, writable finish.

Allow the completed surface to cure fully before writing on it or attaching magnets. During curing, the coating chemically cross-links to form a hard, durable, wipe-clean surface 

What Magnets Work Best on a Magnetic Wall?

Neodymium (rare earth) magnets are the right choice for any magnetic wall surface. They generate significantly stronger magnetic flux than standard ferrite fridge magnets, which is why even a small neodymium magnet outperforms a much larger ceramic one. The type of magnet you use has as much impact on results as the paint itself.

Neodymium Magnets: Why They Work

Neodymium magnets generate roughly 10 to 15 times the magnetic flux of standard ferrite (ceramic) fridge magnets per cubic centimetre. That is why a 5mm neodymium magnet holds notes that a much larger fridge magnet will not.

Small neodymium magnets hold notes, photos, and lightweight accessories with ease. Larger neodymium magnets can hold heavier items such as document folders and lightweight clipboards. If you have tested your wall with a standard fridge magnet and it slips, switch to neodymium magnets before drawing any conclusions about the paint.

How Magnetic Paint Works with Neodymium Magnets

Magnetic paint is engineered specifically to work with neodymium flux strength. The iron particles embedded in each coat create a receptive surface that responds to the pull of rare-earth magnets. With standard ferrite fridge magnets, the surface is capable of far more hold than the magnet can deliver. This is why magnet type is the first thing to check if your magnetic wall is underperforming, before adding more coats or repainting.


Magnetic Wall Ideas for Every Room

Magnetic wall ideas for the kitchen, kids' bedroom, home office, and living room in a modern home

A magnetic wall adds practical value across almost every room in a home. The right product depends on the room, how heavily the surface will be used, and whether a writable finish is also needed. Kitchens and home offices suit Magnetic Whiteboard Paint. Kids' bedrooms benefit from Super Magnetic Paint. Hallways and living rooms are where Magnetic Whiteboard Wallpaper works best.

Magnetic Wall Kitchen

Instead of covering the fridge with notes and magnets, create a dedicated family organisation space for meal plans, shopping lists, weekly schedules, recipes, and children's school reminders. Everything stays visible, organised, and easy to update while reducing everyday kitchen clutter.

Apply Magnetic Paint or Magnetic Whiteboard Paint on a panel next to the fridge or on a dedicated wall section. The white or clear finish of Magnetic Whiteboard Paint makes the surface both magnetic and wipe-clean, which suits a kitchen environment well.

A typical kitchen magnetic wall panel is between 1 and 2 square metres. Magnetic Paint is available in 3m² and 9m² kits, and each kit already includes all the coats needed for its stated coverage. For a 1 to 2m² kitchen panel, the 3m² kit covers the full three-coat application with paint to spare for touch-ups. A 6m² Super Magnetic Paint kit covers a 2m² panel with the full three-coat application, leaving enough for touch-ups.

Magnetic Wall for Kids' Bedroom

A magnetic wall for kids creates an interactive, creative space that grows with them. As children grow, the same wall easily evolves from displaying alphabet magnets and artwork to organising homework, revision notes, creative projects, and personal achievements, without needing to redecorate. It also encourages more screen-free creativity by giving children a dedicated space to draw, display artwork, organise learning activities, and showcase their favourite creations.

To create a writable planner or creative wall, Magnetic Whiteboard Paint is the best choice. It combines magnetic functionality with a smooth dry-erase surface, and the Clear Whiteboard Paint option allows you to preserve your chosen wall colour while adding both writable and magnetic functionality. This makes it an excellent choice for children's bedrooms where the decor can remain colourful and personalised.

If you prefer a traditional chalk writing surface, Super Magnetic Chalkboard Paint combines magnetic functionality with a durable chalkboard finish, giving children a space to draw with chalk while displaying artwork, photos, and learning materials using magnets. All Smarter Surfaces magnetic paints are low-VOC, solvent-free, and isocyanate-free, making them suitable for use in children's bedrooms.

Magnetic Wall Home Office

A magnetic whiteboard wall transforms a home office into a more organised and productive workspace. Instead of relying on a small desktop whiteboard or a separate pinboard, you can create a large writable and magnetic surface for planning projects, brainstorming ideas, tracking tasks, and displaying important documents. A typical home office feature wall is between 1.5 and 2.5 square metres, making it easy to create a dedicated planning area without taking up additional floor space.

Magnetic Whiteboard Paint is the best choice for most home offices because it combines a smooth dry erase surface with magnetic functionality in one system. Write notes, calendars, and project plans directly on the wall while using magnets to display reference sheets, reminders, or lightweight documents. The Clear Whiteboard Paint option also allows you to preserve your existing wall colour, helping the workspace blend seamlessly with your home décor.

Like all Smarter Surfaces products, Magnetic Whiteboard Paint is low VOC, solvent-free, and isocyanate-free, making it well suited to home offices where people spend long hours working indoors.

This aligns much better with how people actually use home office walls and subtly promotes the Clear option, which is a strong homeowner benefit.

Living Room or Hallway

A small magnetic panel in a hallway can become the family's central communication hub using magnetic plaster. It is suitable for calendars, invitations, appointment reminders, shopping lists, spare keys on magnetic hooks, and weekly schedules so everyone knows what's happening at a glance.

For renters or anyone who cannot paint walls, Magnetic Whiteboard Wallpaper is the practical alternative. Because it removes cleanly, renters can personalise their living space without worrying about damaging walls or losing their deposit when it's time to move out. It holds light magnetic items and cards, making it a good low-commitment option for a feature wall or hallway panel.

Whether you're organising a busy family kitchen, encouraging creativity in a child's bedroom, or building a more productive home office, a magnetic wall adapts as your needs change, making it a practical investment for years to come.

Common Magnetic Wall Mistakes Homeowners Should Avoid

Magnetic paint not working tips showing homeowner mistakes like skipping primer, poor stirring, incorrect roller use, & more

1. Skipping the Stir

Iron particles settle to the bottom of the tin between coats. Skipping the stir before each coat is the most common single cause of inconsistent magnetic hold that our team sees. A thorough stir before every application takes under a minute and directly affects how evenly the iron particles distribute across the surface.

 2. Recoating Before the Previous Layer Has Dried

Applying a second coat over a wet first coat traps moisture, reduces the adhesion of both layers, and weakens the finished surface. Each coat must be fully dry before the next one goes on. Rushing this step does not save time: it typically means the whole job needs to be redone.

3. Applying the Topcoat Too Early

The magnetic layer must be fully dry before applying two coats of White Primer, or until the black magnetic surface is completely covered. Once the primer has dried, apply one coat of Whiteboard Paint. Applying the primer or whiteboard topcoat too early can trap residual moisture, affecting both the magnetic performance and the quality of the writable surface. Allow the completed system to cure fully before use.

 4. Using the Wrong Roller or a Used Roller for the Topcoat

Use a short-pile or mohair roller for the magnetic layer. For the whiteboard topcoat, always use a brand-new roller. A roller that has been used for the magnetic paint will carry iron particles that transfer to the topcoat and leave marks in the finished surface.

5. Skipping Primer on Absorbent Walls

Bare plaster, new plaster, or any highly absorbent surface will soak up the magnetic paint before it can form a proper layer. Apply White Primer first and allow it to dry fully. This creates a sealed base that allows the magnetic layer to sit correctly and perform as intended. This is particularly important on newly plastered walls, which can look dry on the surface while still drawing moisture from below.


 Magnetic Paint Not Holding? Here's What to Check

Magnetic paint not holding magnets is almost always caused by one of a small number of fixable issues. The most likely cause is the magnet type, not the paint. Switch to neodymium magnets first, before anything else. Work through this checklist before repainting:

Wrong Magnet Type

Standard fridge magnets are ferrite (ceramic) magnets with very low pull strength. They will not perform reliably on any magnetic paint surface, regardless of how many coats were applied. Replace them with neodymium (rare earth) magnets. Even small neodymium magnets will hold notes, photos, and lightweight accessories on a correctly applied magnetic surface.

Too Few Coats

Three coats are the minimum. Four is better. If only one or two coats were applied, add further coats over the existing surface once it has dried, without sanding back.

Wet Recoating

If coats were applied before the previous one had dried fully, moisture was trapped between layers. This reduces the effective iron particle density and weakens the magnetic hold. Allow future coats to dry completely before recoating.

No Primer on an Absorbent Surface

On bare or new plaster, unpainted masonry, or any highly absorbent wall, the magnetic paint is absorbed before it can form a proper layer. Apply White Primer, allow it to dry fully, then recoat with the magnetic layer.

Edge Effect at Corners

Holding strength is typically weaker at the very edges and corners of a painted area. This is a normal characteristic of any applied coating: the layer thins slightly at masked edges. For best results, keep magnet placement toward the centre of the painted section.


Final Words

Knowing how to make a magnetic wall opens up practical possibilities in almost any room. The process is manageable for most home DIY projects: prepare the surface correctly, stir before every coat, apply four coats of magnetic paint, use neodymium magnets, and allow a few days before writing on the surface.

For a wall that is both magnetic and writable, Magnetic Whiteboard Paint is the primary recommendation for home use. For a stronger hold in a busy home office or active kids' bedroom, Super Magnetic Paint is a straightforward step up. For renters, Magnetic Whiteboard Wallpaper removes the need to paint entirely.

Manufactured in the UK using high-quality raw materials, Smarter Surfaces products have been trusted by homeowners, schools, and businesses in more than 20 countries since 2009. Every product carries a 10-year guarantee to deliver long-lasting performance. They are independently certified by Eurofins (M1 / Indoor Air Comfort) and BTTC (fire-certified, 2018) for low-VOC, solvent-free, and isocyanate-free formulations, suitable for indoor spaces.

Table of Contents

Turn Your Wall Into a Smarter Workspace

Upgrade your space with high-performance surface solutions built for productivity.

Try before you buy

Unsure which is the right product for you?

Then choose one of the sample pack options below to try before you buy.

Talk to an Expert

Not sure which projector paint suits your wall?

Get free advice from our surface specialists.

About Author

Sonia Bueno is Senior Manager at Smarter Surfaces, leading sales operations, customer experience, and distributor partnerships globally. With extensive experience supporting education, office, and commercial projects, she shares practical insights on whiteboard paint, magnetic paint, and functional surface solutions to help organisations make informed specification decisions

FAQ's

Can I paint over magnetic paint with any colour?

Yes. Magnetic Paint and Super Magnetic Paint are designed to be painted over with your preferred wall colour once the magnetic layer has fully dried. This allows you to match existing décor without affecting magnetic performance, as the magnetic layer remains underneath the decorative topcoat.

Can I write directly on magnetic paint?

Standard Magnetic Paint is not writable by itself. If you need a surface that is both magnetic and writable, choose Magnetic Whiteboard Paint. It combines magnetic functionality with a durable dry-erase finish in one system, creating a surface suitable for writing notes, planning, brainstorming, and displaying documents with magnets.

Why is my magnetic paint not holding magnets?

Magnetic paint usually underperforms because of one of four common issues rather than the paint itself. The most frequent cause is using standard fridge magnets instead of stronger neodymium magnets. Too few magnetic coats, insufficient drying time between coats, or skipping primer on absorbent walls can also reduce holding strength. Before repainting, check each of these factors, as most magnetic performance issues can be corrected without starting over.

Is magnetic plaster also suitable for home use?

Magnetic plaster is a high-performance product designed for schools, meeting rooms, and commercial installations. It requires plastering experience to apply and is not recommended for home DIY projects. For home use, Magnetic Paint, Magnetic Whiteboard Paint, and Super Magnetic Paint are the right options.

How much does it cost to make a magnetic wall?

H3 - How much does it cost to make a magnetic wall?

The cost depends on the size of the wall and the product you choose. A small kitchen or home office panel costs significantly less than covering an entire wall. Magnetic Paint is the most economical option, while Magnetic Whiteboard Paint combines magnetic performance with a writable finish. Choosing the correct kit size helps reduce waste and ensures enough coats for the best magnetic strength.

How long does magnetic paint take to dry?

Allow 2 hours between each coat of Magnetic Paint. Once the final magnetic coat has been applied, wait 24 hours before applying two coats of White Primer, or until the black magnetic surface is completely covered. Once the primer has dried, apply one coat of Whiteboard Paint if you require a writable surface. Following the recommended drying and curing times helps ensure maximum magnetic performance and a durable, long-lasting finish.

Is magnetic paint safe for children's bedrooms?

Yes. Smarter Surfaces magnetic paints are low-VOC, solvent-free, and isocyanate-free, making them suitable for indoor spaces including children's bedrooms, playrooms, home offices, and kitchens. Once fully cured, they provide a durable surface for everyday family use.

Smarter Surfaces
Privacy Overview

This website uses cookies so that we can provide you with the best user experience possible. Cookie information is stored in your browser and performs functions such as recognising you when you return to our website and helping our team to understand which sections of the website you find most interesting and useful.