Ultra Short Throw Projector Screen Paint: The Complete Guide
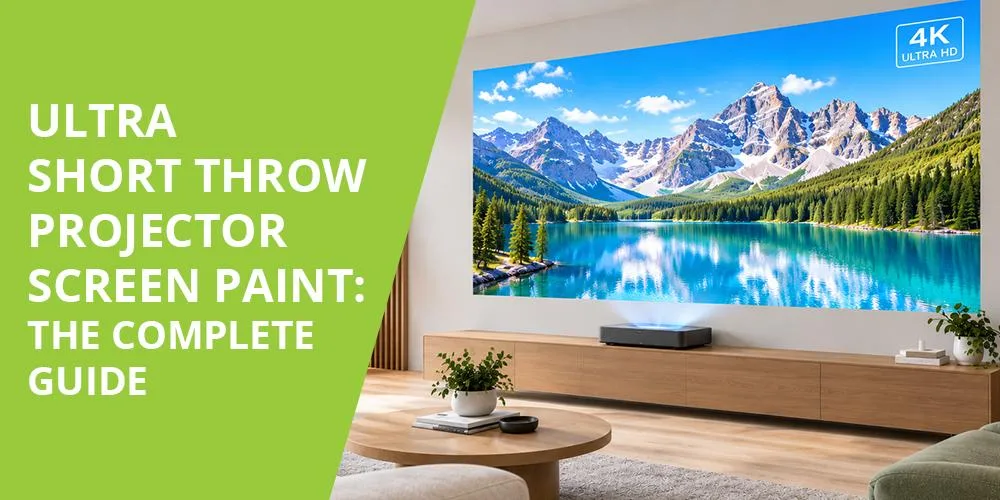
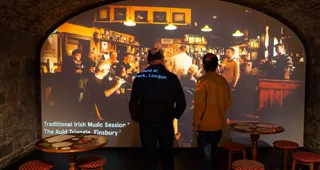
The ultra short throw projector screen paint is creating a seamless 4K home cinema wall with a UST projector.

Ultra short throw projectors have changed how people design home cinemas, offices, classrooms, and meeting rooms. Positioned just a short distance from the wall, they eliminate long cable runs while producing large, high-quality images from compact spaces.

However, image quality depends on more than the projector itself. Even a premium UST projector cannot perform at its best when projecting onto an ordinary painted wall. Surface texture, uneven colour, poor reflectivity, and ambient light all reduce contrast, colour accuracy, and image sharpness.

Ultra Short Throw Projector Screen Paint provides a purpose-built projection surface designed specifically for UST projection. Unlike standard wall paint, it creates a smooth, high-performance screen that delivers brighter images, better colour reproduction, and improved detail while maintaining the clean appearance of a painted wall.

This complete ultra short throw projector screen paint guide explains what Ultra Short Throw Projector Screen Paint is, how it works, how it compares with projector screens and ALR screens, and how to choose the right solution for your space.


 Why Trust This Ultra Short Throw Projector Screen Paint Guide

What Is Ultra Short Throw Projector Screen Paint?

Ultra Short Throw Projector Screen Paint is a specialist projection coating engineered for projectors positioned only a few centimetres from the projection surface. Unlike conventional projector paints or ordinary emulsion, it creates an ultra-smooth finish that reflects projected light evenly across the viewing area.

Because UST projectors project at an extremely steep angle, even small imperfections on the wall become much more noticeable. Surface texture, roller marks, or inconsistent finishes can distort the image and reduce overall picture quality. A dedicated 4K UST projector screen paint minimises these issues by creating a uniform projection surface that helps preserve image sharpness and colour accuracy.

Unlike a fixed projector screen, projector screen paint transforms the wall itself into the screen. Once applied, there are no frames, visible borders, or permanently mounted screens, allowing the projection surface to blend seamlessly into modern interiors.

For homeowners, businesses, education, and commercial spaces, this approach creates a clean installation while delivering professional projection performance.

Find the right Ultra Short Throw Projector Screen Paint for your projector setup.


Why Ultra Short Throw Projectors Need a Special Surface

Ultra short throw projectors behave differently from standard long throw projectors. Instead of projecting across several metres, they sit close to the wall and project upwards at a very steep angle. This unique projection path makes the quality of the projection surface significantly more important.

A standard painted wall often appears smooth when viewed normally, but under UST projection, tiny bumps, roller texture, and surface imperfections become amplified. These irregularities scatter light unevenly, reducing image clarity and creating visible distortion across the picture.

Using a purpose-designed UST projector screen paint helps overcome these challenges by providing:

  • A smoother projection surface for improved image sharpness
  • More consistent brightness across the entire image
  • Better colour accuracy
  • Improved perceived contrast
  • Enhanced 4K and high-resolution detail
  • Professional appearance without installing a fixed screen

For users investing in premium laser projectors or Laser TVs, choosing the correct projection surface is often just as important as selecting the projector itself.

Benefits of Ultra Short Throw Projector Screen Paint
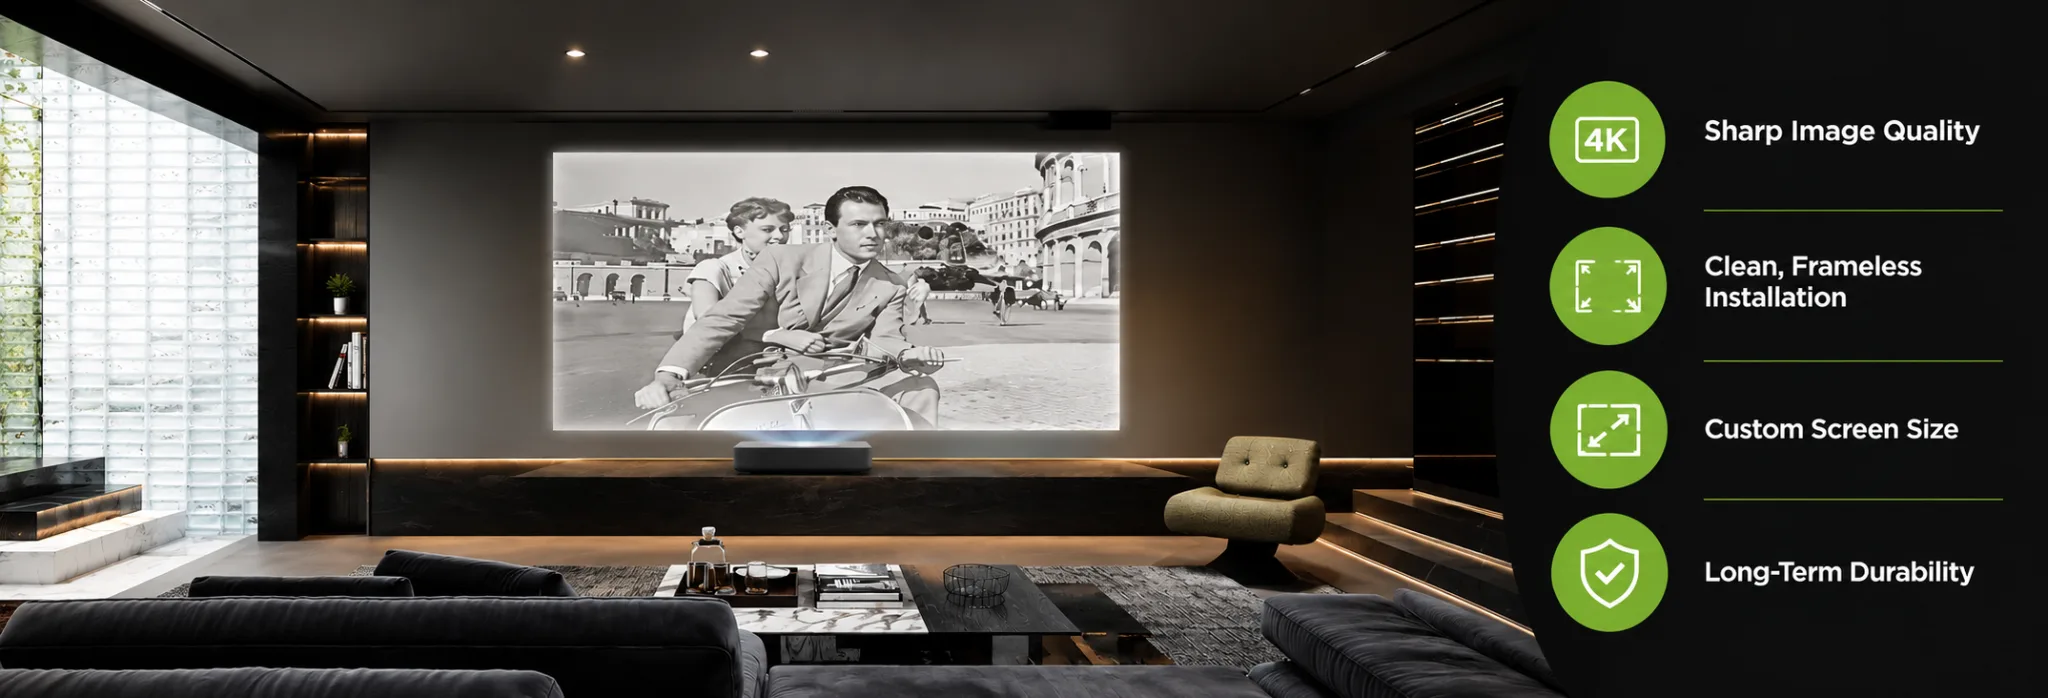
Ultra Short Throw Projector Screen Paint delivers more than a simple decorative finish. It improves projection quality while giving users greater flexibility than traditional projection screens.

Designed Specifically for UST Projection

Unlike standard projector paints, UST projector screen paint has been formulated to perform with the steep projection angle created by ultra short throw projectors. This helps maintain image consistency across the entire screen area while reducing visible distortion caused by uneven wall surfaces.

Excellent 4K Image Performance

Modern UST projectors support Full HD, 4K, and increasingly 8K-compatible content. A smooth projection surface allows these higher resolutions to be displayed with greater clarity, preserving fine image detail without interference from wall texture.

Clean, Minimalist Installation

Traditional projector screens remain permanently visible even when not in use. Projector screen paint transforms the wall itself into the projection surface, maintaining a clean architectural appearance that integrates naturally into homes, offices, classrooms, and meeting spaces.

Flexible Screen Sizes

Unlike fixed screens, projector screen paint is not restricted to standard screen dimensions. Users can create projection surfaces that match the exact wall size and projector requirements, whether installing a 90-inch display in a meeting room or a full home cinema wall.

Long-Term Value

A painted projection surface requires no mechanical housing, retractable components, or frame installation. Once correctly applied, it provides a durable projection surface suitable for years of everyday use while reducing the visual impact of traditional projection screens.

Table of Contents

Turn Your Wall Into a Smarter Workspace

Upgrade your space with high-performance surface solutions built for productivity.

Try before you buy

Unsure which is the right product for you?

Then choose one of the sample pack options below to try before you buy.

Talk to an Expert

Not sure which projector paint suits your wall?

Get free advice from our surface specialists.

About Author

Sonia Bueno is Senior Manager at Smarter Surfaces, leading sales operations, customer experience, and distributor partnerships globally. With extensive experience supporting education, office, and commercial projects, she shares practical insights on whiteboard paint, magnetic paint, and functional surface solutions to help organisations make informed specification decisions

Ready to upgrade your experience? Shop Smarter Surfaces’ top-rated products today.

Ultra Short Throw Projector Screen Paint vs Bare Wall

Many people initially project directly onto a painted wall, assuming it will produce similar results to a dedicated projection surface. While this may be acceptable for occasional viewing, it rarely delivers the image quality expected from today's Ultra Short Throw projectors.

A standard emulsion wall is designed for decoration, not image projection. Even walls that appear smooth often contain small imperfections, roller texture, or inconsistent paint finishes. Because Ultra Short Throw projectors cast light at a very shallow angle, these imperfections become much more visible, reducing sharpness and creating uneven brightness across the image.

Ultra Short Throw Projector Screen Paint is specifically engineered to overcome these limitations. It creates a smoother, more uniform projection surface that improves image clarity, colour accuracy, and overall viewing performance while preserving the clean appearance of a painted wall.

UST Projector Screen Paint vs Bare Wall
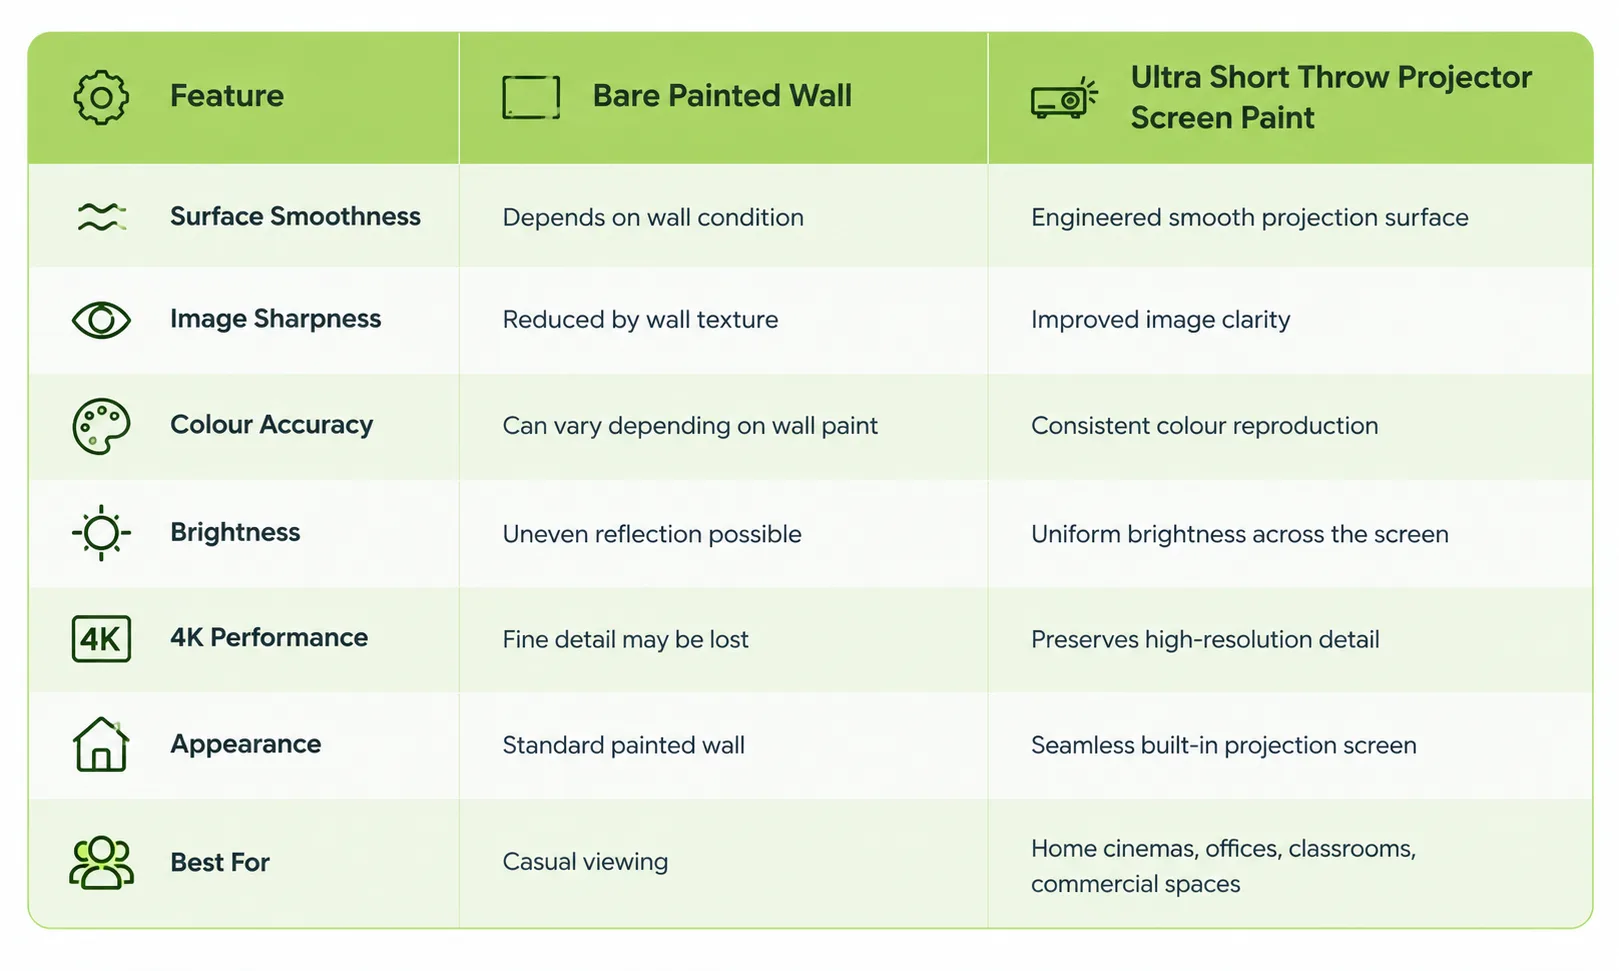
For anyone investing in a premium Laser TV or Ultra Short Throw projector, the projection surface becomes part of the viewing system. Choosing a purpose-built projector screen paint helps maximise projector performance without installing a permanent projector screen.

Ultra Short Throw Projector Screen Paint vs ALR Screen

Ambient Light Rejecting (ALR) screens are often recommended alongside Ultra Short Throw projectors because they help reduce the effects of room lighting. However, they are not the only solution. Ultra Short Throw Projector Screen Paint offers a different approach that prioritises a seamless installation while still delivering excellent projection performance.

An ALR screen uses multiple optical layers to direct projected light towards the viewer while reducing some ambient light from windows or room lighting. These screens typically include a rigid frame and fixed screen size, making them popular for dedicated home cinema installations.

Ultra Short Throw Projector Screen Paint transforms the wall itself into the projection surface. Instead of mounting a visible screen, the painted wall becomes an integrated part of the room, creating a cleaner aesthetic while allowing greater flexibility over screen size.

Ultra Short Throw Projector Screen Paint vs ALR Screen
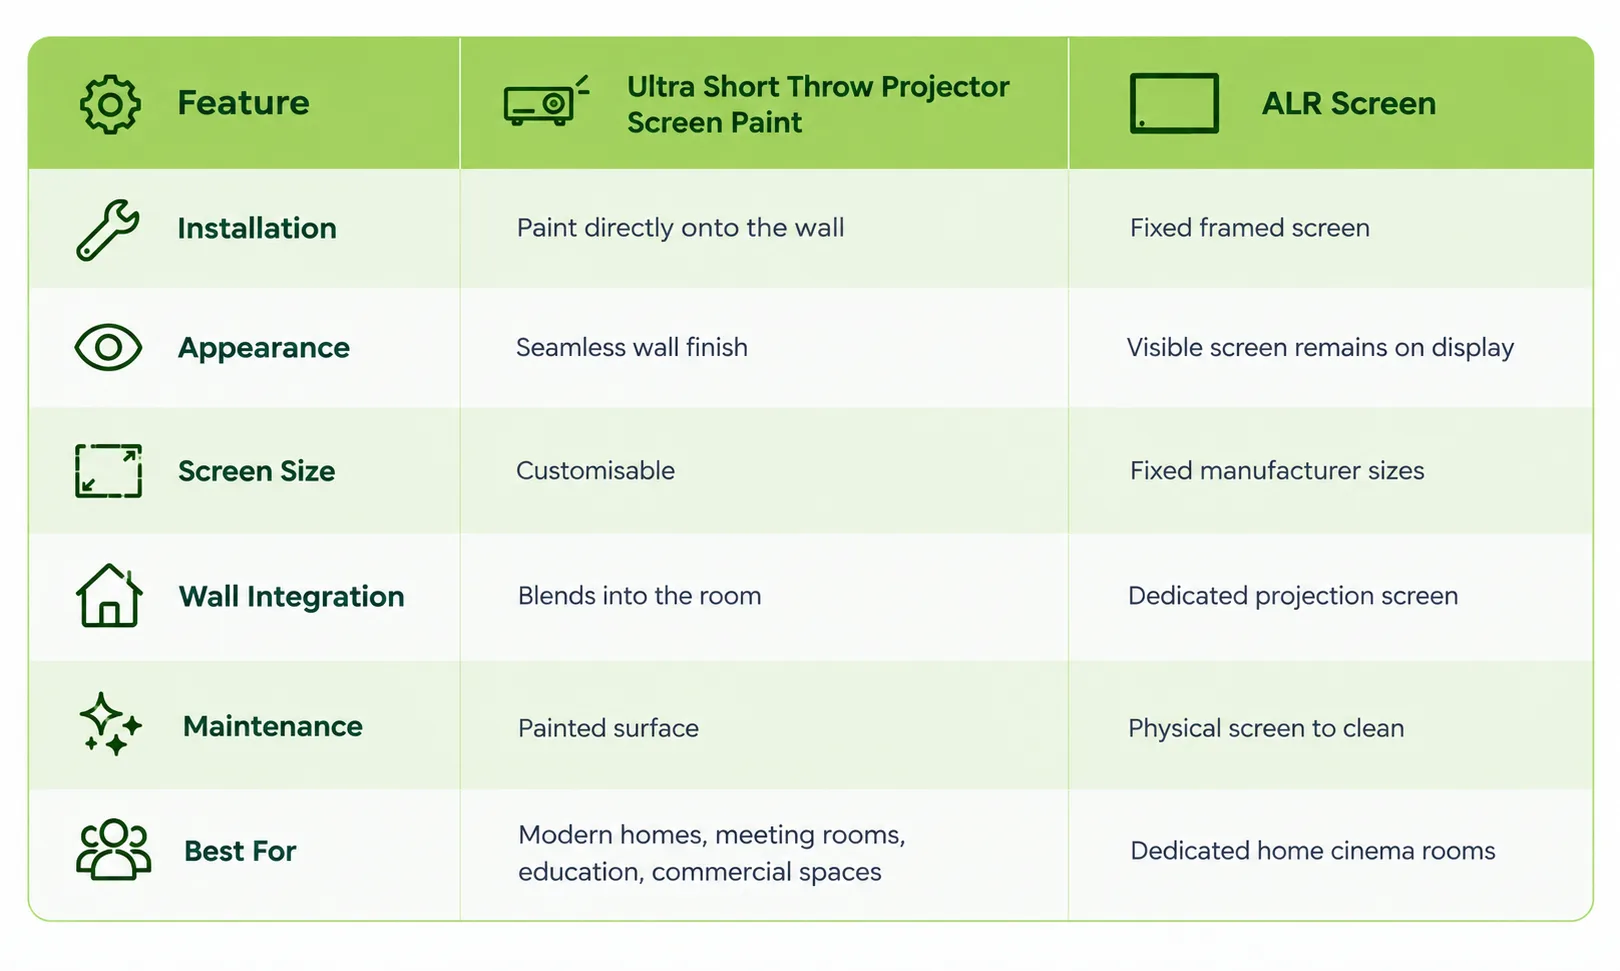
For many residential and commercial installations, projector screen paint provides the cleaner architectural solution. Users wanting a large projection surface without a permanently mounted screen often prefer the flexibility of a painted projection wall.

Projector Screen Paint vs Traditional Projector Screen

Traditional projector screens have been used for decades because they provide a dedicated viewing surface with predictable image quality. However, advances in specialist projection coatings now allow walls themselves to become professional-quality screens.

Projector Screen Paint removes the need for frames, retractable mechanisms, or permanently visible screens. Once applied, the wall functions as the projection surface while maintaining the appearance of a normal painted interior when the projector is switched off.

Projector Screen Paint vs Projector Screen
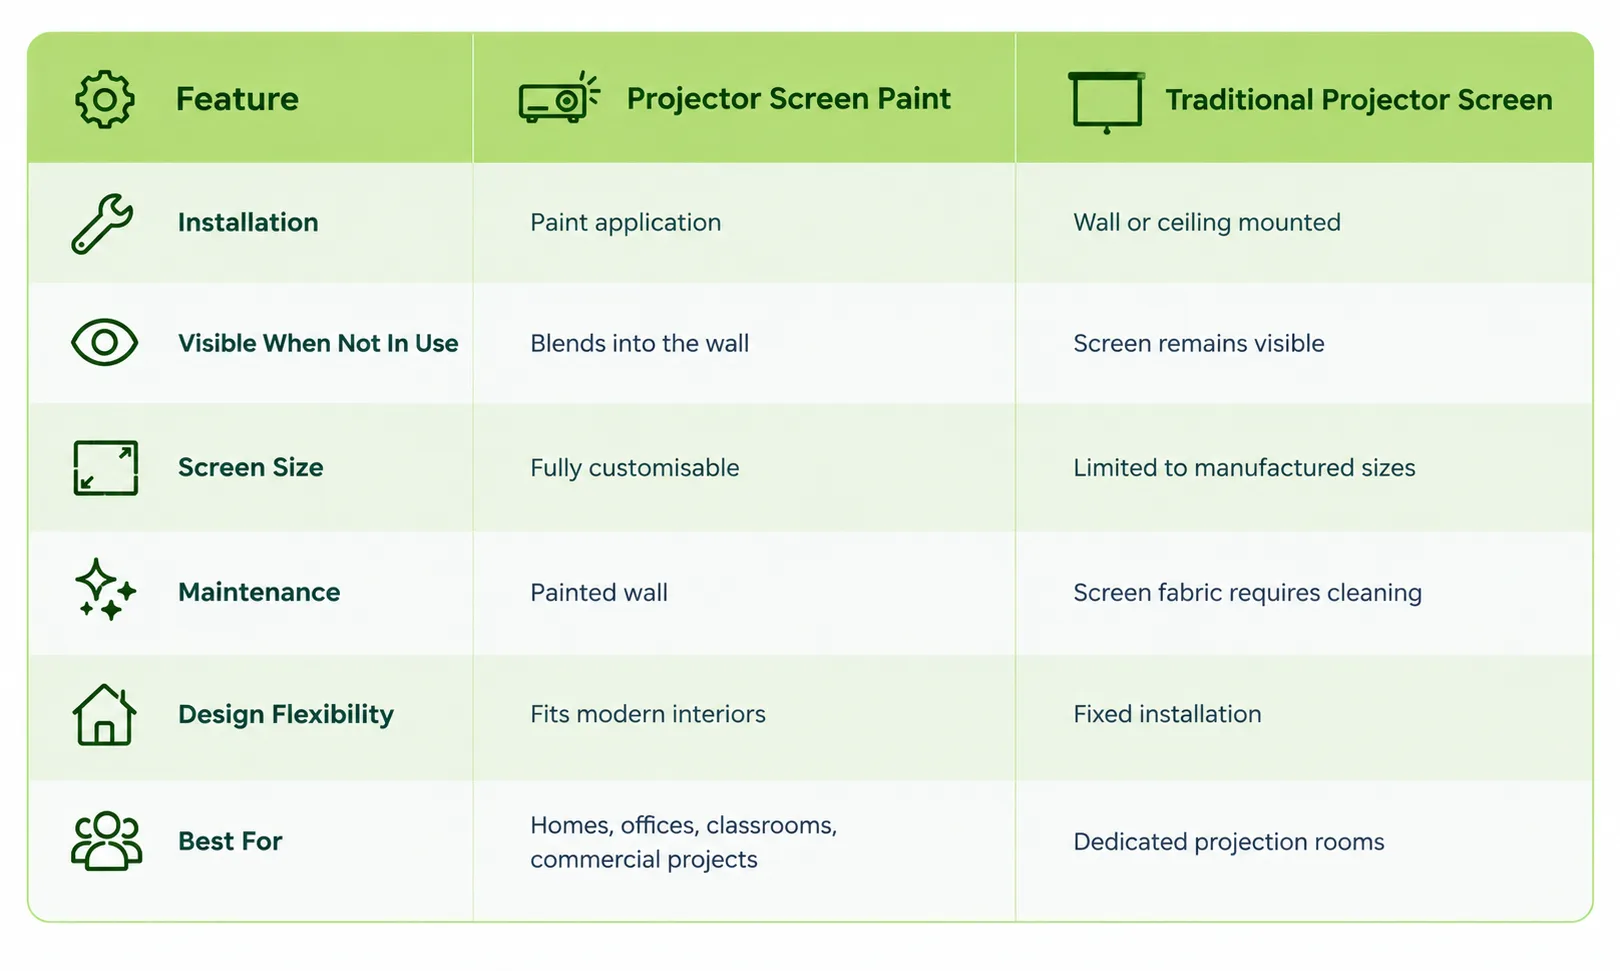
For new build projects, office fit-outs, classrooms, and modern home cinemas, projector screen paint provides greater design flexibility while creating a permanent projection surface that integrates naturally into the room.

How to Choose Ultra Short Throw Projector Screen Paint

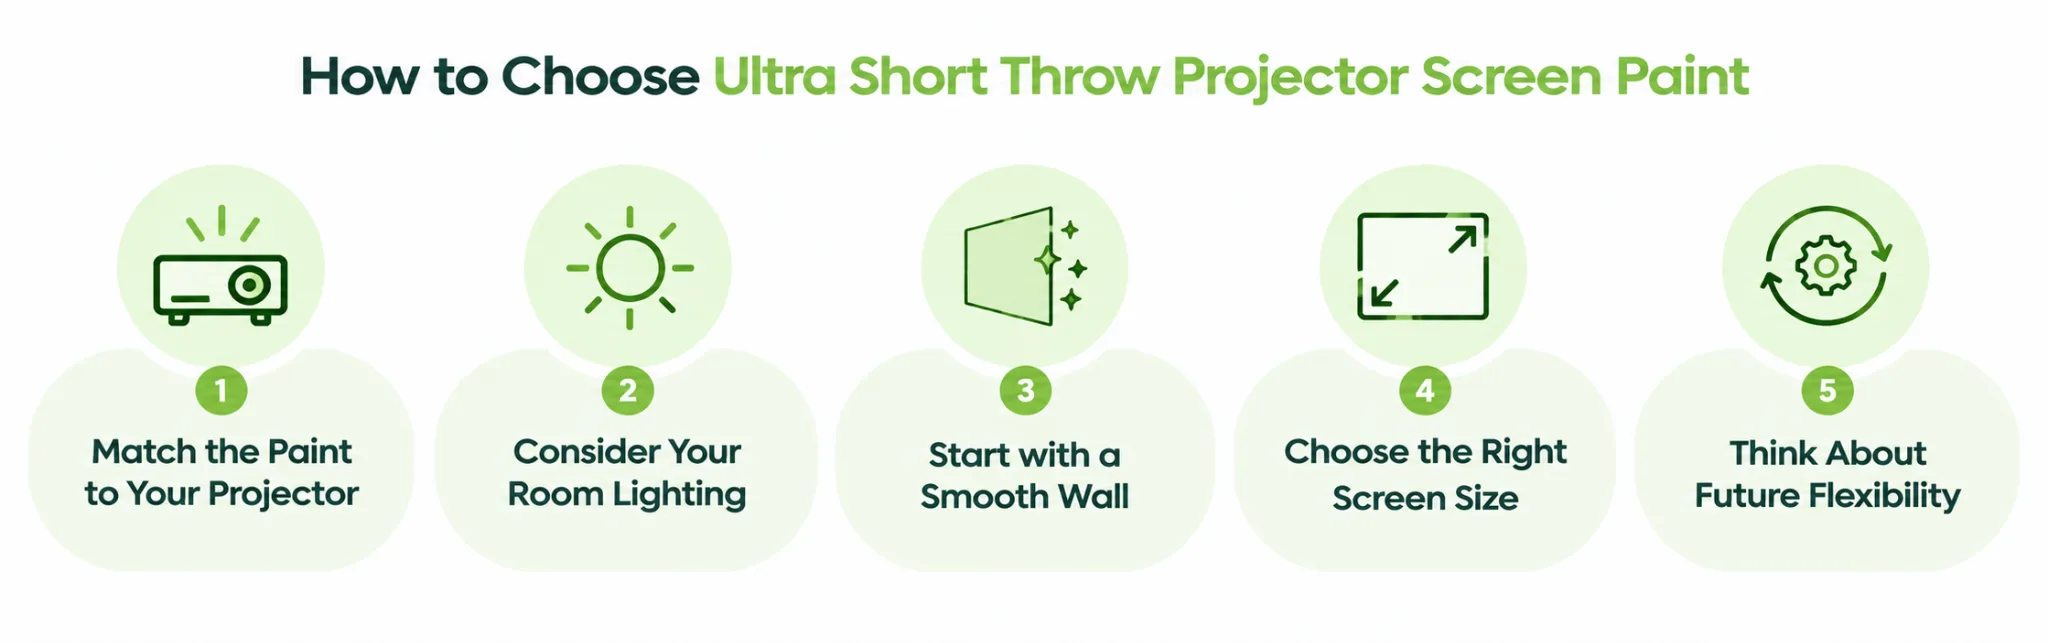
Choosing the right Ultra Short Throw Projector Screen Paint depends on more than the projector itself. Room lighting, wall condition, image size, and how the space is used all influence the final viewing experience. Considering these factors before installation helps ensure the projection surface delivers the performance expected from a premium UST projector.
Match the Paint to Your Projector

Ultra Short Throw projectors use a steep projection angle that places greater demands on the projection surface than standard projectors. Always choose a projector screen paint specifically designed for UST projection rather than a standard projector paint. This helps maintain image sharpness, colour accuracy, and consistent brightness across the screen.

Consider Your Room Lighting

Every room has different lighting conditions. A dedicated home cinema with controlled lighting places fewer demands on the projection surface than a bright office, classroom, or living room.

Before choosing a projector screen paint, consider:

  • The amount of natural daylight entering the room
  • Whether curtains or blinds will be used
  • Artificial lighting during presentations or viewing
  • Typical viewing times throughout the day

Reducing unnecessary ambient light will always improve overall image quality, regardless of the projection surface used.

Start with a Smooth Wall

Even the best Ultra Short Throw Projector Screen Paint cannot completely hide poor wall preparation. Since UST projectors magnify surface imperfections, the wall should be clean, smooth, dry, and free from dents, cracks, or heavy texture before application.

Taking time to prepare the surface properly helps achieve a professional-quality finish with maximum image clarity.

Choose the Right Screen Size

One of the biggest advantages of projector screen paint is flexibility. Unlike fixed projector screens, the painted projection area can be customised to suit both the room and the projector.

When planning your screen size, consider:

  • Viewing distance
  • Available wall space
  • Projector specifications
  • Seating layout
  • Aspect ratio required for your content

A properly sized projection surface creates a more immersive viewing experience while making the best use of the available room.

Think About Future Flexibility

A painted projection surface becomes part of the room itself. There are no retractable screens, visible frames, or bulky installations to accommodate. This makes Ultra Short Throw Projector Screen Paint an excellent choice for modern homes, meeting rooms, classrooms, and commercial spaces where clean interior design is just as important as projection performance.

For users looking for a permanent, minimalist projection solution, projector screen paint offers greater flexibility than many traditional projection screen systems.

How to Apply Ultra Short Throw Projector Screen Paint
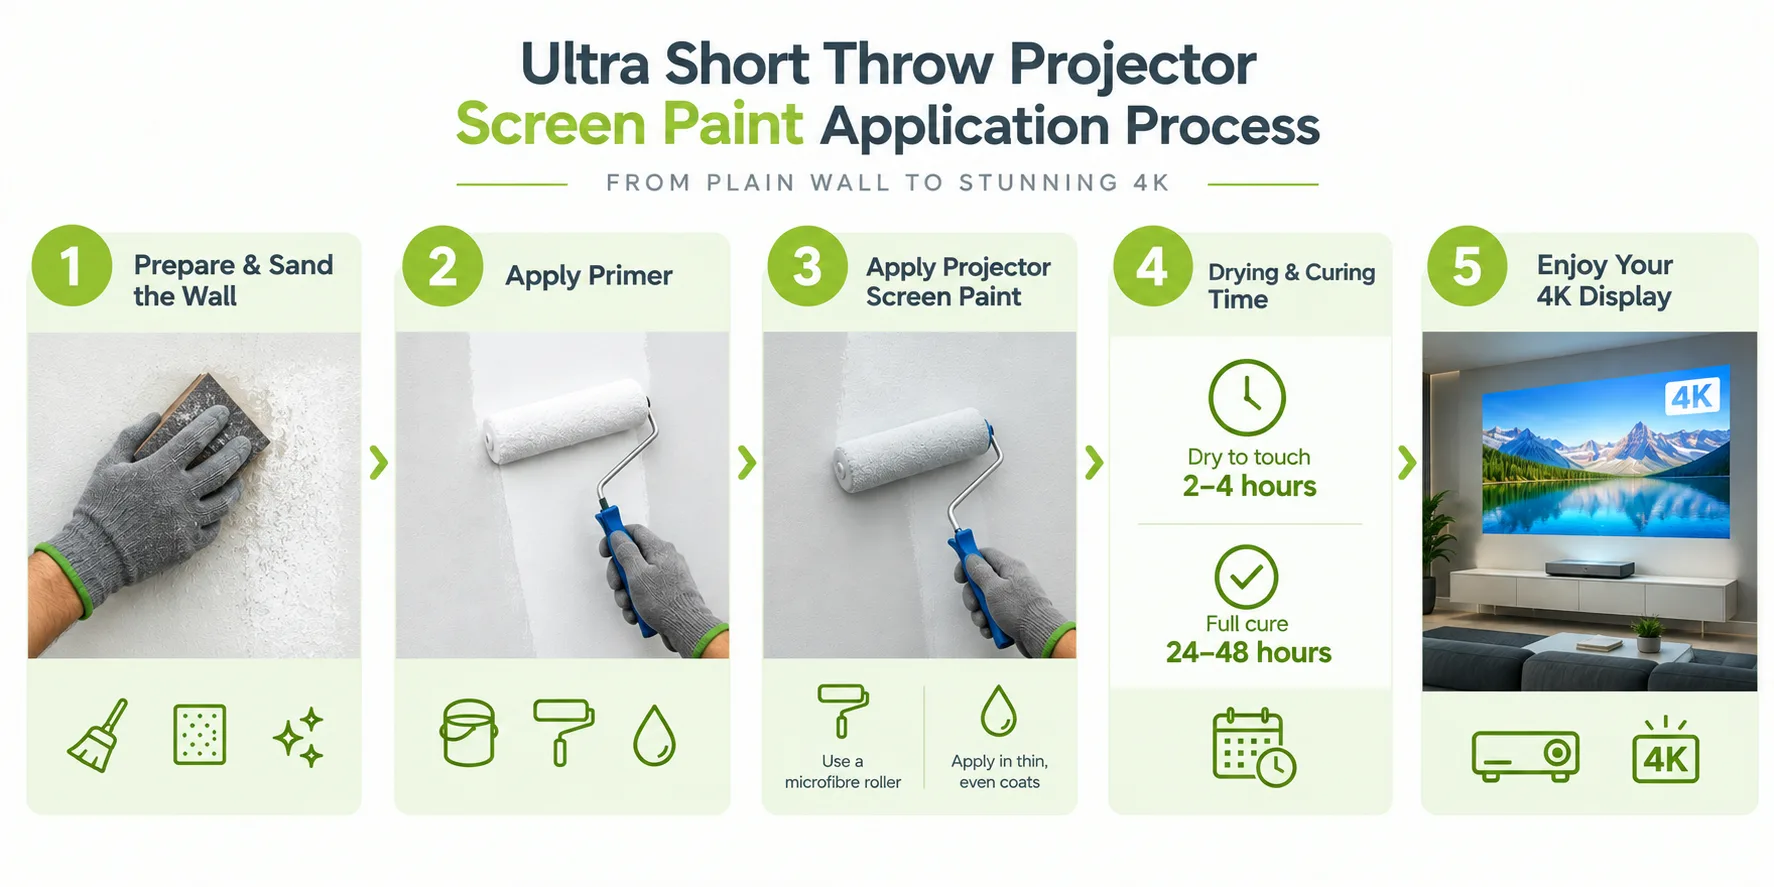
 

Correct application is essential for achieving the smooth, professional-quality surface that Ultra Short Throw projectors require. Because UST projectors sit close to the wall and project at a steep angle, even small imperfections can become visible. Careful preparation and following the recommended application process help maximise image sharpness, colour consistency, and overall projection performance.

Step 1. Prepare the Surface

Ensure the surface is clean, dry, and free from dust, grease, flaking paint, or loose material. Lightly sand the wall to create a smooth finish, as surface texture can become visible with Ultra Short Throw projection. If the wall is bare or unpainted, apply two coats of White Primer and allow it to fully dry before proceeding. Check that the surface is completely smooth before applying the projector paint.

Step 2. Measure and Mask the Projection Area

Measure the intended screen size carefully and mark the projection area using masking tape to create clean, straight edges. Plan the screen dimensions according to your projector setup and desired aspect ratio before painting.

Step 3. Stir the Paint Thoroughly

Before application, stir the projector paint thoroughly to ensure a consistent finish across the entire projection surface. Proper mixing helps maintain even colour and reflectivity.

Step 4. Apply Two Coats Using the Recommended Roller

For best results, apply the paint using a mohair or lint-free short-pile roller sleeve. Apply two even coats, allowing the first coat to dry (in approx 2 hours) before applying the second. Maintaining a consistent finish helps create the smooth surface required for high-quality Ultra Short Throw projection.

Step 5. Allow the Surface to Dry Before Use

The surface will be touch-dry in approximately one hour and ready for use after 24 hours. Allowing the full drying period before using the projector helps ensure optimum projection performance and durability.

Check out the Ultra Short Throw Projector Screen Paint application guide.

Where to Use Ultra Short Throw Projector Screen Paint


Ultra Short Throw Projector Screen Paint is suitable for a wide range of environments where high-quality projection and clean interior design are equally important. Because the wall itself serves as the projection surface, it eliminates the need for bulky projector screens while allowing the space to remain functional when the projector is not in use.

Home Cinemas

Modern home cinemas increasingly use Ultra Short Throw projectors because they require less installation space while producing large, immersive images. Projector screen paint creates a permanent cinema screen without a visible frame, allowing the room to maintain a clean, minimalist appearance when entertainment is not in use.

Living Rooms

Many homeowners use Laser TVs or Ultra Short Throw projectors as an alternative to large televisions. A painted projection surface integrates naturally into the room, providing a discreet solution that avoids the appearance of a permanently mounted projector screen while supporting everyday entertainment.

Offices and Meeting Rooms

Meeting rooms benefit from a dedicated projection surface that is always available without requiring a pull-down screen. Ultra Short Throw Projector Screen Paint creates a professional presentation surface for video conferencing, client presentations, training sessions, and collaborative meetings while keeping the room uncluttered.

Schools and Universities

Educational environments increasingly use Ultra Short Throw projectors because they reduce shadows and glare at the front of the classroom. A dedicated projector screen paint provides a smooth projection surface that improves lesson visibility while allowing teachers to make better use of available wall space.

Commercial Spaces

Retail environments, museums, exhibition spaces, visitor centres, and hospitality venues often require large projected displays without permanently visible screens. Projector screen paint allows designers to incorporate projection into the architecture of the building while maintaining a premium finish.

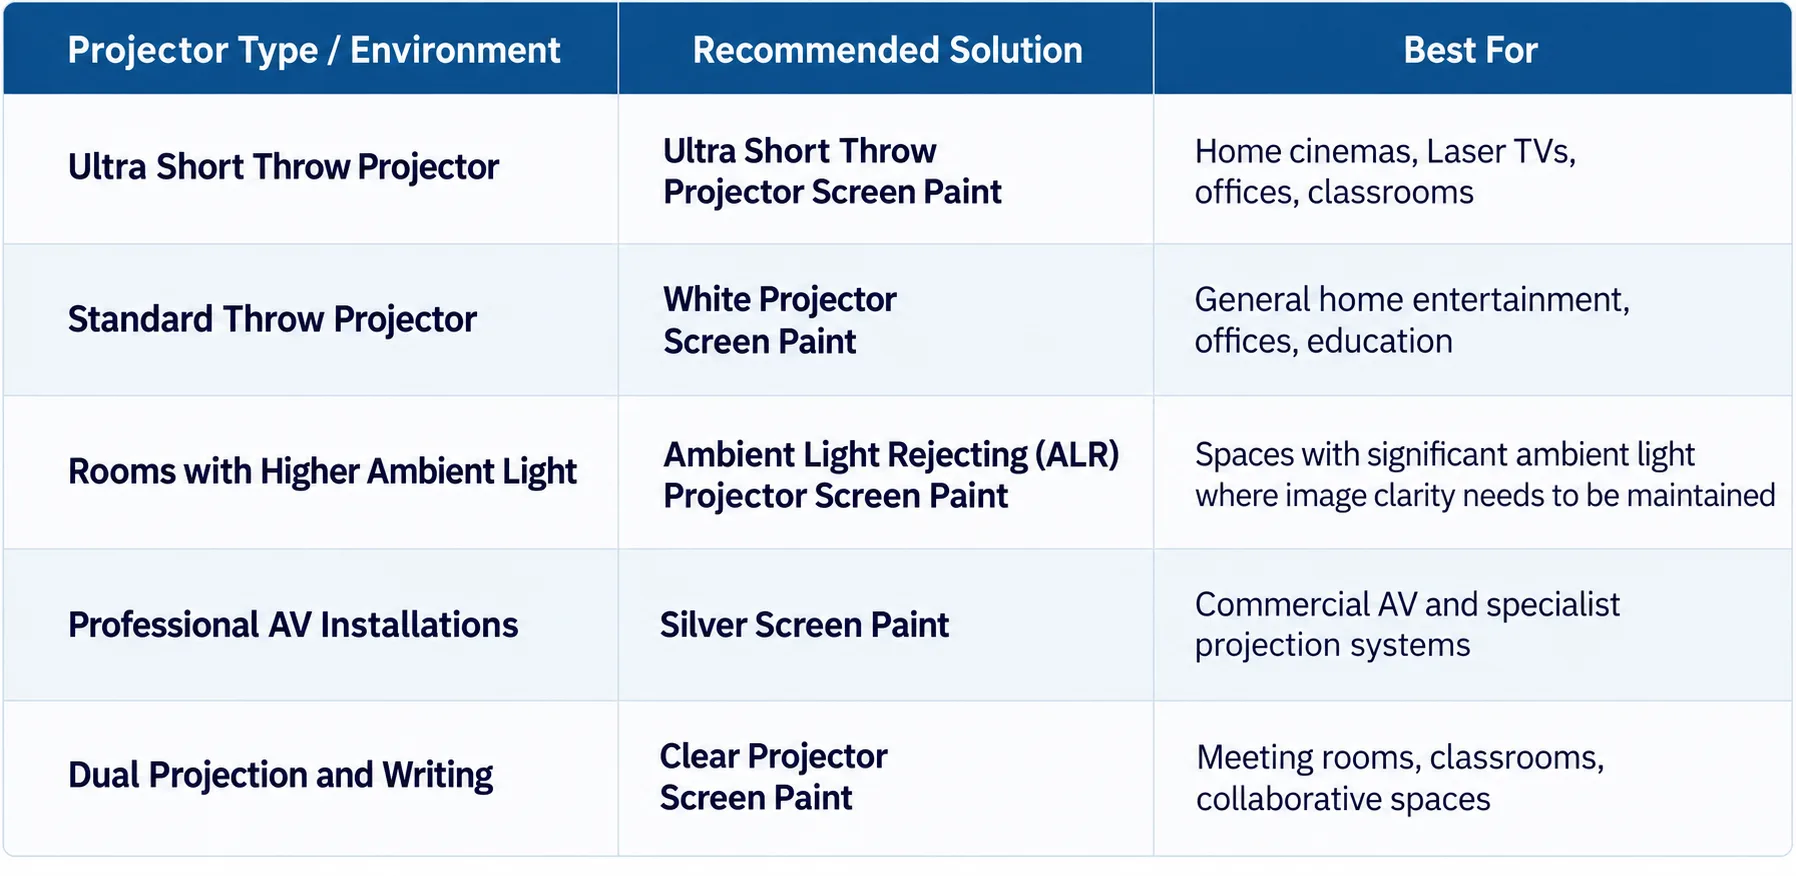
Choosing the Right Projector Screen Paint

The best projector screen paint depends on the type of projector being used, the viewing environment, and the intended application. While Ultra Short Throw Projector Screen Paint is specifically formulated for UST projectors, other projector screen paints are designed to optimise performance in different lighting conditions and projection setups.
Final Words

Ultra Short Throw projectors have transformed modern projection by delivering large, high quality images from only a short distance away. However, achieving the best possible picture depends on more than the projector itself. The projection surface plays an equally important role in image sharpness, colour accuracy, and overall viewing performance.

Ultra Short Throw Projector Screen Paint creates a purpose-built projection surface that helps premium UST projectors perform at their full potential. Compared with projecting onto a standard painted wall, it delivers a smoother finish, improved image consistency, and a cleaner installation without the need for a permanent projector screen.

Whether you are designing a home cinema, upgrading a meeting room, fitting out a classroom, or planning a commercial AV installation, choosing the correct projector screen paint ensures your investment delivers professional-quality results for years to come.

Manufactured across the UK, Ireland, and Europe, Smarter Surfaces projector screen paints have been trusted in homes, businesses, schools, and commercial projects in more than 20 countries since 2009. The range is independently tested and designed to provide durable, high-performance projection surfaces for a wide variety of applications.

Explore the full range of Projector Screen Paints and find the right solution.

FAQ's

What is Ultra Short Throw Projector Screen Paint?

Ultra Short Throw Projector Screen Paint is a specialist projection coating designed specifically for Ultra Short Throw projectors. It creates a smooth, high-performance projection surface that improves image clarity, colour accuracy, and overall viewing quality compared with projecting onto a standard painted wall.

Can I use a normal painted wall with a UST projector?

Yes, but image quality is often reduced. Standard painted walls can contain texture, roller marks, and uneven finishes that become highly visible with Ultra Short Throw projectors. A dedicated projector screen paint provides a smoother surface for improved projection performance.

Is Ultra Short Throw Projector Screen Paint better than a projector screen?

The right choice depends on the installation. Projector screen paint offers a seamless appearance, custom screen sizes, and a no-frame design, making it ideal for modern interiors. Traditional projector screens remain a suitable option for dedicated projection rooms where a framed screen is preferred.

What is the difference between Ultra Short Throw Projector Screen Paint and ALR screens?

ALR screens use specialised optical layers to reduce the effects of ambient light and are supplied as fixed screens. Ultra Short Throw Projector Screen Paint transforms the wall into the projection surface, creating a cleaner appearance with flexible screen sizing while eliminating the need for a permanent screen.

Can I create a custom screen size?

Yes. One of the main advantages of projector screen paint is that the projection area can be customised to suit the available wall space, projector specifications, and viewing distance.

Is Ultra Short Throw Projector Screen Paint suitable for 4K projectors?

Yes. A smooth projection surface helps preserve the fine detail produced by modern 4K Ultra Short Throw projectors, improving image sharpness and overall viewing quality.

Where can Ultra Short Throw Projector Screen Paint be used?

It is suitable for home cinemas, living rooms, offices, meeting rooms, classrooms, universities, museums, retail spaces, and other commercial environments where a permanent, high-quality projection surface is required.

How do I choose the best Ultra Short Throw Projector Screen Paint?

Choose a projector screen paint specifically designed for Ultra Short Throw projection. Consider your projector type, room lighting, wall condition, desired screen size, and installation environment before selecting the most suitable solution.


How to Make a Magnetic Wall: Complete DIY Guide for Homes

How to Make a Magnetic Wall: Complete DIY Guide for Homes

prasanna hegde

by prasanna hegde | Aug 17, 2026

Table of Contents

A magnetic wall can be one of the most useful surfaces in a home. A kitchen panel that holds the week's meal plan. A bedroom wall that displays artwork without a single pinhole. A home office section that keeps projects visible and organised.

Getting there is simple, but the details matter: the right product, enough coats, the right magnets, and the right sequence. Skip one of those, and the results will disappoint.

This guide covers every step: how to create a magnetic wall for the home, which product to choose for your room, how to apply it correctly, how many coats to use, and what to do if the hold is not as strong as expected.

 What Is a Magnetic Wall?

A magnetic wall is an interactive, magnet-friendly surface designed to display notes, photos, artwork, planning tools, educational resources, and business documents without Blu Tack marks, nail holes, drawing pins, or adhesive tape. It helps reduce wall damage while keeping information organised and easily accessible.

Magnetic walls are used in homes, classrooms, offices, meeting rooms, and commercial environments, where they transform unused wall space into practical display and collaboration areas. They can cover an entire wall or a smaller feature section depending on the application.

Depending on your project requirements, a magnetic wall can be created using Magnetic Paint, Magnetic Whiteboard Paint, Super Magnetic Paint, Magnetic Whiteboard Wallpaper, or Magnetic Plaster. Each solution offers different installation methods, surface finishes, and levels of magnetic strength. While paints and wallpaper are well suited to DIY home projects, Magnetic Plaster provides the strongest magnetic performance and is typically specified for professional renovations and commercial installations.

Magnetic Wall vs. Traditional Alternatives

Before choosing a magnetic wall, it helps to compare it with other popular home organisation solutions. Unlike cork boards, fridge doors, or standard notice boards, a magnetic wall creates a larger, clutter-free surface that integrates seamlessly into your decor while keeping notes, photos, reminders, and artwork organised. Magnetic Paint and Super Magnetic Paint can be painted over in virtually any colour, allowing the wall to match your existing decor while retaining its magnetic functionality. It can cover an entire wall or a custom-sized section, giving you far more flexibility than smaller magnetic surfaces.

For added functionality, Magnetic Whiteboard Paint combines magnetic performance with a durable dry-erase finish, allowing you to write, erase, and display items on the same surface. If you prefer a classic writable finish without magnetic functionality, Chalkboard Paint provides a practical alternative for creative spaces, family message centres, and children's play areas.

Which Magnetic Product Is Right for a Home DIY Project?

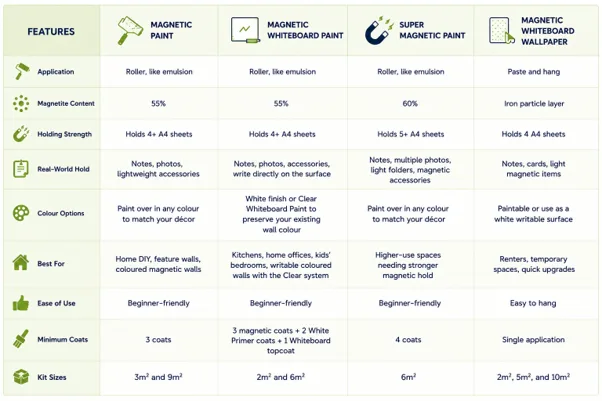
For most home DIY projects, Magnetic Paint or Magnetic Whiteboard Paint is the right starting point. Both are beginner-friendly, applied by roller like standard emulsion, and well-suited to kitchens, home offices, hallways, and children's bedrooms. Super Magnetic Paint is a step up if you need a stronger hold. Magnetic Whiteboard Wallpaper suits renters or anyone who cannot apply paint.

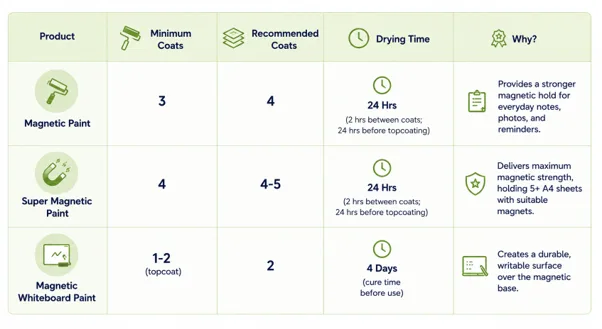
Here is how the home-friendly products compare:

If maximum magnetic strength is the priority, Magnetic Plaster is the highest-performance option. It contains approximately 75% magnetite and can hold 8+ A4 sheets with a suitable magnet, making it ideal for study rooms, home offices, and display walls. Because it requires professional plaster application, it is generally recommended during renovations or new builds rather than DIY home projects.

Ready to upgrade your experience? Shop Smarter Surfaces’ top-rated products today.

Which magnetic wall product is right for you?

For the Home

If you want a magnetic wall in a kitchen, hallway, or living space to display shopping lists, family photos, children's artwork, or reminders while matching your existing decor, Super Magnetic Paint is the recommended choice. Its stronger magnetic performance allows you to paint over the magnetic layer with your chosen interior wall colour without compromising functionality. The result is a discreet magnetic wall that blends seamlessly into your home while providing a practical surface for everyday organisation.

For a Home Office or WFH Setup

Need a space to organise tasks, calendars, meeting notes, and documents? Magnetic Whiteboard Paint creates a wall that is both magnetic and writable, making it ideal for planning and productivity without taking up desk space. The white or clear finish - which allows you to have a whiteboard and magnetic surface of the colour you choose - means   no additional topcoat is needed, and the surface is wipe-clean from day one.

For Families and Kids' Rooms

Super Magnetic Paint is the stronger option for a children's bedroom or playroom. Its higher magnetic hold keeps educational magnets, artwork, chore charts, alphabet letters, and multiple photos securely in place. A practical step up for any space that sees heavy daily use.

For Creative Spaces

Artists, designers, and hobbyists can use Magnetic Whiteboard Paint to sketch ideas, plan projects, and display inspiration boards. The combination of a writable and magnetic surface works well for visual workflows and mood boards.

For Renters and Temporary Spaces

If you cannot paint your walls, Magnetic Whiteboard Wallpaper offers a practical alternative to paint-based solutions. It creates a durable magnetic dry-erase surface without requiring whiteboard or magnetic paint, making it ideal for smooth walls and other flat or curved surfaces. With both writable and magnetic functionality, it is well suited to home offices, study spaces, and other areas where a professional, collaborative surface is needed.


How to Make a Magnetic Wall at Home with Paint: Step-by-Step

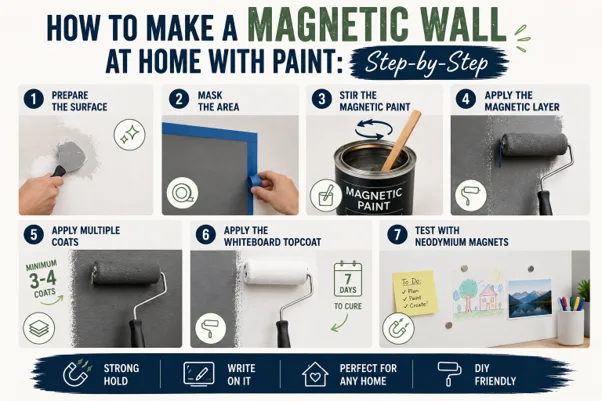
Step-by-step magnetic wall paint DIY for homeowners showing preparation, painting, curing, and neodymium magnet testing

Here is the process to create a wall using Magnetic Whiteboard Paint:

Step 1: Prepare the surface

The wall must be clean, dry, and smooth. Fill any cracks or holes and sand down rough patches. If the wall is absorbent (bare or new plaster), apply White Primer first and allow it to dry fully.

Step 2: Mask the area

Use painter's tape to mark the edges of the area you want to treat. This keeps lines clean and makes application easier.

Step 3: Stir the magnetic paint

Stir thoroughly before every coat. Iron particles settle in transit and again between coats. A thorough stir before each coat costs nothing and makes a significant difference to final performance.

Step 4: Apply the magnetic layer

Use a short-pile or mohair roller for an even, consistent coat. Apply using overlapping strokes. Work steadily. Allow the first coat to dry fully (after approximately 2 hours) before applying the next coat.

Step 5: Apply multiple coats

Plan for a minimum of three to four coats of the magnetic layer. More coats equal a stronger hold. We test every batch of Magnetic Paint at our manufacturing site for particle density: three coats consistently meet the 4+ A4 sheet specification on a properly primed wall. Four coats reliably exceed it, which is why we recommend four for the best home result.

Step 6: Apply the whiteboard topcoat

Once all magnetic coats are fully dry, apply two coats of White Primer, or continue until the black magnetic surface is completely covered. Allow the primer to dry between coats. Once the primer is dry, apply one coat of Whiteboard Paint using a brand-new roller to prevent iron particles from transferring from the magnetic coats. Allow the surface to cure fully before writing on it.

Step 7: Test with neodymium magnets

Use small neodymium (rare earth) magnets for best results. Standard ceramic fridge magnets are much weaker and will not perform reliably on a magnetic paint surface.

How Many Coats Does Magnetic Paint Need?

The number of coats you apply has the biggest impact on how well your magnetic wall performs. Each coat adds more iron particles to the surface, increasing the magnetic strength and allowing magnets to hold more securely. Rushing the coat count is the single most common reason magnetic walls underperform.Between each coat, allow the paint to dry fully (approx 2 hours) before recoating. Applying a second coat over a wet first coat traps moisture and reduces the effectiveness of both layers.

Once all magnetic coats are fully dry, apply two coats of White Primer, or continue until the black magnetic surface is completely covered. After the primer has dried, apply one coat of Whiteboard Paint using a clean, new roller to achieve a smooth, writable finish.

Allow the completed surface to cure fully before writing on it or attaching magnets. During curing, the coating chemically cross-links to form a hard, durable, wipe-clean surface 

What Magnets Work Best on a Magnetic Wall?

Neodymium (rare earth) magnets are the right choice for any magnetic wall surface. They generate significantly stronger magnetic flux than standard ferrite fridge magnets, which is why even a small neodymium magnet outperforms a much larger ceramic one. The type of magnet you use has as much impact on results as the paint itself.

Neodymium Magnets: Why They Work

Neodymium magnets generate roughly 10 to 15 times the magnetic flux of standard ferrite (ceramic) fridge magnets per cubic centimetre. That is why a 5mm neodymium magnet holds notes that a much larger fridge magnet will not.

Small neodymium magnets hold notes, photos, and lightweight accessories with ease. Larger neodymium magnets can hold heavier items such as document folders and lightweight clipboards. If you have tested your wall with a standard fridge magnet and it slips, switch to neodymium magnets before drawing any conclusions about the paint.

How Magnetic Paint Works with Neodymium Magnets

Magnetic paint is engineered specifically to work with neodymium flux strength. The iron particles embedded in each coat create a receptive surface that responds to the pull of rare-earth magnets. With standard ferrite fridge magnets, the surface is capable of far more hold than the magnet can deliver. This is why magnet type is the first thing to check if your magnetic wall is underperforming, before adding more coats or repainting.


Magnetic Wall Ideas for Every Room

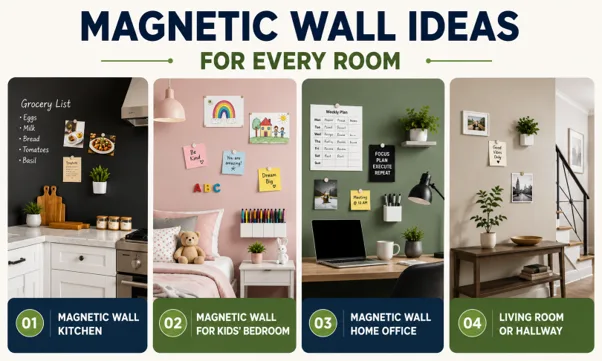
Magnetic wall ideas for the kitchen, kids' bedroom, home office, and living room in a modern home

A magnetic wall adds practical value across almost every room in a home. The right product depends on the room, how heavily the surface will be used, and whether a writable finish is also needed. Kitchens and home offices suit Magnetic Whiteboard Paint. Kids' bedrooms benefit from Super Magnetic Paint. Hallways and living rooms are where Magnetic Whiteboard Wallpaper works best.

Magnetic Wall Kitchen

Instead of covering the fridge with notes and magnets, create a dedicated family organisation space for meal plans, shopping lists, weekly schedules, recipes, and children's school reminders. Everything stays visible, organised, and easy to update while reducing everyday kitchen clutter.

Apply Magnetic Paint or Magnetic Whiteboard Paint on a panel next to the fridge or on a dedicated wall section. The white or clear finish of Magnetic Whiteboard Paint makes the surface both magnetic and wipe-clean, which suits a kitchen environment well.

A typical kitchen magnetic wall panel is between 1 and 2 square metres. Magnetic Paint is available in 3m² and 9m² kits, and each kit already includes all the coats needed for its stated coverage. For a 1 to 2m² kitchen panel, the 3m² kit covers the full three-coat application with paint to spare for touch-ups. A 6m² Super Magnetic Paint kit covers a 2m² panel with the full three-coat application, leaving enough for touch-ups.

Magnetic Wall for Kids' Bedroom

A magnetic wall for kids creates an interactive, creative space that grows with them. As children grow, the same wall easily evolves from displaying alphabet magnets and artwork to organising homework, revision notes, creative projects, and personal achievements, without needing to redecorate. It also encourages more screen-free creativity by giving children a dedicated space to draw, display artwork, organise learning activities, and showcase their favourite creations.

To create a writable planner or creative wall, Magnetic Whiteboard Paint is the best choice. It combines magnetic functionality with a smooth dry-erase surface, and the Clear Whiteboard Paint option allows you to preserve your chosen wall colour while adding both writable and magnetic functionality. This makes it an excellent choice for children's bedrooms where the decor can remain colourful and personalised.

If you prefer a traditional chalk writing surface, Super Magnetic Chalkboard Paint combines magnetic functionality with a durable chalkboard finish, giving children a space to draw with chalk while displaying artwork, photos, and learning materials using magnets. All Smarter Surfaces magnetic paints are low-VOC, solvent-free, and isocyanate-free, making them suitable for use in children's bedrooms.

Magnetic Wall Home Office

A magnetic whiteboard wall transforms a home office into a more organised and productive workspace. Instead of relying on a small desktop whiteboard or a separate pinboard, you can create a large writable and magnetic surface for planning projects, brainstorming ideas, tracking tasks, and displaying important documents. A typical home office feature wall is between 1.5 and 2.5 square metres, making it easy to create a dedicated planning area without taking up additional floor space.

Magnetic Whiteboard Paint is the best choice for most home offices because it combines a smooth dry erase surface with magnetic functionality in one system. Write notes, calendars, and project plans directly on the wall while using magnets to display reference sheets, reminders, or lightweight documents. The Clear Whiteboard Paint option also allows you to preserve your existing wall colour, helping the workspace blend seamlessly with your home décor.

Like all Smarter Surfaces products, Magnetic Whiteboard Paint is low VOC, solvent-free, and isocyanate-free, making it well suited to home offices where people spend long hours working indoors.

This aligns much better with how people actually use home office walls and subtly promotes the Clear option, which is a strong homeowner benefit.

Living Room or Hallway

A small magnetic panel in a hallway can become the family's central communication hub using magnetic plaster. It is suitable for calendars, invitations, appointment reminders, shopping lists, spare keys on magnetic hooks, and weekly schedules so everyone knows what's happening at a glance.

For renters or anyone who cannot paint walls, Magnetic Whiteboard Wallpaper is the practical alternative. Because it removes cleanly, renters can personalise their living space without worrying about damaging walls or losing their deposit when it's time to move out. It holds light magnetic items and cards, making it a good low-commitment option for a feature wall or hallway panel.

Whether you're organising a busy family kitchen, encouraging creativity in a child's bedroom, or building a more productive home office, a magnetic wall adapts as your needs change, making it a practical investment for years to come.

Common Magnetic Wall Mistakes Homeowners Should Avoid

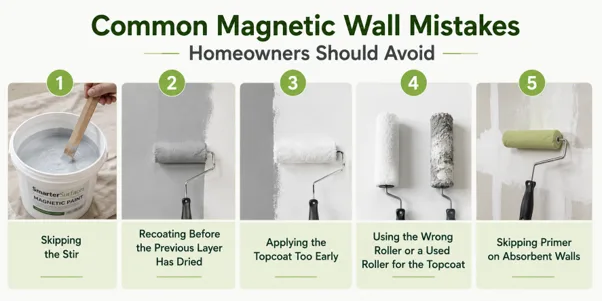
Magnetic paint not working tips showing homeowner mistakes like skipping primer, poor stirring, incorrect roller use, & more

1. Skipping the Stir

Iron particles settle to the bottom of the tin between coats. Skipping the stir before each coat is the most common single cause of inconsistent magnetic hold that our team sees. A thorough stir before every application takes under a minute and directly affects how evenly the iron particles distribute across the surface.

 2. Recoating Before the Previous Layer Has Dried

Applying a second coat over a wet first coat traps moisture, reduces the adhesion of both layers, and weakens the finished surface. Each coat must be fully dry before the next one goes on. Rushing this step does not save time: it typically means the whole job needs to be redone.

3. Applying the Topcoat Too Early

The magnetic layer must be fully dry before applying two coats of White Primer, or until the black magnetic surface is completely covered. Once the primer has dried, apply one coat of Whiteboard Paint. Applying the primer or whiteboard topcoat too early can trap residual moisture, affecting both the magnetic performance and the quality of the writable surface. Allow the completed system to cure fully before use.

 4. Using the Wrong Roller or a Used Roller for the Topcoat

Use a short-pile or mohair roller for the magnetic layer. For the whiteboard topcoat, always use a brand-new roller. A roller that has been used for the magnetic paint will carry iron particles that transfer to the topcoat and leave marks in the finished surface.

5. Skipping Primer on Absorbent Walls

Bare plaster, new plaster, or any highly absorbent surface will soak up the magnetic paint before it can form a proper layer. Apply White Primer first and allow it to dry fully. This creates a sealed base that allows the magnetic layer to sit correctly and perform as intended. This is particularly important on newly plastered walls, which can look dry on the surface while still drawing moisture from below.


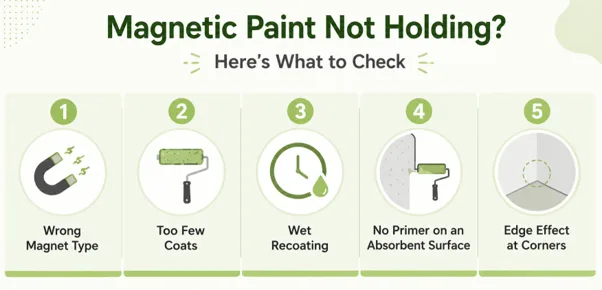
 Magnetic Paint Not Holding? Here's What to Check

Magnetic paint not holding magnets is almost always caused by one of a small number of fixable issues. The most likely cause is the magnet type, not the paint. Switch to neodymium magnets first, before anything else. Work through this checklist before repainting:

Wrong Magnet Type

Standard fridge magnets are ferrite (ceramic) magnets with very low pull strength. They will not perform reliably on any magnetic paint surface, regardless of how many coats were applied. Replace them with neodymium (rare earth) magnets. Even small neodymium magnets will hold notes, photos, and lightweight accessories on a correctly applied magnetic surface.

Too Few Coats

Three coats are the minimum. Four is better. If only one or two coats were applied, add further coats over the existing surface once it has dried, without sanding back.

Wet Recoating

If coats were applied before the previous one had dried fully, moisture was trapped between layers. This reduces the effective iron particle density and weakens the magnetic hold. Allow future coats to dry completely before recoating.

No Primer on an Absorbent Surface

On bare or new plaster, unpainted masonry, or any highly absorbent wall, the magnetic paint is absorbed before it can form a proper layer. Apply White Primer, allow it to dry fully, then recoat with the magnetic layer.

Edge Effect at Corners

Holding strength is typically weaker at the very edges and corners of a painted area. This is a normal characteristic of any applied coating: the layer thins slightly at masked edges. For best results, keep magnet placement toward the centre of the painted section.


Final Words

Knowing how to make a magnetic wall opens up practical possibilities in almost any room. The process is manageable for most home DIY projects: prepare the surface correctly, stir before every coat, apply four coats of magnetic paint, use neodymium magnets, and allow a few days before writing on the surface.

For a wall that is both magnetic and writable, Magnetic Whiteboard Paint is the primary recommendation for home use. For a stronger hold in a busy home office or active kids' bedroom, Super Magnetic Paint is a straightforward step up. For renters, Magnetic Whiteboard Wallpaper removes the need to paint entirely.

Manufactured in the UK using high-quality raw materials, Smarter Surfaces products have been trusted by homeowners, schools, and businesses in more than 20 countries since 2009. Every product carries a 10-year guarantee to deliver long-lasting performance. They are independently certified by Eurofins (M1 / Indoor Air Comfort) and BTTC (fire-certified, 2018) for low-VOC, solvent-free, and isocyanate-free formulations, suitable for indoor spaces.

Table of Contents

Turn Your Wall Into a Smarter Workspace

Upgrade your space with high-performance surface solutions built for productivity.

Try before you buy

Unsure which is the right product for you?

Then choose one of the sample pack options below to try before you buy.

Talk to an Expert

Not sure which projector paint suits your wall?

Get free advice from our surface specialists.

About Author

Sonia Bueno is Senior Manager at Smarter Surfaces, leading sales operations, customer experience, and distributor partnerships globally. With extensive experience supporting education, office, and commercial projects, she shares practical insights on whiteboard paint, magnetic paint, and functional surface solutions to help organisations make informed specification decisions

FAQ's

Can I paint over magnetic paint with any colour?

Yes. Magnetic Paint and Super Magnetic Paint are designed to be painted over with your preferred wall colour once the magnetic layer has fully dried. This allows you to match existing décor without affecting magnetic performance, as the magnetic layer remains underneath the decorative topcoat.

Can I write directly on magnetic paint?

Standard Magnetic Paint is not writable by itself. If you need a surface that is both magnetic and writable, choose Magnetic Whiteboard Paint. It combines magnetic functionality with a durable dry-erase finish in one system, creating a surface suitable for writing notes, planning, brainstorming, and displaying documents with magnets.

Why is my magnetic paint not holding magnets?

Magnetic paint usually underperforms because of one of four common issues rather than the paint itself. The most frequent cause is using standard fridge magnets instead of stronger neodymium magnets. Too few magnetic coats, insufficient drying time between coats, or skipping primer on absorbent walls can also reduce holding strength. Before repainting, check each of these factors, as most magnetic performance issues can be corrected without starting over.

Is magnetic plaster also suitable for home use?

Magnetic plaster is a high-performance product designed for schools, meeting rooms, and commercial installations. It requires plastering experience to apply and is not recommended for home DIY projects. For home use, Magnetic Paint, Magnetic Whiteboard Paint, and Super Magnetic Paint are the right options.

How much does it cost to make a magnetic wall?

H3 - How much does it cost to make a magnetic wall?

The cost depends on the size of the wall and the product you choose. A small kitchen or home office panel costs significantly less than covering an entire wall. Magnetic Paint is the most economical option, while Magnetic Whiteboard Paint combines magnetic performance with a writable finish. Choosing the correct kit size helps reduce waste and ensures enough coats for the best magnetic strength.

How long does magnetic paint take to dry?

Allow 2 hours between each coat of Magnetic Paint. Once the final magnetic coat has been applied, wait 24 hours before applying two coats of White Primer, or until the black magnetic surface is completely covered. Once the primer has dried, apply one coat of Whiteboard Paint if you require a writable surface. Following the recommended drying and curing times helps ensure maximum magnetic performance and a durable, long-lasting finish.

Is magnetic paint safe for children's bedrooms?

Yes. Smarter Surfaces magnetic paints are low-VOC, solvent-free, and isocyanate-free, making them suitable for indoor spaces including children's bedrooms, playrooms, home offices, and kitchens. Once fully cured, they provide a durable surface for everyday family use.

Smarter Surfaces
Privacy Overview

This website uses cookies so that we can provide you with the best user experience possible. Cookie information is stored in your browser and performs functions such as recognising you when you return to our website and helping our team to understand which sections of the website you find most interesting and useful.