
Best Projector Wall Paint for Outdoors – Step-by-Step Guide
- Introduction
- How To Make An Outdoor Projector Screen: A Step-By-Step Guide
- Common Mistakes to Avoid While Applying Projector Wall Paint for Outdoors
- Key Features of Smarter Surfaces Projector Wall Paint For Outdoors
- How To Use an Outdoor Projector Screen for Backyard - Daytime and Night
- Safety Tips for the Best Outdoor Projector Screen Setup
- Benefits of Having a Projector Wall Paint For Outdoors
- Key Takeaway
- FAQs
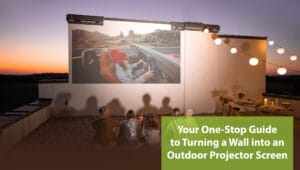
A Complete Guide to Turning a Wall into an Outdoor Projector Screen
An outdoor projector screen is a weather-resistant surface designed for displaying videos or images in outdoor settings. A large wall made of concrete, wood or glass, or a temporaryportable screen, you can turn any surface into an outdoor projector screen with the best outdoor projector paint.
This comprehensive guide walks you through every aspect of creating your own outdoor projector screen using specialised paint, from selecting the perfect wall to hosting your first movie night. Whether you're a seasoned DIY enthusiast or a complete beginner, these detailed instructions will help you achieve professional-looking results whilst avoiding common pitfalls that could compromise your viewing experience.
Check out our outdoor projection paint being used by the famous gamers Cam & Petra on YouTube.
How To Make An Outdoor Projector Screen: A Step-By-Step Guide
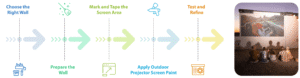
You can turn any reasonably smooth outdoor surface into an exterior projection screen with the Outdoor Projection Screen Paint by Smarter Surfaces. The application method is really simple and only takes a few steps. Let’s have a look at the step-by-step outdoor projector wall guide
Step 1: Choose the Right Wall
Select the appropriate wall forms for the foundation of your outdoor cinema project. The ideal wall should face away from street lighting and neighbouring windows to minimise light pollution during evening screenings.
Examine the wall surface carefully for structural integrity. Brick, rendered concrete, and smooth exterior walls typically provide excellent bases for projector screen paint. The wall should be relatively flat—significant bumps or deep texture will create shadows and distort your projected image but the surface does not need to be perfect.
Step 2: Prepare the Wall
Thorough wall preparation determines the longevity and quality of your outdoor screen. Begin by cleaning the entire surface with a pressure washer or garden hose, removing dirt, moss, and any loose debris. Allow the wall to dry completely—this may take 24-48 hours, depending on weather conditions and wall construction.
Inspect for cracks, holes, or damaged areas that require attention. Fill small cracks with exterior-grade filler and sand smooth once dry. Scrap any loose or rough masonry.
Step 3: Mark and Tape the Screen Area
Measure and mark the area you want to paint based on your projector's specifications and viewing distance.
Common aspect ratios include:
- 4.5 m2 : 120” / 320cm at 16:9 Aspect Ratio
- 13.5 m2 : 220” / 559cm at 16:9 Aspect Ratio
- 25 m2 : 301" / 764.5cm at 16:9 Aspect Ratio
Apply a high-quality White Primer, suitable for your wall material. This crucial step ensures optimal paint adhesion and provides a uniform base colour. Exterior projector screen paint works best over white primer.
Step 4: Apply Outdoor Projector Screen Paint
Quality exterior projector screen paints are formulated to reflect projected light while absorbing some ambient light, improving image clarity and colour accuracy compared to standard wall paint. Read this Outdoor Projection Screen Paint instructions thoroughly before beginning application.
Most outdoor projector screen paints require two or three thin coats rather than one thick application. Use a high-quality synthetic brush or short-nap roller designed for smooth finishes.
Stir paint thoroughly before use. Apply 2 coats, allowing the first coat to dry before applying the second coat.
Step 5: Test and Refine
Once your paint has fully cured—around 24 hours after the final coat—conduct thorough testing with your projector. Set up your equipment during both daylight and evening conditions to assess performance across different lighting scenarios. Pay attention to image uniformity, colour accuracy, and any areas where the surface may not reflect light evenly.
Note your projector settings for optimal image quality, including brightness, contrast, and colour temperature adjustments. These settings may differ from those used indoors due to the unique properties of projector screen paint and outdoor viewing conditions.
Common Mistakes to Avoid While Applying Projector Wall Paint for Outdoors

Avoid basic mistakes by understanding the steps and application process. The points below discuss common issues to avoid while applying projector wall paint for outdoor home theater ideas.
1. Skipping Surface Preparation
Inadequate cleaning and priming can lead to poor paint adhesion and premature failure. Even if your wall appears clean, oils, dirt, and weathering residue can prevent proper bonding.
2. Using Standard Wall Paint
Regular exterior paint lacks the optical properties necessary for quality projection. The investment in proper and best paint for outdoor projection screen pays rewards in image quality and viewing satisfaction.
3. Applying Paint in Poor Conditions
Painting in direct sunlight, high winds, or extreme temperatures affects the outdoor projector screen in daylight paint application and curing. Wait for optimal conditions—mild temperatures with low humidity produce the best results.
4. Inadequate Coverage
Thin or uneven paint application creates hot spots and colour variations in your projected image. To have the best paint for outdoor projection screen, multiple thin coats always outperform single thick applications.
5. Ignoring Ambient Light
Failing to consider surrounding light sources when choosing your wall location significantly impacts viewing quality. Large amounts of stray light can wash out your projected image for example a nearby street lamp.
6. Incorrect Screen Sizing
Matching your screen size to your projector's capabilities and viewing distance ensures optimal image quality. Oversized screens often appear dim, while undersized screens waste your projector's potential.
Key Features of Smarter Surfaces Projector Wall Paint For Outdoors
Transform simple movie nights into memorable experiences that define your home's unique character. Let’s look at the Key features:
- The paint is resistant to weather, ultraviolet rays, and cracks.
- The special formulation allows it to project high-definition videos both during the day and at night.
- It eliminates hotspots (unusually bright areas on the screen).
- It is wipeable with a damp cloth (use no detergent).
- Everything you need to apply the paint is included in the kit.
- You can use all external projectors
- It has a gain value of 1.26 at a 90° angle.
- The outdoor screen paint makes your wall ready for 4K & 8K Ultra HD projection.
- The paint exceeds all safety and environmental standards set in the EU and the USA.
The outdoor projector screen paint was designed with different lighting conditions in mind. With a high gain value of 1.26, it ensures high-quality projection even in bright daytime conditions. It also gives you a wide viewing angle making it ideal for large groups in outdoor environments.
Smarter Surfaces also has a solution for turning floors into projection screens. Check out the floor projection screen paint.
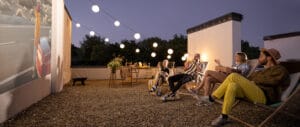
How To Use an Outdoor Projector Screen for gardens - Daytime and Night
Outdoor home theater ideas represent just the beginning—as you gain experience with your installation, you'll discover opportunities for enhancement through improved audio systems, comfortable seating arrangements, and seasonal decorations. Be careful while transforming your area into a fun outdoor screen. Here are some tips for you:
1. Daytime Viewing Strategies
Position seating to face away from the sun, reducing glare on the screen surface. Consider temporary shading solutions like parasols or gazebos to improve viewing conditions. An outdoor projector screen in daylight viewing works best during overcast conditions or in naturally shaded areas.
2. Evening Optimisation
Wait until twilight for the best viewing experience—complete darkness isn't necessary, and some ambient light actually enhances perceived image quality. Position any necessary lighting behind viewers to avoid screen reflection and get a quality projector screen for backyard.
3. Weather Monitoring
Keep an eye on weather forecasts and have contingency plans for sudden weather changes. Light rain won't immediately damage your screen with projector wall paint for outdoors, but your projector and electronics require protection.
4. Ambient Light Management
Use strategic landscaping or temporary screens to block unwanted light sources. Even distant street lighting can impact image quality on your outdoor wall paint for projection screen. So consider your environment holistically.
Safety Tips for The Best Outdoor Projector Screen Setup
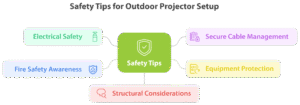
The investment in proper outdoor projector screen paint and careful application techniques provides superior image quality, weather resistance, and long-term durability. Let’s look at the safety tips:
1. Electrical Safety
Use weatherproof electrical connections rated for outdoor use. Install residual current devices (RCDs) to protect against electrical faults, and keep all connections elevated and protected from moisture.
2. Secure Cable Management
Route cables safely to prevent tripping hazards. Use bright tape or cable protectors where cables cross walkways, and secure loose cables that might be caught by wind.
3. Equipment Protection
Invest in weather-resistant covers for your projector and audio equipment. Even brief exposure to moisture can damage sensitive electronics, so prepare for sudden weather changes.
4. Fire Safety Awareness
Maintain clear evacuation routes and keep fire safety equipment accessible. Hot projector lamps and electrical equipment pose fire risks, especially during dry conditions.
5. Structural Considerations
Ensure that the mounting hardware is properly rated for outdoor use and wind loads. Regularly inspect mounting points for signs of wear or loosening.
Benefits of Having a Projector Wall Paint For Outdoors
Having an outdoor projection screen wall can offer several benefits for various activities and events. Here are four advantages:
1. Entertainment and Movie Nights
Outdoor projection screen paints are perfect for hosting movie nights, whether it’s for family gatherings, friends, or larger community events. You can enjoy your favourite films under the open sky, creating a unique and immersive cinematic experience with an authentic movie theatre feel.
2. Sports and Gaming Events
You can host an outdoor entertainment screen for major sporting events or set up gaming consoles for multiplayer gaming sessions. The large screen size and outdoor setting make it ideal for action-packed games and sports events.
3. Social Gatherings and Events
You can use outdoor screens for karaoke nights, live music performances, outdoor home theater ideas, or even display photo slideshows at weddings and other celebrations. The outdoor setting provides a more open and dynamic space for social events.
4. Educational and Presentational Uses
Projector wall paint for outdoors is also useful for educational and business purposes. They can be used for outdoor classes, workshops, or presentations. This is beneficial for institutions and businesses that want to utilise outdoor spaces for teaching or conveying information.
If you have an outdoor wall that you think will make an excellent projection screen but are unsure what paint to get or how much to buy, book a free video consultation. Show us your space, and our projection experts will help you get the right product for your needs.
Key Takeaway
Creating the best screens using projector wall paint for outdoors represents an affordable, effective way to establish your own garden cinema. This project combines practical DIY skills with technical knowledge to produce professional-quality results that enhance your outdoor living experience.
This blog has discussed how to make an outdoor projector screen a success thoroughly. It depends on careful planning, quality materials, and attention to detail throughout the installation process. From selecting the optimal wall location


